

Have you ever needed to access your home computer while traveling, help a family member fix a software issue, or support a colleague’s device from miles away? AnyDesk makes this possible with fast, secure remote desktop access. This guide walks you through how to use AnyDesk for personal, business, and IT support scenarios, covering everything from initial setup to advanced security features.
By the end of this article, you will know how to download AnyDesk, establish connections, transfer files securely, and troubleshoot common issues on Windows, Mac, and Linux systems.
Download and Install AnyDesk on Your Device
Get the Official Installer
To begin using AnyDesk, download the software directly from the official website at anydesk.com. Using third-party sites risks malware or outdated versions that may not function properly. AnyDesk supports multiple platforms including Windows 7 through 11, macOS, Linux distributions like Ubuntu, and Chrome OS.
Click the Download Now button on the homepage. If the wrong version auto-detects, manually select your operating system before downloading.
Complete the Installation Process
Follow these steps to install AnyDesk on your computer:
- Open the downloaded installer file
- Click Install and follow the setup wizard prompts
- Accept the license agreement terms
- Choose your preferred installation folder
- Launch AnyDesk automatically when installation finishes
You can also run AnyDesk as a portable application without installation, but this limits functionality to basic attended sessions. Full features like unattended access require the installed version.
Find Your AnyDesk ID and Set Up an Alias
Locate Your Unique Address
After launching AnyDesk, your unique 9-digit AnyDesk ID appears at the top of the main window. This code serves as your remote address, similar to a phone number that others use to connect to your device. Anyone with your ID can request access to your computer.
Share your ID only with trusted individuals who need remote access to your machine.
Create a Custom Alias
Numeric IDs can be difficult to remember, especially when managing multiple devices. Assign a memorable alias to simplify connections:
- Right-click your AnyDesk ID in the main interface
- Select Choose Alias from the context menu
- Enter a descriptive name like Office PC or Moms Laptop
- Confirm the alias creation
Aliases are particularly valuable for IT teams managing numerous computers across different locations.
Connect to Another Computer with AnyDesk
Initiate a Remote Connection
To control another device remotely, open AnyDesk on your local machine and follow these steps:
- Locate the Enter Remote Address field at the top of the window
- Type the target devices AnyDesk ID or alias
- Press Enter or click the arrow button to connect
The remote user receives an instant notification requesting permission to allow the connection.
Accept Incoming Connection Requests
When someone attempts to connect to your device, a pop-up window appears with three options. Click Accept to grant full control of your desktop. Choose Screen Sharing Only for view-only access during presentations or training sessions. Click Decline to reject the connection attempt entirely.
No additional configuration is required for one-time attended sessions where both parties are present.
Choose the Right Access Type for Your Session
Understand Permission Levels
AnyDesk offers three distinct access levels for remote sessions. Screen Sharing provides view-only access where the remote user sees your display but cannot interact with files or applications. Full Access grants complete desktop control, requiring your approval for each connection. Unattended Access enables remote login anytime, even when you are not physically present at the machine.
Select the appropriate access type based on your specific needs and security requirements.
Configure Session Permissions
During active sessions, you can adjust what the remote user can do. Control permissions for file transfer, audio streaming, clipboard sharing, and USB device access through the Permissions tab in the session toolbar. These settings can be changed dynamically without ending the session.
Enable Unattended Access for Remote Connections

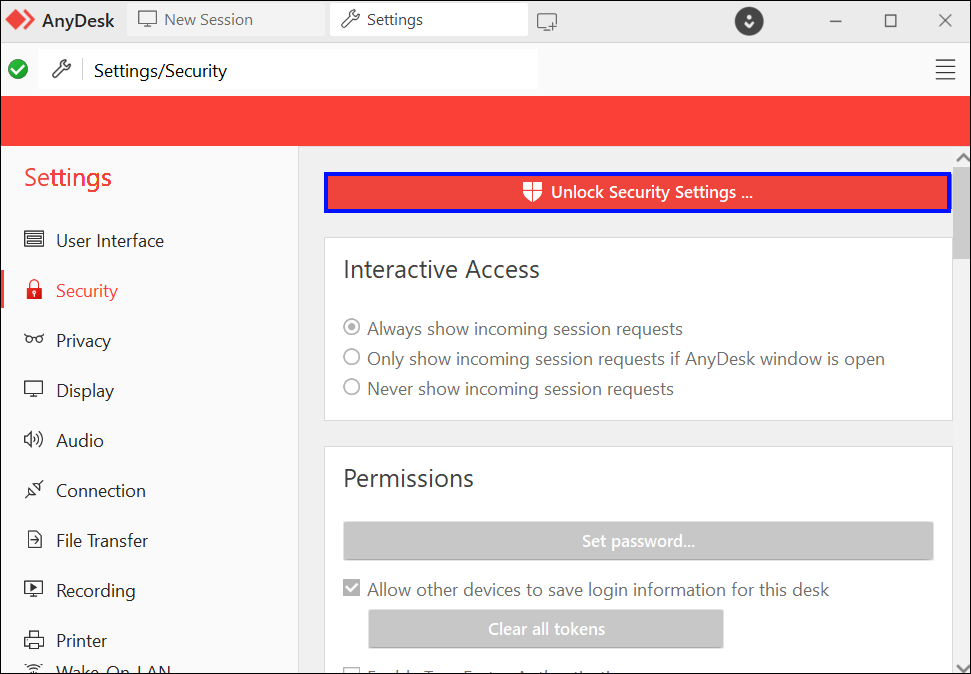
Set a Permanent Password
Unattended access allows remote connections without manual approval each time. To enable this feature:
- Go to Settings in the AnyDesk interface
- Navigate to the Security section
- Under Unattended Access, create a strong password
- Confirm the password by entering it again
This password is required every time someone connects remotely to your device.
Configure Auto-Start for Constant Availability
For devices you need to access frequently, enable automatic startup:
- Go to Settings then General
- Check the option labeled Auto-start with system
- AnyDesk now launches automatically when Windows starts
Enable unattended access only on secure networks and combine it with strong passwords for maximum protection.
Transfer Files and Use Core Features
Move Files Between Devices
AnyDesk enables seamless file transfer during remote sessions. Drag and drop files directly into the AnyDesk window to transfer them. Use the built-in File Manager to browse folders on either device and copy files between computers. This feature must be enabled in Security settings under Session Permissions before use.
Share Audio and Clipboard Content
Enable audio sharing to hear sound from the remote computer during sessions. Click the Audio icon in the session toolbar and select Play Remote Audio. Configure your preferred output device from the dropdown menu.
Clipboard synchronization allows copying text on one machine and pasting on another. Enable this feature in Settings under Security. This works bidirectionally, so you can copy locally and paste remotely, or vice versa.
Access USB Devices Remotely
Share USB peripherals connected to your local machine with the remote device. Click Devices in the session toolbar, select USB Devices, and choose which device to share. This is useful for accessing external drives, smart cards, or specialized hardware.
Use On-Screen Tools During Remote Sessions

Chat and Annotate
Communicate with the remote user without leaving the session by clicking the Chat icon in the toolbar. Type messages visible to both parties for giving instructions or confirming actions.
Use the Whiteboard tool to draw arrows, circles, or text directly on the remote screen. This is ideal for training or highlighting specific areas during troubleshooting.
Control Session Dynamics
Block Input temporarily disables keyboard and mouse control on the remote side. This prevents interference during sensitive operations like installing software or configuring system settings.
Switch Sides reverses control roles between users. The remote user takes control while you observe, and you can switch back anytime. This facilitates collaborative problem-solving sessions.
Secure Your AnyDesk Setup
Leverage Built-in Encryption
All AnyDesk connections use TLS 1.2 encryption, providing military-grade security for your data in transit. This encryption is automatic and requires no additional configuration.
Add Extra Password Protection
Set a session password by clicking the lock icon in the main interface. Create a temporary password and share it only with trusted users. This password expires when you restart AnyDesk or create a new one.
Create a Trusted Device List
Restrict access to approved devices only:
- Go to Settings then Security
- Click Restricted Control List or Add Trusted Device
- Enter the AnyDesk ID of each trusted user
- Save your changes
Only whitelisted IDs can initiate connections to your device.
Manage Session Permissions
In Security settings, disable features you do not want remote users to access. Control file transfer, audio streaming, clipboard sharing, and USB access individually. Setting defaults minimizes risk during future sessions.
Clear Session Data After Use
After completing sensitive work, remove cached credentials by going to Settings, selecting Security, and clicking Clear Tokens. This removes connection history and enhances privacy on shared devices.
Manage Multiple Devices with My.AnyDesk.com
Access the Web Portal
Log in to my.anydesk.com to manage all your devices from a centralized dashboard. This web portal requires an AnyDesk account and provides visibility into your entire device network.
From the portal, you can view online status of all devices, organize devices into groups, manage user permissions, monitor connection history, and configure unattended access settings remotely.
Organize Your Device Network
Use Address Books and Groups to sort devices by location, department, or client. This organization is especially valuable for IT teams supporting dozens or hundreds of machines.
Optimize AnyDesk Performance Settings
Adjust Display Quality
For smoother performance on slow connections:
- Go to Settings then Display
- Adjust resolution, frame rate, and visual quality
- Lower these settings for bandwidth-limited connections
Higher frame rates improve responsiveness while lower resolution reduces bandwidth requirements.
Enable Visual Helpers
Make navigation easier by enabling these features in Settings under Display:
• Follow Cursor automatically scrolls to where your mouse moves
• Follow Window keeps the active window in view
• Focus highlights the current interaction area
Configure Proxy Settings
If operating behind a corporate firewall:
- Go to Settings then Connection
- Enable Use Proxy
- Enter proxy type (HTTP, HTTPS, or SOCKS5) and credentials
This ensures connectivity in restricted network environments.
Understand AnyDesk Pricing and Plans
Free Version Capabilities
The free version supports basic remote access with up to three devices. It includes attended sessions only, with no session logging or remote restart capability. This version suits personal use or occasional support scenarios.
Paid Plan Options
The Solo plan costs approximately £12.90 per month when billed annually and includes three devices, one outgoing connection at a time, and up to 100 managed devices. Standard and Advanced plans offer increased user slots, custom branding, premium support, and enterprise tools. Contact sales for custom pricing on business plans.
Paid plans unlock remote restart, session recording, multi-monitor support, and custom client builder features.
Troubleshoot Common AnyDesk Issues
Fix Display Server Errors on Windows
If AnyDesk fails to launch with a display server error, try these solutions:
• Update graphics drivers through Device Manager
• Run AnyDesk in compatibility mode via Properties settings
• Disable hardware acceleration in Settings under Display
• Restart your computer after making changes
Resolve Display Issues on Ubuntu Linux
On Linux systems using Wayland display server:
- At login, click the gear icon and select Ubuntu on Xorg
- If Xorg is unavailable, install it using sudo apt-get install xorg
- Update system packages with sudo apt-get update && sudo apt-get upgrade
- Reinstall AnyDesk using sudo apt-get remove anydesk && sudo apt-get install anydesk
These steps resolve most display-related incompatibilities on Linux.
Frequently Asked Questions About AnyDesk
How do I find my AnyDesk ID?
Your AnyDesk ID appears at the top of the main AnyDesk window immediately after launching the application. This 9-digit code is your unique address that others use to connect to your device remotely.
Can I use AnyDesk for free?
Yes, AnyDesk offers a free version limited to three devices with basic attended session features. This works well for personal use or helping family members occasionally.
Is AnyDesk secure?
AnyDesk uses TLS 1.2 encryption for all connections, providing military-grade security. Additional security features include two-factor authentication, password protection, and trusted device whitelists.
How do I transfer files using AnyDesk?
Enable file transfer in Security settings, then drag and drop files into the AnyDesk window during an active session. You can also use the built-in File Manager to browse and transfer files between devices.
Can I use AnyDesk without the remote user accepting?
Yes, but only if you have configured unattended access with a password. This allows connections without manual approval but requires prior setup in Settings under Security.
Does AnyDesk work on Mac and Linux?
AnyDesk supports Windows, macOS, Linux (including Ubuntu), and Chrome OS. The interface and core features remain consistent across all platforms.
Key Takeaways for Using AnyDesk Effectively
AnyDesk provides powerful remote desktop capabilities across all major operating systems. Start by downloading from the official website, then locate your unique ID to enable connections. Configure unattended access with strong passwords for devices you access frequently, and always maintain security settings like whitelists and permission controls.
For personal use, the free version suffices. Businesses and IT professionals should consider paid plans for additional features like session recording and multi-device management. Use the my.anydesk.com portal to organize and monitor all your devices from one location.
Remember to clear session data after sensitive operations and keep AnyDesk updated for the latest security improvements and performance enhancements.


