
Covering a desk is one of the fastest ways to transform a worn or boring workspace without spending hundreds of dollars on new furniture. Whether you have a scratched particle board surface, a dated wood desk that needs updating, or simply want to match your desk to a new room theme, the right covering material can achieve a professional look for under $20. The most popular method uses peel-and-stick contact paper, which applies in under an hour with no special tools, but laminate, fabric, and temporary wallpaper offer alternatives depending on your needs for durability or removability. This guide walks you through every step from choosing materials to finishing edges so you can revamp your workspace with confidence.
Choosing the Right Covering Material for Your Desk
The material you select depends on how long you need the covering to last, whether you rent or own your space, and the look you want to achieve.
Compare Materials by Use and Style
Peel-and-stick contact paper works best for beginners because it applies quickly, requires no drying time, and comes in wood grain, marble, and solid colors. Laminate sheets bonded with contact cement offer the most durable surface and withstand daily wear for five or more years, making them ideal for permanent upgrades. Temporary wallpaper peels off cleanly without damaging the underlying surface, perfect for dorm rooms or rental apartments. Fabric wrapped with cornstarch paste provides a creative, eco-friendly option that removes completely but requires sealing for water resistance.
Match Material to Your Situation
Renters should choose removable options like contact paper or temporary wallpaper that leave no residue when taken off. Homeowners wanting long-term solutions benefit from laminate with contact cement for a permanent, scratch-resistant finish. Students in dorms often prefer temporary wallpaper or fabric wraps because they can be removed during move-out without penalty.
Preparing Your Desk Surface Properly
Surface preparation determines whether your covering lasts for years or peels within weeks. Taking time to clean and smooth the desk now prevents problems later.
Clean Thoroughly Before Applying
Wipe the entire desk surface with a damp rag to remove dust, oils, and sticky residues from coffee spills or old adhesives. Pay extra attention to corners and edges where grime accumulates. Use elbow grease for stubborn spots, especially in areas frequently touched by hands or near drink containers. Let the surface dry completely before proceeding, because moisture left behind causes bubbling and peeling.
Remove All Obstacles and Check for Damage
Clear the desk of drawers, keyboard trays, and accessories. Decide whether to remove built-in power strips or cable management systems, or work around them. Ensure the surface is flat and smooth with no loose veneer or chipped edges. Patch any damage with wood filler or sand lightly before applying the covering.
Applying Peel-and-Stick Contact Paper
This method delivers the best balance of ease, cost, and results for most DIYers. Follow these steps for a smooth, bubble-free finish.
Measure and Cut Accurately
You do not need precise measurements. Lay the contact paper face down and position it over the desk to estimate size. Cut slightly larger than the desk surface to allow for trimming later. Use standard scissors as long as they make clean snips. For multi-panel desks, cut pieces to fit each section with a one-millimeter overlap at seams to avoid gaps.
Apply from One Edge to the Other
Peel back about six inches of the backing and align the sticky edge with one side of the desk. Press down gently to start, then slowly peel more backing while smoothing the paper forward. Keep tension even to prevent wrinkles. Work from one side to the other, never letting the unpeeled section touch unintended areas.
Smooth Out Air Bubbles
Use a flat, rigid tool like a gas card, credit card, or squeegee to push air pockets toward the edges. Start at the center and move outward in straight lines. If a bubble forms, lift the edge slightly and re-smooth. Avoid pressing too hard on thin vinyl, which can stretch or tear.
Handling Edges and Corners
Edges are the most common failure point, especially where chair arms rub against the desk. Proper finishing extends the life of your covering significantly.
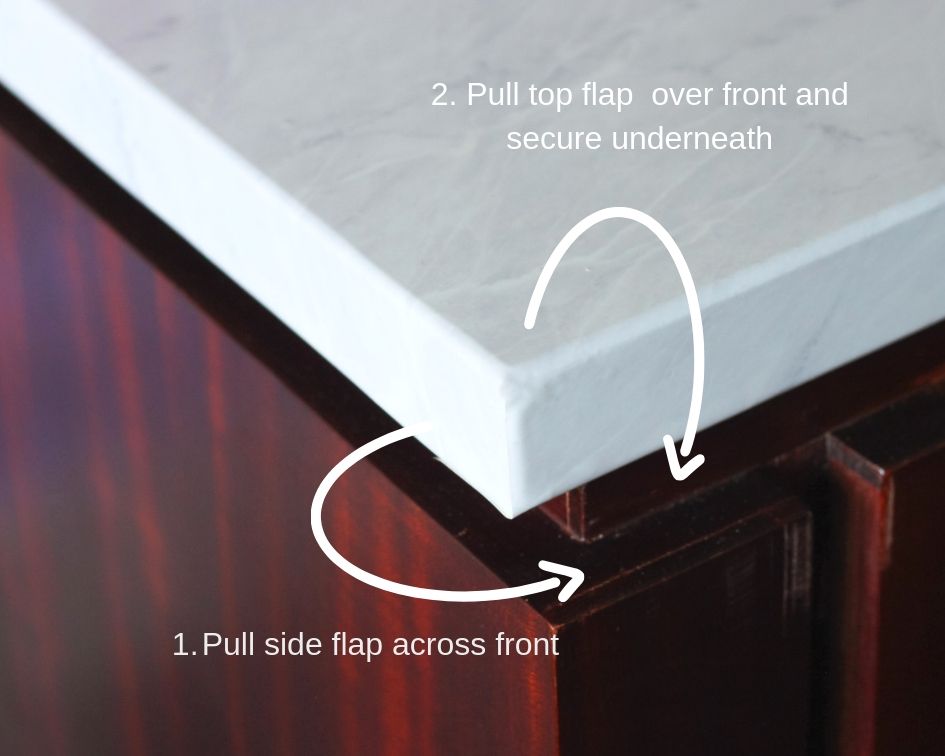
Tuck Excess Material Under the Desk
After covering the top, fold the overhang down over the desk sides. Use your fingers to crease the material at sharp edges. Then tuck the excess underneath and trim with scissors. On narrow edges, wrap carefully because sharp corners make clean folding difficult.
Secure Back Edges with Adhesive
For added hold, apply a small amount of glue or double-sided tape to the backside of the material on hidden edges like the rear desk lip. This prevents lifting over time, especially in high-use zones. Avoid applying glue to visible surfaces where it might seep out.
Protect High-Wear Areas from Damage
Chair arm contact is the number one cause of edge damage. Leave a small gap between your chair and desk edge. Install edge protectors or clear adhesive strips after application. Choose thicker vinyl because it resists fraying better than thin rolls.
Installing Laminate with Contact Cement
For a permanent, professional-grade finish that lasts for years, laminate with contact cement outperforms peel-and-stick options.
Cut Laminate to Fit Perfectly
Measure your desk precisely and cut the laminate sheet one-eighth inch smaller on all sides to avoid expansion issues. Use a utility knife and straightedge for clean cuts. Pre-cut sheets are available at hardware stores in wood tones or solid colors. Always wear gloves and work in a well-ventilated area when handling adhesives.
Apply Contact Cement to Both Surfaces
Brush a thin, even layer of contact cement on the desk and the back of the laminate. Follow manufacturer instructions for drying time, usually fifteen to thirty minutes, until the adhesive feels tacky but not wet. Never touch either surface once prepped because oils from skin reduce bonding strength.
Bond in One Smooth Motion
Once both surfaces are tacky, position the laminate carefully. Lower it slowly from one edge to the other because contact cement bonds instantly and alignment must be perfect the first time. Use a J-roller or squeegee to press out any trapped air and ensure full adhesion.
Trying Fabric with Homemade Paste
This experimental method works well for renters who need a temporary, residue-free finish that allows for creative textile choices.
Mix Cornstarch and Water Adhesive
Combine one part cornstarch with two parts water in a saucepan. Heat gently, stirring until it thickens into a glue-like consistency. Let cool before using. This eco-friendly paste is ideal for renters who want a temporary finish that removes cleanly.
Apply Fabric Like Wallpaper
Cut cotton or linen fabric to size, leaving extra for trimming. Brush the paste evenly onto the desk, then lay the fabric on top. Smooth from center outward with a squeegee. Trim edges with scissors and let dry completely, usually two to four hours.
Seal for Water Resistance
Since untreated fabric is not water-resistant, apply a clear sealant like Mod Podge after drying. This protects against spills and light wear. Reapply sealant every few months in high-use areas.
Using Temporary Wallpaper for Quick Makeovers
Temporary wallpaper offers another removable option with more design variety than standard contact paper.
Select Wide Rolls for Large Surfaces
Temporary wallpaper often comes in twenty-and-a-half-inch-wide rolls, ideal for desk tops. Choose designs that mimic wood, marble, or concrete for a premium look. Patterned versions may require seam matching, so unroll first to align motifs.
Apply Like Contact Paper
Clean the desk, peel the backing gradually, and smooth as you go. Use a squeegee to eliminate bubbles. For multi-strip applications, butt edges closely and avoid overlaps that create ridges.
Remove Without Damage
When it is time to switch looks, peel slowly from one corner. High-quality temporary wallpaper removes cleanly and leaves no residue, perfect for dorm rooms or shared spaces. Avoid excessive pulling to prevent lifting paint or veneer underneath.
Matching Design to Room Aesthetics
Your covered desk should enhance the room rather than clash with existing decor. Consider the overall theme when selecting colors and patterns.
Harmonize with Existing Decor
A wood-grain desk pairs well in rooms with hardwood floors or natural wood furniture. In a pink or pastel-themed room, contrast a black desk with white marble or light gray contact paper to brighten the space. Avoid monochrome setups because a black desk in a dim room can feel oppressive.
Enhance Visual Quality
Low-cost desks often have rough textures. A smooth vinyl wrap instantly elevates the look and makes a particle board surface appear high-end. Prioritize seamless application in camera-facing areas like video call backgrounds.
Sourcing Materials Easily
Finding the right materials takes knowing where to look and what to ask for because products go by different names.
Find Supplies at Major Retailers
Amazon offers endless design options including wood, marble, and geometric patterns. Home Depot and Lowe’s sell contact paper labeled as shelf liner or self-adhesive laminate. Hardware stores carry peel-and-stick vinyl by the roll in neutral finishes. Check multiple labels because the same product may be marketed under different names.
Watch for Quality Differences
Two rolls that look identical may vary in thickness and durability. Thicker vinyl applies smoother and lasts longer. Buy extra material, at least ten percent more, for mistakes or future repairs. Users with extensive experience warn that cheap, thin paper is harder to handle and prone to tearing.
Maintaining Your Covered Desk
Proper care extends the life of your covering and keeps it looking fresh for years.
Clean With a Damp Cloth
Wipe spills immediately with a soft, damp cloth. Avoid abrasive cleaners or scrubbing pads because they can scratch or dull the surface. Never soak the desk, especially if edges are not fully sealed.
Repair Bubbles and Lifts Promptly
If a bubble appears, gently lift the edge with a fingernail or tweezers. Reapply pressure while smoothing it back down. For recurring lifts, add a tiny drop of glue underneath before resealing. Small touch-ups keep the surface looking fresh.
Monitor for Wear
Check edges monthly, especially where chair arms rest. Early signs of peeling can be fixed before they worsen. Replace edge protectors if worn. With proper care, contact paper lasts one to three years while laminate can go five or more years.
Avoiding Common Mistakes
Learning what not to do saves time and prevents frustration. These errors cause the most common covering failures.
Never Skip Surface Preparation
The number one reason for failure is poor cleaning. Sticky or greasy surfaces prevent adhesion and lead to peeling within days. Always clean, dry, and inspect before applying any material.
Take Your Time During Application
Peel too fast and you risk misalignment or trapped air. Work slowly, especially on large surfaces. If using contact cement, remember it bonds instantly, so double-check positioning before final placement.
Use Quality Tools
A bent credit card or dull scissors can ruin a smooth finish. Use a stiff, flat tool for smoothing and sharp blades for trimming. Clean cuts disappear visually while jagged edges stand out prominently.
Frequently Asked Questions About Covering a Desk
Can I cover a desk with contact paper over existing paint or stain?
Yes, contact paper adheres to most clean, non-porous surfaces including painted or stained desks. The surface must be completely clean and dry. Avoid applying over chalky or peeling paint because the covering will pull it off.
How long does peel-and-stick contact paper last on a desk?
With proper installation and edge protection, contact paper typically lasts one to three years in moderate-use environments. High-traffic areas may show wear sooner, especially where chair arms contact the edges.
Does contact paper damage wood when removed?
High-quality contact paper removes cleanly from sealed wood surfaces without damage. Unsealed or porous wood may retain some adhesive residue. Test a small hidden area first if you are concerned about delicate finishes.
Can I use contact paper on a desk with drawers that open and closed?
Yes, just ensure the covering does not interfere with drawer operation. Trim excess material carefully around drawer openings and test that drawers slide smoothly before finishing the entire desk.
What is the best material for covering a desk that gets heavy daily use?
Laminate with contact cement offers the most durable surface for heavy daily use and can last five or more years. For a less permanent solution, choose thicker vinyl contact paper and protect edges with guards or adhesive strips.
Key Takeaways for Covering Your Desk
Covering a desk is a fast, affordable upgrade that transforms your workspace with minimal tools and expense. The peel-and-stick contact paper method remains the top choice for beginners because it is easy, cheap, and effective while offering hundreds of design options. For lasting results that withstand heavy use, laminate with contact cement delivers professional durability and a permanent finish. Renters benefit most from fabric with homemade paste or temporary wallpaper because both remove cleanly without leaving residue. Success ultimately comes down to three things: thoroughly clean the surface before starting, apply slowly to avoid bubbles and wrinkles, and protect edges from chair arm wear. With just a few dollars and basic household tools, you can create a sleek, personalized desk that looks store-bought but costs a fraction of the price.


