Building a custom desk cabinet gives you complete control over size, storage, and style while saving money compared to store-bought options. Whether you repurpose pre-built kitchen cabinets or construct a modular unit from scratch, this guide covers every phase: selecting materials, adjusting height for ergonomics, building or assembling the cabinet box, installing drawers and shelves, attaching a durable desktop, and adding professional finishes. You will learn how to build a desk cabinet that is functional, safe, and tailored to your specific needs.
This comprehensive guide works for beginners using pre-built cabinets and advanced DIYers crafting built-in systems alike. Each section provides clear, actionable steps based on real-world builds and expert techniques.
Choose Your Desk Cabinet Type
The foundation of your desk starts with selecting the right cabinet configuration. Each type offers distinct advantages depending on your space, budget, and skill level.
Use Pre-Built Base Cabinets
Standard kitchen base cabinets provide a fast, reliable starting point. These units measure 24 inches deep by 34.5 inches tall and are widely available at home improvement stores or Habitat for Humanity ReStores.
Advantages:
– Pre-assembled and structurally strong
– Consistent, predictable dimensions
– Solid wood models from ReStores offer premium quality at low cost
Disadvantages:
– Taller than standard desk height (34.5 inches vs. ideal 28 to 30 inches)
– May require modification for seated use
Best for: Budget-friendly adult desks, counter-height workstations, or standing desk conversions.
Build Modular Cabinet Boxes
Creating custom-sized units from 3/4-inch plywood gives you full control over dimensions. Build multiple 24-inch-wide boxes to span a wall or support a long desktop.
Standard box dimensions:
– Width: 24 inches
– Height: 29-1/4 inches (adds to 30 inches with 3/4-inch top)
– Depth: 20 inches
– Internal width: 22-1/2 inches after face frame
Best for: Full control over dimensions, material selection, and interior layout.
Repurpose Filing Cabinets
Three-drawer lateral filing cabinets make excellent desk bases. They are stackable, lockable, and require no tools to assemble.
Setup approach:
– Place melamine or butcher block across two cabinets
– Four cabinets can support three workspaces
– No drilling needed
Best for: Temporary setups, rental-friendly configurations, or mobile desks.
Convert Wall Cabinets to Desk Height
Turn 30-by-30-inch wall cabinets into child-sized or compact desks by adding legs.
Installation steps:
1. Add 8 to 12-inch legs for ergonomic height
2. Pre-made metal legs cost approximately $3.18 each
3. Secure legs with wood glue and screws
4. Let dry upside-down before flipping
Best for: Kids rooms, tight spaces, or modern floating aesthetic.
Modify Cabinet Height for Comfortable Use
Standard base cabinets sit too tall for seated desk use. Adjust them to hit the ideal 28 to 30-inch range for comfortable working.
Why Standard Cabinets Need Modification
Kitchen base cabinets measure 34.5 inches tall including the 3.5 to 4-inch toe kick. The ideal seated desk height ranges from 28 to 30 inches, meaning standard cabinets exceed this by 4.5 to 6.5 inches. This difference makes them uncomfortable for standard office chairs.
Remove the Toe Kick
Cut out the bottom front rail to reduce height without compromising cabinet structure.
Steps:
1. Mark a cut line 1-1/2 inches above the floor to maintain clearance for doors and drawers
2. Use a jigsaw to remove the toe kick section
3. Sand edges smooth
4. Reinforce the bottom with a new support rail if needed
This approach preserves cabinet integrity while lowering the overall profile.
Install Shorter Legs or Blocks
After removing the toe kick, attach shorter legs or wood blocks to fine-tune the height.
Recommendations:
– Use 1.5 to 2-inch wooden blocks or pre-made legs
– Screw from inside the cabinet or use mounting tags for metal legs
– Place shims to ensure level positioning on uneven floors
– Check with a level before final tightening to avoid wobbling
Keep Full Height for Standing Desks
At 34.5 inches, base cabinets work effectively as standing desks. Pair with an anti-fatigue mat and monitor riser for proper ergonomics. Use a hydraulic chair for hybrid sit-stand setups. This configuration benefits users with mobility challenges who need easier standing access.
Build a Custom Cabinet Box from Plywood
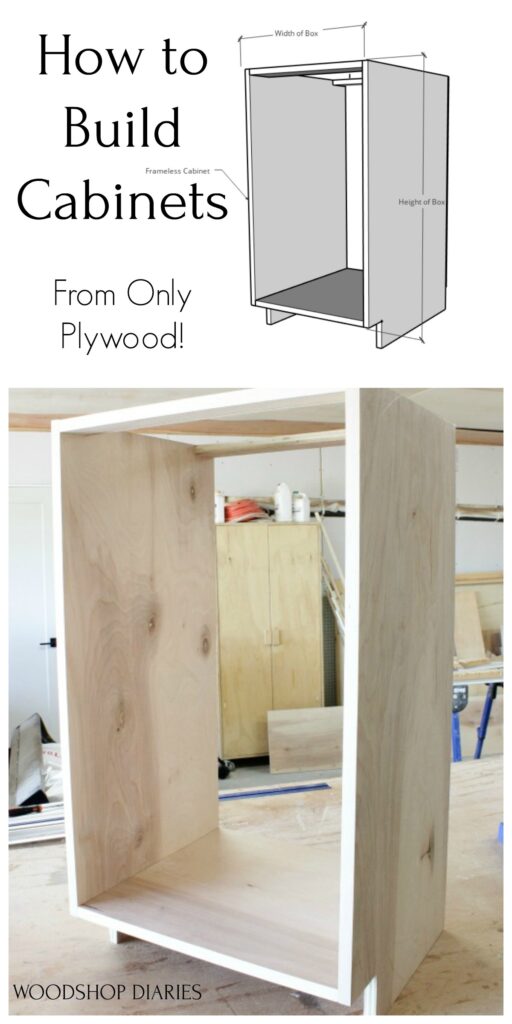
Construct a strong, square cabinet box using 3/4-inch plywood and pocket joinery for professional results.
Cut Plywood to Size
From a 4-by-8 sheet, rip 20-inch-wide strips using a circular saw with an edge guide.
Required pieces per cabinet:
– Side panels: 2 pieces at 29-1/4 inches tall by 20 inches deep
– Bottom panel: 22-1/2 inches wide by 20 inches deep
– Top support rail: 3 inches by 22-1/2 inches
– Toe kick rail: 3 inches by 22-1/2 inches (optional)
Use a Bora WGX guide for straight, splinter-free cuts.
Edge-Band All Exposed Edges
Cover raw plywood edges for a finished appearance.
Application method:
1. Use iron-on PVC or veneer tape
2. Apply with a household iron
3. Trim excess with a utility knife
4. Sand smooth after application
Focus on front and top edges since sides may be hidden by walls or adjacent units.
Assemble with Pocket Screws
Create strong, invisible joints using pocket hole joinery.
Assembly steps:
1. Drill pocket holes into ends of the bottom panel (2 holes per side) and into ends of top and toe kick rails
2. Apply wood glue to all mating surfaces
3. Clamp and screw the bottom to the sides
4. Attach the top rail 3/4 inch below the top edge
5. Add the toe kick rail at the bottom if keeping the toe kick
Use spacer blocks to maintain squareness during assembly.
Attach the Back Panel
Reinforce structure and prevent racking by adding a back panel.
Installation:
1. Cut 1/4-inch plywood to 29-1/4 inches by 24 inches
2. Align with back edges
3. Secure with brad nails or screws every 6 inches
The back panel adds rigidity and hides wall imperfections.
Install Shelves and Drawers for Storage
Tailor each cabinet interior to your storage needs with shelves, drawers, or file storage configurations.
Add Adjustable Shelves
Shelves work well for books, supplies, or decorative items.
Installation steps:
1. Drill shelf pin holes using a jig, spacing them 1 inch apart vertically
2. Cut shelves from 3/4-inch plywood at 18 inches deep by 22-1/4 inches wide
3. Make shelves 1/4 inch narrower than internal width for easy removal
4. Use fixed shelves secured with dados or screws for heavy loads
Install Drawer Slides
Enable smooth, reliable drawer operation with proper slide mounting.
Mounting guidelines:
– Use 16-inch ball-bearing slides for durability
– Bottom-mounted slides install at the cabinet floor
– Top-mounted slides position 12-1/2 inches from the bottom to allow file folder clearance above
– Use a drawer-slide jig to align both sides perfectly
– Screw slides into cabinet sides with multiple fasteners to prevent sagging
Build Drawer Boxes
Create strong, functional drawers using rabbet joints or pocket screws.
Cut components:
– Front and back: 3/4-inch plywood, width equals internal cabinet width minus 1 inch
– Sides: 3/4-inch plywood, length equals drawer depth minus 1-1/2 inches
– Bottom: 1/4-inch plywood fitting within rabbets or dados
Assembly options:
– Cut 3/4-inch by 3/4-inch rabbets on box edges
– Use pocket screws into front and back from the sides
– Cut 1/4-inch deep by 1/4-inch wide dado 1/2 inch from bottom for bottom panel
Construction steps:
1. Assemble the box with glue and screws
2. Insert bottom into dados
3. Secure with glue and brads
4. Leave 1/8-inch gap on each side for smooth slide operation
Add File Folder Rails
Convert drawers into vertical file storage with rails.
Installation:
– Fixed rail: Glue and screw 1/4-inch plywood strip to one drawer side
– Removable rail: Cut 1/4-inch wide by 1/4-inch deep dado on opposite side 12-1/4 to 12-1/2 inches from edge
– Space rails 12 inches apart to fit standard hanging folders
Test with actual file folders before finalizing dimensions.
Select and Attach Your Desktop Surface
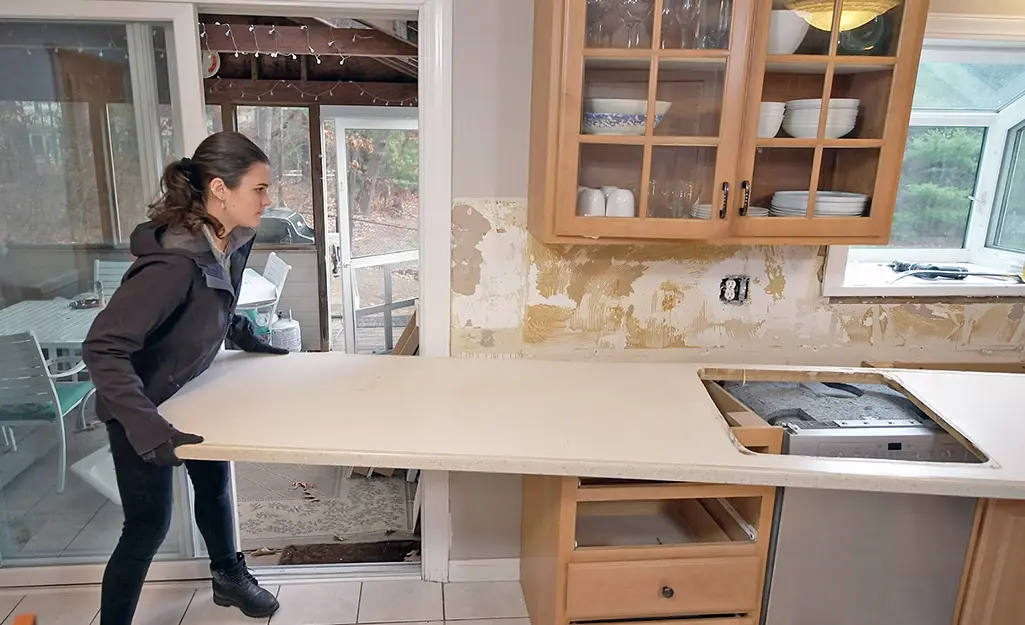
Choose a durable top and secure it properly to the cabinet base.
Choose Desktop Material
Butcher block offers warmth, durability, and seamless surfaces ideal for high-use workspaces. Luxury vinyl plank flooring provides scratch resistance and easy cleaning at budget-friendly cost. 3/4-inch plywood remains affordable and customizable for painted or edged builds. Melamine comes pre-finished requiring no preparation for modular or rental setups. Solid wood planks allow custom widths and natural appearance for glued-up custom tops.
Use scrap OSB as underlayment for flexible surfaces like luxury vinyl plank.
Support and Secure the Top
Prevent sagging and allow disassembly when needed.
Cleat installation:
1. Attach 1-by-2 or 1-by-3 wooden cleats to the underside of the desktop
2. Position cleats inside the cabinet frame above leg space
3. Screw through cleats into cabinet top rails
4. Leave 1/8-inch overhang on front and sides for clean edge
Cleats allow transport of multi-section desks easily.
Span Multiple Cabinets
For long desks spanning several cabinets, use a continuous top.
Installation steps:
1. Align cabinets side-by-side
2. Screw cabinets together through the sides
3. Level all units using shims on sloped floors
4. Place the top across all units
5. Secure with cleats or screws from below
6. Anchor entire unit to wall studs for safety
Finish Edges for a Professional Look
Raw edges appear unfinished. Cover them properly for a polished appearance.
Plywood Countertop Edge Treatment
Apply a stacked edge using 3/4-inch strips then add iron-on banding. Glue the strips in layers, trim flush, and finish with veneer tape. Sand smooth after application.
Luxury Vinyl Plank Edge Treatment
Cut 2-inch strips from the same flooring to trim desktop sides. Use construction adhesive and painter’s tape to secure. This creates the appearance of a solid countertop.
MDF Edge Treatment
Cover exposed edges with shiplap or 4.5-inch trim boards. Attach using a finishing nail gun. Paint both the trim and cabinet the same color for a seamless look.
Add Cable Management and Power Access
Keep devices charged and cords tidy with integrated power solutions.
Install USB Outlets and Power Strips
Mount USB outlets or power strips inside the cabinet for hidden charging. Drill a 1-inch hole in the desktop or back panel to route cords downward to the power strip. Use zip ties under the desktop to secure cables in place.
Mount the power strip under a shelf for hidden but accessible charging.
Organize Drawer Contents
Sort items by frequency of use. Place daily items on top, occasional items below. Use dividers customized to your specific supplies. Secure organizers with 3M adhesive instead of screws. Label folders clearly for tax, medical, school, and bills.
Anchor Your Desk Cabinet Safely
Ensure safety and longevity with proper wall installation.
Prevent Tipping
Use L-brackets screwed into wall studs. If studs do not align with cabinet position, use drywall anchors instead. Wall anchoring is required for any cabinet with drawers that could be pulled out simultaneously.
Warning: Fully loaded file cabinets can tip forward if two drawers are open at once. Always anchor to wall.
Pair with Proper Seating
Complete your setup with an ergonomic chair. Use hydraulic height-adjustable chairs to match any desk height. Adjust chair so elbows rest at 90 degrees when typing.
Frequently Asked Questions About Building Desk Cabinets
What is the ideal desk cabinet height?
The ideal seated desk height ranges from 28 to 30 inches from floor to work surface. Standard kitchen base cabinets measure 34.5 inches tall and typically require modification by removing the toe kick or adding shorter legs.
Can I use kitchen cabinets for a desk?
Yes, kitchen base cabinets work well as desk foundations. They are pre-assembled, structurally strong, and available at reasonable cost. Modify the height by removing the toe kick to achieve standard desk height.
How much does it cost to build a desk cabinet?
Costs vary widely based on materials. Pre-built cabinets from Habitat ReStores cost significantly less than new. A basic plywood cabinet box requires a 4-by-8 sheet of 3/4-inch plywood plus hardware. Total project costs range from $100 for basic builds to $500 or more for premium materials.
What tools do I need to build a desk cabinet?
Essential tools include a circular saw or table saw, pocket hole jig, drill, jigsaw, miter saw, clamps, level, and tape measure. A Bora WGX edge guide improves cut accuracy. A drawer-slide installation jig ensures proper drawer alignment.
How do I make my desk cabinet look built-in?
Install upper units close to the ceiling, add crown molding, and remove baseboards where the cabinet meets the floor. Use scribe molding to close gaps against bowed walls. Paint the unit the same color as surrounding walls.
Can I build a desk cabinet without prior woodworking experience?
Yes, beginners can successfully build desk cabinets using pre-built base cabinets. Simply purchase standard cabinets, modify the height if needed, add a desktop, and finish to match your style. Building from scratch requires more skill but offers complete customization.
Key Takeaways for Building Your Desk Cabinet
Building a desk cabinet is flexible, affordable, and deeply rewarding. Whether using pre-built units or crafting from plywood, focus on three critical factors: precise measurements for square assembly, proper height adjustment for ergonomic comfort, and quality finishes for professional appearance. Always anchor cabinets to wall studs for safety, especially when drawers contain heavy files. Customize interior storage with shelves, drawers, or file rails based on your specific needs. Add cable management during construction for a clean, functional workspace. Your custom workspace will serve you for years when built with attention to detail and proper planning.