
Building a butcher block desk is one of the most rewarding DIY projects for home offices. With solid wood construction, customizable dimensions, and a warm natural finish, a butcher block desk outperforms standard particleboard alternatives in durability, aesthetics, and long-term value. Whether you’re crafting a floating workstation, a sit-stand setup, or a minimalist writing desk, this guide covers everything you need to build a strong and functional desk that lasts decades.
Using insights from real builders and material experts, we will walk you through every phase: selecting the right slab, cutting and sanding, applying a protective finish, installing legs or frames, adding bracing, managing cables, and flipping your completed desk safely. You will learn how to avoid common pitfalls like warping, cracking, or wobbling, and create a custom workspace tailored to your room and workflow.
Choose the Right Butcher Block Slab
Selecting the appropriate butcher block slab sets the foundation for your entire build. The type of wood affects durability, appearance, and maintenance requirements. Harder species like maple, acacia, and sappy li resist dents and sagging better than softer options.
Pick Your Wood Species
The wood species you choose impacts how your desk will age and perform over time. Consider these popular options for desk builds.
• Maple is dense, light-colored, and highly durable, making it ideal for heavy office use.
• Acacia offers rich grain patterns and natural water resistance with excellent stability.
• Beech provides a smooth finish, affordable pricing, and stains evenly.
• Saman (Shorea) is a tropical hardwood with teak-like properties, available at major home improvement stores.
• Baltic Birch is a plywood-core option that is less rigid than solid wood, best suited for shallow desks.
Avoid slabs with visible knots, dings, or uneven grain. Inspect pieces in person when possible to ensure quality.
Select Optimal Dimensions
Standard stock sizes make planning your build easier. The ideal dimensions depend on your workspace and intended use.
• Length options include 48″, 72″, or 96″ for dual-monitor or content creation setups.
• Depth should be 25-32 inches. Add bracing if exceeding 30 inches.
• Thickness of 1.5 inches is standard, while 2 inches offers extra rigidity for long spans.
• Height of 28-30 inches is ergonomic for seated work.
A 72″ × 32″ × 1.5″ maple slab is a popular choice for full-sized desks.
Buy Prefinished or Unfinished
Your finish choice affects the build timeline and customization options.
• Prefinished slabs are ready to install, great for quick builds. You will need to seal any cut edges after modification.
• Unfinished slabs allow full customization with stain and topcoat. They require sanding and sealing but offer superior long-term protection when properly finished.
For a premium look and long-term care, unfinished slabs are recommended.
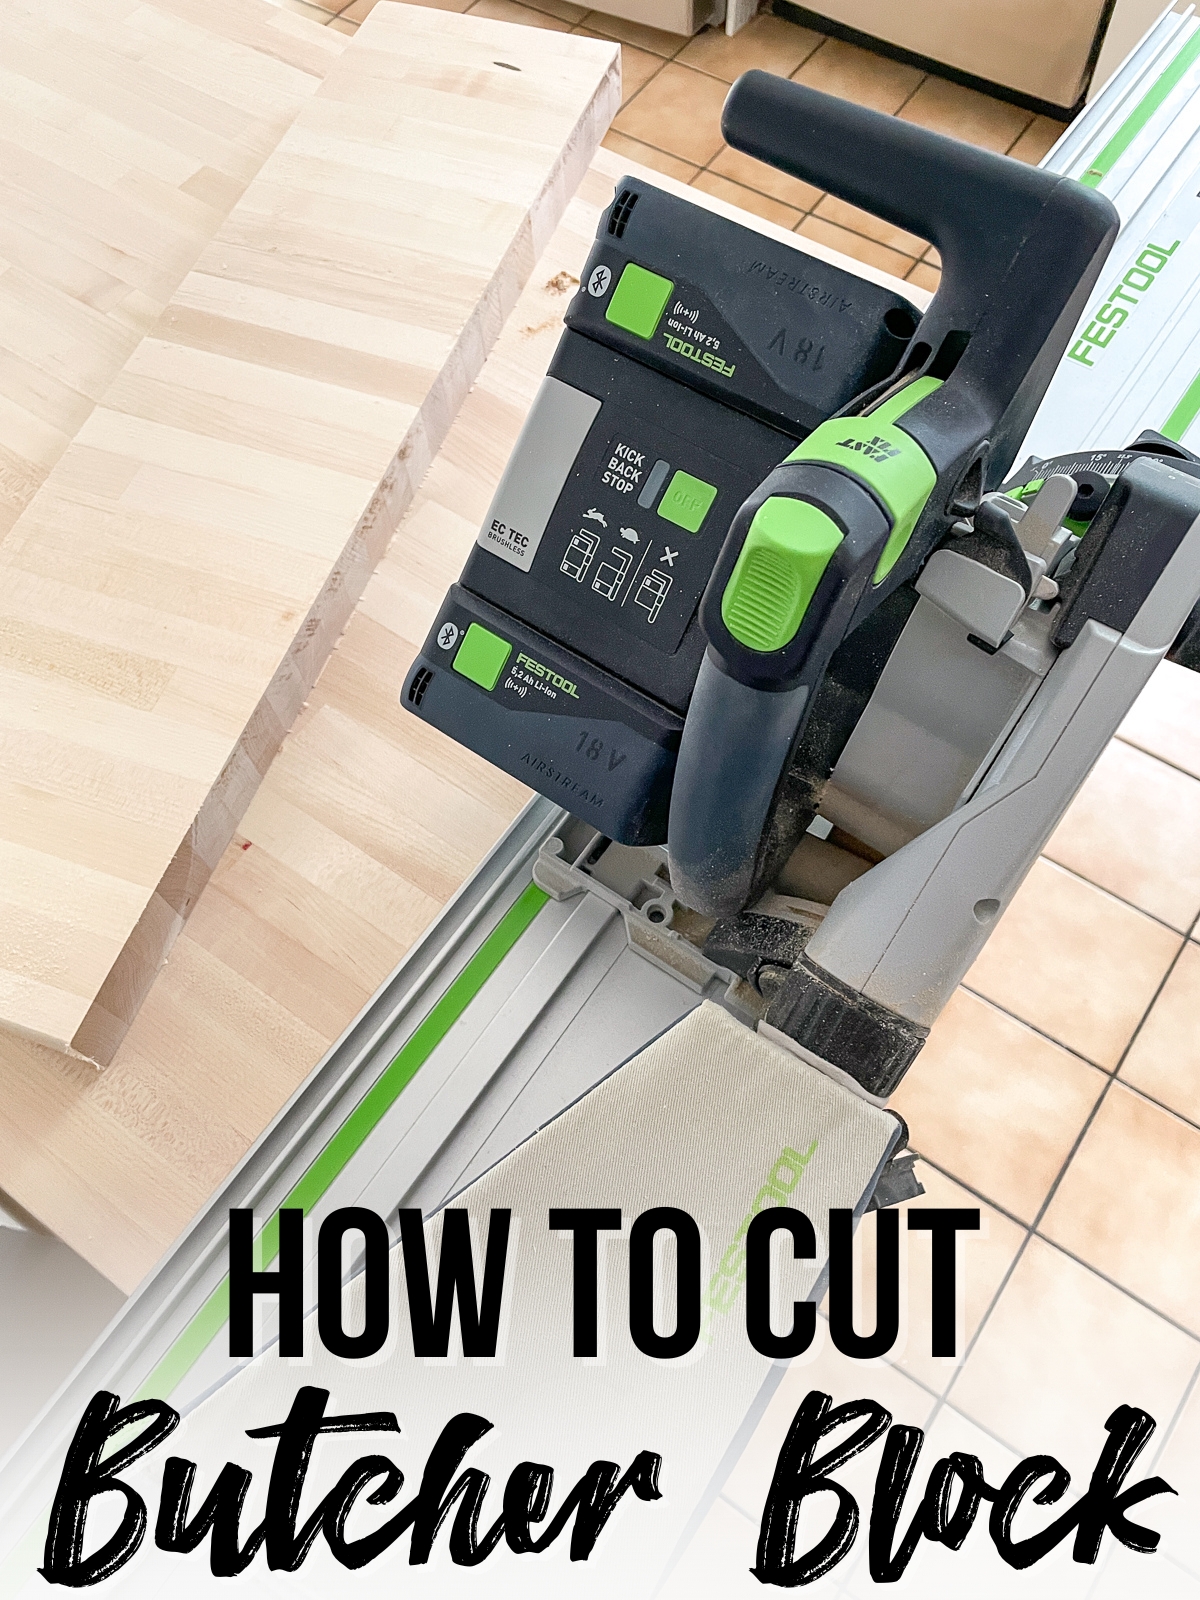
Cut the Slab to Size
Once you have selected your slab, cutting it to your exact dimensions ensures a perfect fit for your space.
Plan Your Cuts
Standard 8-foot slabs can be cut into two usable pieces. One piece can serve as your main desk while the other becomes a secondary workstation. A 72″ length often does not need mid-span support if the slab is 1.5″ thick and well-supported at both ends.
Cut Safely and Cleanly
Follow these steps for precise, clean cuts.
- Unwrap the slab immediately and finish it within 1-2 days to prevent warping.
- Cut with the non-visible side up to minimize chipping on the finished surface.
- Use a circular saw or table saw with a fine-tooth blade (80+ teeth) for clean cuts.
- Clamp the block securely and use a sacrificial backing board to prevent tear-out.
- Drill pilot holes near cut lines to avoid splitting.
- Mark cut lines with a speed square for accuracy.
Pro Tip: Many hardware stores will cut the slab for free. Call ahead to confirm their policy.
Sand for a Smooth Finish
Proper sanding ensures an even, professional surface ready for staining and sealing.
Use the Right Grit Sequence
Following the correct grit progression prevents scratches and achieves optimal smoothness.
• Start with 120-150 grit sandpaper. Sand the top, edges, and bottom. Round sharp corners slightly.
• Progress to 220 grit. Focus on top and edge faces for smoothness.
• Finish with 320 grit (sponge pad) to create an ultra-smooth, comfortable surface.
Use a random orbital sander for speed and consistency. Hand sanding takes twice as long.
Remove All Dust
After each grit change, eliminate all debris.
• Wipe with a microfiber cloth or blow off dust with a leaf blower outdoors.
• Use a tack cloth to remove fine particles before finishing.
Dust-free preparation is critical. Any debris left behind will show under polyurethane.
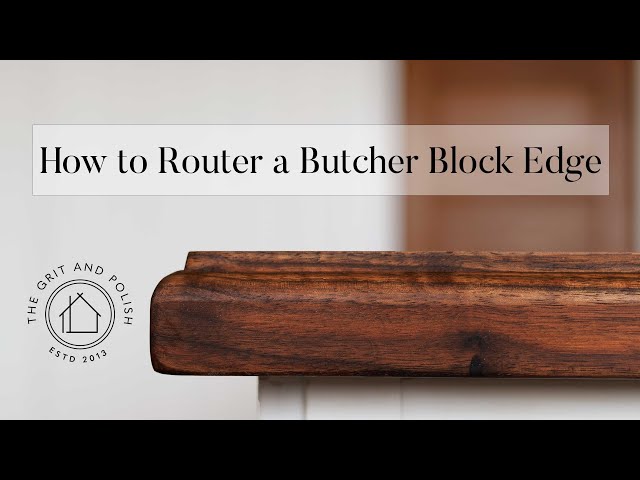
Round Edges and Apply Finish
Refining the edges and applying a durable finish protects your desk and enhances its appearance.
Use a Router for Professional Results
After sanding, refine the edges for a polished look.
• A roundover bit (3/8″ radius) softens edges for comfort and elegance.
• A 45° chamfer bit creates a modern, beveled profile popular on acacia builds.
Apply to both top and bottom edges. Slightly round corners to prevent sharp impacts.
Option 1: Stain Plus Polyurethane
This combination provides the most durable finish with rich color.
- Pre-condition the wood (e.g., Verithane) for even stain absorption. Wait 30 minutes.
- Apply 2-3 thin coats of stain. Wipe with a lint-free cloth and let dry several hours between coats.
- Seal with 3-4 coats of satin polyurethane. Stir (do not shake) to avoid bubbles.
- Lightly sand with 320-grit sponge between coats, except on the final layer.
- Wipe with tack cloth before each new coat.
- Final buff with a crumpled brown paper bag for a silky feel.
Pro Tip: Stain all surfaces (top, edges, and underside) to prevent moisture imbalance and warping.
Option 2: Mineral Oil Plus Wax
This option provides a natural patina with easier maintenance.
• Wipe on mineral oil, wait 5 minutes, and wipe off excess.
• Apply oil-wax conditioner after 2 oil coats.
• Reapply every few months as needed.
Do not apply polyurethane over oil or wax. Adhesion will fail.
Seal Cut Edges
End grain absorbs moisture rapidly. Seal all cut edges with finish to prevent swelling or cracking.
Install Legs or Frame

Mounting the legs or frame correctly ensures stability and prevents damage to your desktop.
Mounting Basics
Follow these steps for secure attachment.
- Place the slab face down on a soft surface like carpet, towels, or cardboard.
- Position legs or frame. Center sit-stand frames 2 inches from each end.
- Mark screw locations through mounting holes.
- Drill 3/4 inch deep pilot holes. Use tape on the drill bit as a depth stop.
- Attach with 1″ lag screws and washers or included hardware.
- Use all available holes to maximize stiffness.
A speed square ensures legs are perpendicular during installation.
Choose the Right Support
Your desk dimensions determine the appropriate support system.
• Corner legs only work for desks under 30″ deep or under 6 feet long. Consider bracing for larger builds.
• A center leg (mid-span support) is essential for desks over 6 feet. Use a single or pair of legs under the center.
• Sit-stand frames like the Froman dual-motor support up to 300 lbs and adjust to 51″ height. Self-drilling screws simplify attachment.
• Floating or wall-mounted options attach a 2×4 cleat to wall studs. Support the front edge with file cabinets or drawer units.
Modify Hairpin Legs if Needed
Standard hairpin legs are 25.5″ deep, which may overhang a 25″ desk by 1/4 inch per side.
Fix Depth Mismatch
Trim the legs for a flush fit.
- Trim 1/2 inch total (1/4 inch per side) with a jigsaw.
- Drill a new center mounting hole for structural integrity.
- Touch up cuts with black spray paint to match the original finish.
Warning: Trimming removes original mounting holes. Always add a new center hole for stability.
Add Bracing for Stability
Proper bracing prevents flexing, twisting, and long-term damage to your desk.
When Bracing Is Required
Add bracing in these situations.
• Depth exceeds 30 inches.
• Length exceeds 6 feet without a mid-leg.
• Heavy loads like monitors, printers, or frequent leaning are expected.
Even if no flex is visible initially, long-term stress can cause cracking along glue lines.
Bracing Solutions
Choose the appropriate bracing method for your build.
• Angle iron (steel L-bracket) attaches along the rear edge with countersunk bolts. Prevents twisting and reduces deflection.
• Wooden cleats (1×4 or 2×4) screw into wall studs to support the rear edge in floating builds.
• Cross-braced frames distribute weight evenly and prevent racking.
Expert Insight: Wood glue joints are stronger than wood itself. However, wood movement and moisture cause most failures.
Install Cable Management
Organized cables keep your workspace clean and functional.
Add a Desk Grommet
- Mark the location near the back edge.
- Drill a pilot hole through the center.
- Use a Forstner bit or hole saw to cut the grommet opening. Drill from bottom up to minimize tear-out on top.
- Insert the grommet into the opening.
Use Under-Desk Trays
Vidor cable trays organize power cords, USB hubs, and monitor cables. Leave slack in sit-stand motor cables for full range of motion. Mount the largest power strip centrally under the desk.
Integrate Functional Add-Ons
• USB hub switcher lets you switch between two computers.
• Laptop brackets mount under the desk. Measure your device first.
• Monitor arms save space for triple-monitor setups.
Flip Safely and Test
The flipping process requires care and proper technique.
Flip the Completed Desk
A 60″ slab combined with a sit-stand frame can weigh 150 pounds. This is the most challenging step.
• Have at least one helper available.
• If working alone, roll the desk over on a soft surface.
• Protect the controller unit (protrudes from the frame) during the flip.
• Assemble near the final location to avoid moving after completion.
Maintain Your Butcher Block Desk
Regular maintenance keeps your desk looking beautiful for decades.
Daily Care
• Wipe with a damp cloth. Never soak the surface.
• Use coasters and mats under hot or wet items.
• Avoid direct sunlight to prevent fading and warping.
• Keep cats in mind. Oil and wax finishes can be refreshed if scratched.
Long-Term Maintenance
• Reseal annually, especially oil or wax finishes.
• Sand and refinish locally for scratches or dings.
• Full refinishing every few years restores original beauty.
Butcher block is highly repairable. Minor damage is fixable with sandpaper and finish.
Cost and Value Breakdown
Building a butcher block desk delivers exceptional value compared to store-bought options.
Estimated Build Cost
• Butcher Block Slab: $99-$250
• Sit-Stand Frame: $300-$500
• Legs or Bracing: $50-$150
• Finish and Supplies: $30-$60
• Cable Management: $50-$100
• Total: Under $1,000
Why DIY Wins
• Custom fit to your space and workflow.
• Superior materials compared to budget furniture.
• Decades of use with proper care.
• Aesthetic warmth of solid wood.
• High resale value if you ever sell.
Few off-the-shelf desks under $500 match the quality of a DIY butcher block build.
Frequently Asked Questions About Building a Butcher Block Desk
What is the best wood for a butcher block desk?
Maple is the most popular choice because it is dense, durable, and takes stain well. Acacia offers rich grain patterns and natural water resistance. Both species resist sagging and dents better than softer woods.
Do I need to add bracing to my butcher block desk?
Add bracing if your desk is deeper than 30 inches, longer than 6 feet without a center leg, or will hold heavy equipment. Even without visible flex, long-term stress can cause cracking along glue lines.
Can I use hairpin legs on a butcher block desk?
Yes, hairpin legs work well for modern aesthetics. Standard hairpin legs are 25.5 inches deep, which may overhang a 25-inch desk by 1/4 inch per side. Trim 1/4 inch from each side and drill a new center mounting hole.
How long does it take to build a butcher block desk?
Plan for 1-2 days for cutting, sanding, and finishing. The stain and polyurethane require 8 hours per coat to cure. Total build time is typically one week when accounting for finish drying time between coats.
Can I put a butcher block desk on an IKEA Alex drawer?
Yes. Place non-slip material between the drawer top and wood to prevent shifting. Secure the slab to the drawers from underneath with screws for added stability.
How do I prevent my butcher block desk from warping?
Seal all surfaces including the underside and cut edges. Stain all sides to prevent moisture imbalance. Avoid placing the desk in direct sunlight. Use proper support at recommended intervals.
Final Thoughts on Building Your Custom Butcher Block Desk
A butcher block desk is more than furniture. It is a long-term investment in your workspace that outperforms store-bought options in durability, aesthetics, and customization. The key to success lies in selecting quality materials, applying proper support and bracing, and finishing all surfaces including the underside and cut edges.
Take time to plan your dimensions, test stain colors on scrap wood, and seal every exposed surface. Support every 36 inches along the length, add bracing for deep or long spans, and pre-drill all holes to prevent splitting. With proper planning and attention to detail, your custom butcher block desk will serve you reliably for decades while adding warmth and character to your home office.


