
Is your old desk scratched, worn, or outdated? You do not need to buy a new one. Resurfacing a desk can transform it into a modern, durable piece that fits your home office perfectly. Whether you have a veneer-covered particle board desk from a big-box store or a vintage solid wood beauty, resurfacing gives you a custom look for a fraction of the cost.
This guide walks you through every step: assessing your desk material, choosing the right method, avoiding common mistakes, and achieving a professional finish. You will learn which materials work best, how to prep properly, and expert tricks for a flawless result.
Assess Your Desk Material Before Resurfacing
Identify what your desk is made of before choosing a resurfacing method. The surface type determines whether you can sand, strip, or must cover entirely.
Check for Veneer vs Solid Wood
Check the edges and hidden areas to determine construction type:
- Veneer over particle board: Thin wood layer glued to engineered core. Common in IKEA and office desks. Edges show layers. Sanding too deep ruins the surface.
- Solid wood: Full hardwood like oak, maple, or pine. Can be sanded and refinished multiple times.
- Laminate: Plastic coating like Formica. Scratch-resistant but not refinishable. Must be removed or covered.
- Engineered wood: Includes MDF, plywood, particle board. Less durable. May need reinforcement.
Inspect for Existing Damage
Look for these issues before starting:
- Bubbling or peeling veneer
- Water stains, warping, or soft spots
- Loose joints or wobbly legs
- Deep scratches, dents, or burns
If the structure is sound but the surface is damaged, resurfacing is ideal. Work in temperatures between 60–75°F (15–24°C) for proper adhesive drying.
Choose the Best Resurfacing Method

Select your method based on desk material, skill level, and desired outcome.
When to Re-Cover the Surface
When veneer is bubbled, chipped, or too thin to sand, covering is safer than refinishing. This method works well for desks with damaged veneer over particle board.
When to Use Epoxy Coating
Epoxy creates a glass-like, seamless surface perfect for modern desks. Best substrates include Masonite or sanded plywood. Avoid bare particle board.
When to Paint and Seal
Choose paint for solid wood or stable substrates needing a color change. This method offers unlimited color options and durability with proper sealing.
When to Strip and Refinish
Stripping works best for solid wood desks with character, grain, or hidden beauty. Ideal for vintage pieces you want to restore to natural wood.
Re-Cover a Desk with New Surface Material
Re-covering works when veneer is too damaged to save but the underlying structure is solid.
Best Materials for Re-Covering
These materials provide durable new surfaces:
- Lauan plywood: 1/8″ or 1/4″ thick. Lightweight, smooth, affordable at $18–20 per 4×8 sheet. Natural reddish tone resembles mahogany.
- Formica or plastic laminate: Durable, wipeable, wide color selection.
- Untempered Masonite: Ideal base for painting or epoxy.
- Prefinished plywood: Factory-sealed, minimal effort required.
- Concrete overlay: 1–2 inches thick for industrial look. Requires formwork and leveling.
How to Apply New Surface
Follow these steps for a secure bond:
- Remove old veneer carefully. Clean the surface thoroughly.
- Fill holes with Minwax stainable wood filler.
- Cut new material slightly oversized.
- Apply contact cement to both desk and new layer. Use Formica brand or 3M NF Green. Avoid white latex glue.
- Let adhesive dry to tackiness per product label.
- Align and press down using full body weight or a roller.
- Use dowel rods as spacers to prevent shifting during placement.
- Trim edges flush with a router and flush-trim bit.
Apply Epoxy Coating for a Sleek Finish
Epoxy creates a glossy, seamless surface ideal for modern desk designs.
Pick the Right Epoxy
Choose products designed for furniture:
- Coating epoxy: Made for furniture like bars and desks
- Pourable resin: Self-leveling, great for gloss finish
- Avoid garage floor epoxy: Too gritty for writing surfaces
Step-by-Step Epoxy Application
- Ensure desk is perfectly level for even flow.
- Mix enough epoxy to cover entire surface in one pour.
- Pour and spread, allowing it to drip over edges for seamless look.
- Remove bubbles with heat gun or small torch.
- Cure 24–72 hours per manufacturer instructions.
Warning: Standard epoxy may be too soft for daily writing surfaces. Use high-abrasion-resistant epoxy if using pens or mouse regularly.
Paint and Seal Your Desk for Custom Style
Painting offers unlimited color options and transforms outdated desks quickly.
Use Durable Paint Only
Regular wall paint chips and wears fast. Choose specialty coatings:
- Rust-Oleum Ready-to-Use Paint: Proven on desk bodies and drawers. Apply with sponge brush for smooth finish.
- Hammerite Rust Cap: Contains glass flakes for extreme toughness. Originally for metal but ultra-durable.
- Chalkboard paint: Lets you write directly on desk. Texture may interfere with mouse tracking.
- Whiteboard paint: Liquid or sheet form. Risk exists of marker ink transferring to clothes.
Seal with Polyurethane
Polyurethane is essential for protection:
- Water-based polyurethane: Low odor, dries clear, non-toxic. Brands like Janvic or Minwax work well.
- Apply 3+ coats on desktop, 2 on legs.
- Sand lightly between coats with 220–300 grit paper.
- Use paint pad, not roller, for smooth finish.
Sealing protects from oils, spills, and coffee cup sweat.
Want Natural Wood Feel
Apply furniture wax instead of polyurethane:
- Buff in circular motions
- Two coats for durability
- Do not use polyurethane if waxing
Strip and Refinish Solid Wood Desks
Stripping reveals natural grain and removes old finish from solid wood desks.
Strip Safely and Effectively
Gather these materials:
- Citristrip (eco-friendly stripper)
- Plastic putty knife
- Furniture refinisher for stubborn varnish
- Steel wool (medium grade)
- Palm sander for better control
- Drop cloths
Step-by-Step Strip Process
- Remove hardware and drawers. Label screws for reassembly.
- Cover floor with plastic sheeting.
- Apply Citristrip thickly over surface.
- Wait 30 minutes, then scrape off in grain direction.
- Clean residue with soapy water and soft brush. Dry immediately to prevent swelling.
- Remove leftover finish using furniture refinisher and steel wool. Mineral spirits help clean Citristrip residue.
- Sand lightly. Hand-sand cracks with 150 grit. Final pass with palm sander at 220+ grit.
- Wipe dust with tack cloth.
Stain Wood to Enhance or Change Color
After stripping, staining brings out grain or changes the wood tone.
Choose the Right Stain
- Oil-based: Deeper color, longer dry time
- Water-based: Faster, less odor
- Gel stain: Thick, no drips, ideal for beginners. Example: Barane Gel Stain in Mahogany
Apply Stain Like a Pro
- Stir stain thoroughly. Do not shake.
- Apply with rag or brush.
- Wipe off excess after 5–15 minutes.
- Let dry fully before sealing.
- Add second coat for darker results.
Fix Orange or Red Tones
Oak and mahogany often turn too warm:
- Apply gray-toned stain first to neutralize warmth
- Mix green oil-based stain with jackabean to complement red tones
- Test mix on hidden area first
Upgrade with Stone or Quartz Desktop

Transform your desk with a luxury surface that hides damage and adds value.
Quartz vs Marble Options
- Quartz: Engineered stone, non-porous, resists stains and etching. More durable than marble. Available as remnants for huge savings.
- Marble: Elegant but porous. Etches from coffee, lemon, vinegar. High maintenance.
How to Source and Install
- Visit local stone shops for remnants.
- Ask for remnants often 50–80% cheaper.
- Provide exact desk dimensions.
- Pay for cutting and edge shaping (approximately $400).
- Glue in place with construction adhesive.
Real example cost: Quartz remnant at $100 plus $400 fabrication equals $500 total versus $2000+ retail.
Repair Joints and Restore Hardware
Fix structural issues before applying finish.
Tighten Loose Joints
- Disassemble if possible.
- Clean out old glue.
- Reapply Titebond III wood glue.
- Clamp until dry (24 hours).
For stripped screw holes, fill with wood glue and toothpicks, then re-drill pilot hole.
Restore Hardware
- Remove all knobs, pulls, hinges
- Clean with wire brush and soapy water
- Polish with Bar Keeper’s Friend or brass polish
- Dry thoroughly to prevent rust
Refinish Metal Accents
Use antique gold rub and buff:
- Apply with brush on flat parts or glove on textured pieces
- Dries fast, matches vintage tones
Fix Drawer Interiors
- Paint with Rust-Oleum (avoid cheap brands)
- Line with non-adhesive drawer liner for easy replacement and style
Apply Professional Finishing Touches
Final steps distinguish DIY from professional results.
Trim and Smooth Edges
After applying new surface:
- Use router with flush-trim bit to even edges
- Sand lightly with 220 grit
- Wipe clean
Remove Brush Marks in Polyurethane
Even expert painters get orange peel or bumps:
- Use a paper bag (Trader Joe’s or grocery bag)
- Rub gently in circular motion
- Acts like 400–600 grit sandpaper
- No dust, no scratching
Result: Satin-smooth feel, eliminates brush marks.
Apply Flat-Black Wax on Painted Surfaces
Enhances depth and uniformity. Use after final paint coat and buff lightly.
Essential Tools and Supplies
Use right tools for efficiency and quality results.
Power Tools You Need
- Palm sander for flat surfaces
- Mouse sander for corners and carvings
- Orbital sander for large areas (120 then 220 grit)
- Router with flush-trim bit for trimming new layers
- Brad nailer for reattaching trim
- Dust extractor to reduce mess
- Heat gun or torch for epoxy bubbles
Hand Tools
- Scraper
- Clamps
- Mallet
- Trim puller
- Applicator brushes
- Gloves, goggles, mask
Sanding Grit Guide
- Start: 120–150 grit (veneer-safe)
- Progress to: 180–220 for final smoothing
- Never use below 80 grit on veneer
Safety Precautions for Desk Resurfacing
Protect yourself and your space during the project.
- Wear gloves, mask, and goggles when using chemicals
- Work in well-ventilated area
- Avoid lacquer thinner indoors
- Use dust extractor when sanding
- Collect chemical runoff in a basin
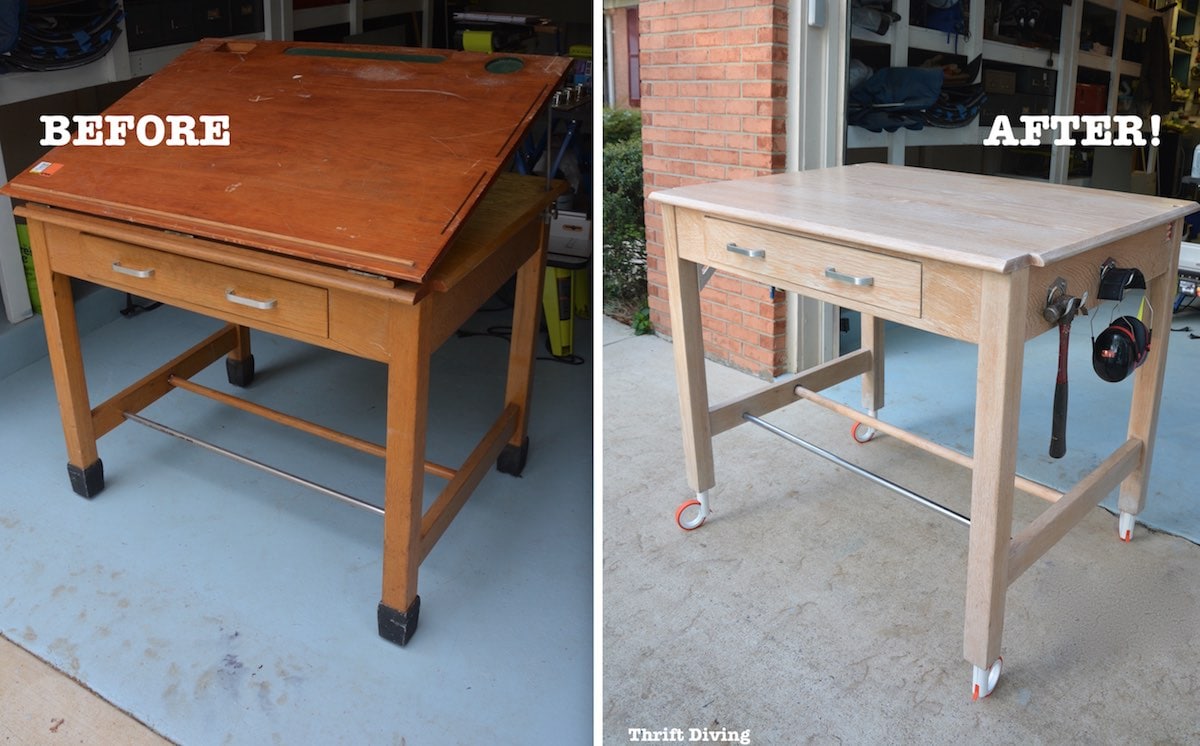
Real Desk Transformation Examples
Red-Heart Wood Desk Makeover
- Found weathered desk with hidden red-heart inlay
- Stripped with Citristrip
- Filled cracks with Minwax filler
- Sanded by hand to preserve veneer
- Finished top with wax only for tactile feel
- Body: Rust-Oleum black paint plus flat-black wax
- Result: High-contrast showpiece
Oak Desk with Orange Tone Fix
- Vintage oak turned too orange after staining
- Stripped with Citristrip plus refinisher
- Applied gray-toned stain first to neutralize warmth
- Sealed with water-based polyurethane (3 coats)
- Outcome: Modern, neutral finish matching cabinetry
Lawyer’s Mahogany Desk
- Goal: Rich, dark, non-reddish finish
- Mixed green oil stain with jackabean
- Used gel stain for even coverage
- Sprayed satin polyurethane
- Result: Professional, timeless office desk
Cost Comparison and Value Analysis
Resurfacing saves significant money versus buying new.
| Item | Cost |
|---|---|
| Thrifted desk | $28 |
| Quartz top plus cut | $500 |
| Tools and materials | $100–200 |
| New retail desk (similar) | $2000+ |
Savings: 70–90% with full customization.
Frequently Asked Questions About Resurfacing a Desk
Can I resurface a desk with damaged veneer?
Yes. When veneer is bubbled or chipped, covering it with a new surface layer like lauan plywood or Formica is safer than sanding. Sanding thin veneer risks exposing the particle board underneath, which ruins the surface.
What is the best finish for a desk used for writing?
Water-based polyurethane applied in 3+ coats provides the most durable protection for writing surfaces. It resists oils, spills, and daily wear. For a softer feel, use furniture wax, but know it offers less protection than polyurethane.
How do I stop oak wood from turning orange when staining?
Apply a gray-toned stain first to neutralize the warm tones before adding your final stain color. Alternatively, mix green oil-based stain with jackabean to counteract red undertones. Always test on a hidden area first.
Is epoxy coating good for desk surfaces?
Epoxy creates a sleek, glossy finish but standard epoxy may be too soft for daily writing. Use high-abrasion-resistant epoxy if the desk will see heavy pen or mouse use. Epoxy works best over stable substrates like Masonite or sanded plywood.
How much does it cost to resurface a desk?
Basic resurfacing with paint and polyurethane costs $50–150 in materials. Re-covering with lauan plywood runs $40–60. Adding a quartz remnant costs approximately $500 total including fabrication. This represents 70–90% savings versus buying a new desk.
Can I use a router to trim new desk surface material?
Yes. A router with a flush-trim bit trims new surface layers like lauan plywood or Formica flush to the desk edges. Inexpensive routers are available at hardware stores, making this a budget-friendly trimming solution.
Key Takeaways for Resurfacing Your Desk
Resurfacing a desk transforms worn furniture into a custom workspace for a fraction of retail cost. Success starts with properly assessing your desk material. Veneer over particle board requires re-covering rather than sanding, while solid wood can be stripped, stained, and refinished. Choose your method based on the desk condition and your design goals.
Always test stains and paints on hidden areas before committing. Use contact cement for re-covering projects and water-based polyurethane for durable sealing. For professional results, smooth final coats with a paper bag to eliminate brush marks. Allow full cure time before using the desk.
Your next step: Assess your desk material today and choose one method to try. Start with a small project like painting the drawer interiors or re-covering a single surface to build confidence before tackling a full transformation.


