
If you’ve ever struggled to check your appearance while working from home or wanted to turn a plain desk into a vanity-style station, attaching a mirror to a desk is a smart, space-saving upgrade. Whether you’re creating a makeup station, boosting room brightness, or personalizing your workspace, a securely mounted mirror adds both function and flair. But improper installation can lead to cracks, detachment, or safety hazards.
This guide walks you through the right materials, mounting methods, and pro tips to attach a mirror to a desk safely and beautifully without damaging your furniture or risking injury. You’ll learn how to choose the right mirror, prepare your desk surface, pick the best adhesive or mechanical fasteners, and even add decorative touches for a custom look.
Choose the Right Mirror for Desk Attachment
Select Safe, Finished-Edge Glass
Always use a mirror with polished or seamed edges. Never use raw-cut glass because DIY-edged mirrors can have dangerously sharp borders and are more prone to chipping. For safety and longevity, order a custom-cut mirror from a glass shop in your desired size and thickness.
Standard desk-friendly thickness ranges from 1/8 inch to 1/4 inch. Thinner mirrors are lighter and easier to mount with adhesives. Thicker ones feel more premium but require stronger support.
Determine the Right Size and Shape
Measure your desk surface carefully before purchasing. For desktop mounting, leave at least 1 to 2 inches of clearance from edges. For front-panel mounting on drawers, ensure the mirror doesn’t interfere with opening or closing. Common shapes include rectangle, square, or custom cutouts for cut-in designs.
Avoid oversized mirrors unless reinforced with clips or cleats. Excess weight increases detachment risk significantly.
Prepare the Desk Surface Properly
Clean and Roughen for Better Grip
Adhesives fail when applied to dirty or glossy surfaces. To ensure a strong bond, wipe the mounting area with isopropyl alcohol to remove oils, dust, and residue. Then lightly sand wooden, laminated, or painted desks with 120-grit sandpaper to create texture. Finally, vacuum or wipe away all dust after sanding.
On laminated or veneered desks, test adhesion in an inconspicuous spot first. Removal may peel the surface later.
Check Material Compatibility
Different desk materials require different approaches.
- Wood (solid, MDF, plywood) works best with adhesives and sands well
- Metal desks need silicone or construction adhesive and must be degreased first
- Laminate and veneer work with strong adhesives but carry high removal risk
- Glass or plastic tops should avoid direct bonding. Use VHB tape or mechanical supports only
Pick the Best Mounting Method

Adhesive Options by Mirror Weight
Choosing the right adhesive depends on how much your mirror weighs.
- Under 2 lbs: 3M VHB double-sided tape works well
- 2 to 5 lbs: Silicone or mirror mastic provides secure bonding
- Over 5 lbs: Mirror mastic combined with clips offers the strongest hold
Mirror mastic is the top choice for permanent, heavy-duty bonding. It’s flexible, moisture-resistant, and designed specifically for mirrors. Apply with a caulk gun in a zig-zag or spiral pattern across the back to prevent air pockets.
Silicone adhesive (neutral cure) works well on uneven or non-porous surfaces. It’s less messy than mastic but takes longer to cure.
VHB tape (like 3M 5952 or 4910) is ideal for lightweight mirrors. Cut strips to fit the perimeter and center. Don’t rely on edges alone.
When to Use Mechanical Fasteners
For mirrors over 5 lbs or in high-use areas, reinforce adhesives with clips or brackets.
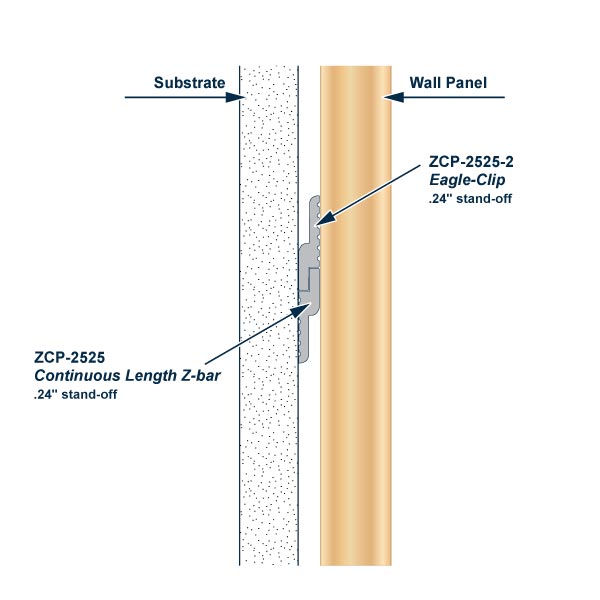
- Z-clips or L-brackets mount to the desk, then the mirror slides into place. This keeps the mirror flush and adds support
- French cleat systems mount a slotted strip to the desk back and attach a mating piece to the mirror frame. This supports vertical weight completely
- Countersunk screws only work on professionally drilled mirrors. Never drill your own. Risk of shattering is too high
Apply the Mirror Safely
Step-by-Step Installation Process
-
Dry-fit first: Place the mirror on the desk without adhesive. Check alignment, balance, and clearance around drawers or monitors.
-
Apply adhesive: For mastic or silicone, use a caulk gun to lay a zig-zag bead on the mirror’s back. Keep 1 to 2 inches from the edge. For VHB tape, cut strips to fit edges and center. Press firmly to activate adhesion.
-
Mount the mirror: Carefully position the mirror. Press evenly for 30 seconds. Use a level to ensure it’s straight.
-
Secure during cure: Use painter’s tape or foam blocks to hold the mirror in place for the first few hours. Avoid clamps because they can crack glass.
-
Wait 24 to 48 hours: Let adhesive fully cure before use. Heavy mirrors may need 72 hours.
Add Decorative Overlays for a Custom Look
Create a Vanity-Style Design
Transform a plain mirror into a statement piece with a carved overlay around the edges. This technique mimics high-end furniture at a fraction of the cost.
Best materials for overlays include 1/4 inch MDF (easy to cut, paint, and glue), PVC foam board (lightweight and moisture-resistant), and laser-cut acrylic (modern look with precise patterns).
Cut and Attach the Design
- Trace your pattern (floral, geometric, or other design) onto the material.
- Drill a starter hole inside any enclosed cutout.
- Use a jigsaw or scroll saw to follow the lines.
- Sand edges smooth with 120 to 220 grit paper.
- Round corners slightly to prevent chipping.
Apply 2 to 3 coats of primer, then semi-gloss paint for durability.
Bond Overlay to Mirror
Use clear silicone or epoxy to glue the frame design directly onto the mirror surface. Apply adhesive to the back of the overlay, align carefully, and press down evenly. Wipe excess with a damp cloth before it cures. Let dry 24 hours.
Leave a small gap (1/16 inch) between the overlay and mirror edge for a shadow-line effect.
Reinforce for Long-Term Durability
Install Mirror Clips for Heavy Glass
Even with strong adhesive, large mirrors benefit from Z-clips. Attach one half of the clip to the desk using screws. Adhere the mating clip to the mirror’s back edge. Slide the mirror into place for hidden support.
Place clips at top and bottom. Never place them just on the sides.
Use a French Cleat for Vertical Support
This method works ideal for mirrors mounted on a desk back panel. Cut a 45-degree wooden strip (cleat) into two interlocking pieces. Screw one piece to the desk, the other to a backing board behind the mirror. Hang the mirror like a picture.
This method carries weight off the adhesive entirely.
Handle and Position the Mirror Safely
Wear Protective Gear
Always wear cut-resistant gloves and safety goggles. Glass can shatter unexpectedly, especially during handling or removal.
Work on a Soft Surface
Install the mirror on a carpeted floor or foam padding to prevent scratches or cracks.
Avoid High-Risk Zones
Do not mount mirrors near heating vents because temperature swings weaken adhesives. Avoid high-traffic areas where impact risk is high. Never place mirrors over electronics because glass shards can damage devices.
Maintain Your Desk Mirror
Clean Without Damage
Use ammonia-free glass cleaner and a microfiber cloth. Ammonia-based products (like Windex) can degrade the mirror’s backing over time, causing dark spots or peeling.
Inspect Annually
Check for lifting edges, bubbling adhesive, cracks, or delamination. Humid environments require more frequent checks.
Remove Carefully if Needed
To detach the mirror, use a thin putty knife to gently cut through adhesive. Work slowly from one corner. Expect some surface damage on painted or laminated desks.
VHB tape usually leaves residue. Remove it with isopropyl alcohol.
Real-World DIY Tips for Beginners
Start Small for First-Timers
If you’re new to mirror mounting, begin with a small, lightweight mirror under 2 lbs. Use VHB tape for a no-mess, removable option. Upgrade to mastic and clips once you feel confident.
Ventilate When Using Adhesives
Mirror mastic and silicone emit strong fumes. Work in a well-ventilated room and consider wearing a respirator.
Use Clamping Alternatives
Instead of clamps, try painter’s tape (lightly taped top and bottom), foam blocks wedged between wall and mirror, or books or weights placed gently on the frame (if applicable). Avoid direct pressure on glass edges.
When to Hire a Professional
Consider Professional Help for Complex Jobs
Hire a glass shop if you need custom shapes or drilled holes, beveled or tempered glass, or large mirrors over 24 inches wide.
They’ll cut, edge, and even pre-drill safely. Plus, they’ll provide mounting advice for your specific situation.
DIY vs. Professional: Quick Comparison
- DIY costs $20 to $60 and takes 1 to 2 hours with moderate precision
- Professional installation costs $100 to $300 or more and takes 1 to 3 days with high precision
DIY works great for standard setups. Pros handle complexity and reduce risk.
Key Takeaways for Attaching a Mirror to a Desk
- Use a custom-cut mirror with finished edges for safety
- Clean and lightly sand the desk surface before bonding
- Choose adhesive by weight: VHB tape for light mirrors, mastic for heavy ones
- Reinforce with clips for mirrors over 5 lbs
- Add MDF or PVC overlays for a custom vanity look
- Let adhesive cure 24 to 48 hours before use
- Inspect annually and clean with ammonia-free products
Attaching a mirror to a desk boosts functionality and style, especially for grooming, design work, or small-space living. With the right tools and techniques, you can achieve a clean, secure, and professional-looking result in just a few hours.
Frequently Asked Questions About Attaching a Mirror to a Desk
What is the best adhesive for attaching a mirror to a desk?
Mirror mastic is the best adhesive for heavy-duty mirror mounting. It’s specifically designed for bonding mirrors to various surfaces, offers flexibility, and resists moisture. For lightweight mirrors under 2 lbs, 3M VHB double-sided tape works well.
Can I attach a mirror to a laminated desk?
Yes, but with caution. Adhesives will stick to laminate, but removal may damage the surface. Test adhesion in an inconspicuous spot first. If you might need to remove the mirror later, consider using VHB tape instead of mastic.
How long does mirror adhesive take to cure?
Most mirror adhesives require 24 to 48 hours to fully cure before the mirror can be used or subjected to stress. Heavier mirrors may need up to 72 hours for complete curing.
Can I drill holes in a mirror myself?
No. Never drill your own holes in a mirror. Risk of shattering is extremely high. Custom glass shops can professionally drill holes for brackets or mounting hardware.
What thickness mirror is best for desk mounting?
Mirrors ranging from 1/8 inch to 1/4 inch work best for desk mounting. Thinner mirrors (1/8 inch) are lighter and easier to adhere. Thicker mirrors (1/4 inch) feel more premium but require stronger mounting support.
How do I remove a mirror attached with adhesive?
Use a thin putty knife to gently cut through the adhesive, working slowly from one corner. Expect some damage to painted or laminated desk surfaces. VHB tape residue can be removed with isopropyl alcohol.


