
Is your desk chair looking worn, faded, or just outdated? Instead of replacing it, you can give it a fresh, custom look by reupholstering the seat and backrest. Reupholstering a desk chair is an affordable, eco-friendly DIY project that takes about two hours and requires only basic tools. Whether you’re refreshing a tired office chair or upgrading a hand-me-down, this guide will walk you through every step.
Using just a staple gun, screwdriver, scissors, and about one yard of decor-weight fabric, you can transform your chair to match your workspace style. You’ll also learn how to refinish metal or plastic parts for a coordinated look, avoid common mistakes, and extend the life of a structurally sound chair.
Disassemble the Chair Safely
Before touching any fabric, remove the cushions so you can work on them freely. Most desk chairs use screws to attach the seat and backrest to the frame.
Remove Cushions with Care
Locate the screws underneath the seat and along the backrest support. Use a flathead or Phillips screwdriver to unscrew and detach both pieces. Set screws aside on a magnetic tray or in a labeled container to avoid losing them.
Take photos during disassembly. This helps when reassembling, especially if the chair has a tilt mechanism or non-standard bracket design. Some models, like the IKEA Rickard, have simple screw-on backs, making this step quick and intuitive.
Inspect Foam and Frame
Once the cushions are free, check the foam padding. If it’s flattened, cracked, or lumpy, consider adding a half-inch foam topper or replacing it entirely. Fresh foam restores comfort and gives the new fabric a smoother appearance. Avoid reupholstering over damaged foam, as it will show through and shorten the life of your work.
Ensure the chair base, gas lift, and casters are stable. Reupholstering won’t fix wobbly legs or broken swivel joints. Only proceed if the chair’s structure is solid.
Prepare and Refinish Exposed Surfaces

If the chair has visible metal, plastic, or wood parts that are scratched or dull, now is the time to refresh them. This optional step dramatically improves the final look.
Sand and Clean Before Painting
Use fine-grit sandpaper to lightly scuff glossy surfaces like plastic armrests or painted metal bases. This helps spray paint adhere better. Wipe away dust with a tack cloth or damp rag. Never skip this step, or the paint may peel.
Work in a well-ventilated area, preferably outdoors or in a garage. Cover nearby surfaces with a drop cloth.
Apply Spray Paint in Thin Coats
Choose a spray paint designed for the material you are refinishing. Hold the can eight to twelve inches from the surface and apply two to three light coats, waiting ten to fifteen minutes between coats. Heavy coats cause drips and uneven texture. Let the final coat dry fully before reassembly.
Common refinishing targets include the swivel base, armrest shells, and back support brackets. Matching paint to your new fabric creates a cohesive, custom look.
Cut and Staple New Fabric
This is the core of reupholstering. Covering the cushions with fresh fabric takes patience and precision. Done right, it looks store-bought.
Lay Fabric Right-Side Down
Always place your fabric right-side down on a clean, flat surface. That way, when you flip the cushion over after stapling, the finished side is perfect and visible.
Center the cushion on top of the fabric. Ensure at least three to four inches of overhang on all sides. This gives enough material to wrap around and staple underneath.
If using patterned or directional fabric, align the design before cutting. You may need extra yardage to match patterns between seat and backrest.
Staple with Cross-Tension Method
Start by placing one staple in the center of one edge. Pull the opposite side tight and staple its center. This creates cross-tension and prevents wrinkles. Repeat for the other two sides.
Now work from the center outward, stapling every one to two inches. Keep the fabric taut but not stretched thin. Avoid skipping areas, as gaps lead to sagging later.
Fold Corners Like a Pro
Neat corners give a professional finish. Think of wrapping a gift. Pull one side tightly and fold it down. Pull the adjacent side over it, creating a pleat or miter. Staple securely from the top down.
Trim excess fabric close to staples, but never cut so close that staples are exposed. A clean corner should lie flat with no puckering. Repeat for all cushions. For contoured backs, make small relief cuts in the fabric near curves to help it lay smoothly.
Reassemble the Chair Correctly
Now that your cushions are fresh and styled, put everything back together.
Align Cushions and Reattach Screws
Match the reupholstered seat and backrest to their original positions. Double-check that no fabric is blocking screw holes. This is a common oversight that causes reassembly problems.
Reinsert screws using your disassembly photos as a guide. Tighten securely, but do not over-tighten, especially on plastic inserts, which can strip easily.
Test Stability and Movement
Once assembled, sit in the chair or apply pressure to test stability. Check that the seat swivels smoothly, the backrest reclines if applicable, and no fabric gets pinched during movement.
If something feels off, disassemble and recheck alignment. A well-reupholstered chair should function exactly as it did, only looking better.
Choose the Right Fabric
The fabric you pick affects durability, comfort, and style. Do not use old bed sheets or quilting cotton, as they will wear out fast.
Pick Durable Decor-Weight Fabric
Opt for upholstery-grade or home decor fabric from craft stores or online retailers. These are tightly woven and designed to handle daily use.
Recommended fabric types include cotton canvas, linen blends, performance fabrics, and indoor/outdoor fabric. Avoid stretchy or thin materials. They will not hold tension and may tear.
Match Pattern and Color Thoughtfully
Bold prints make a statement. Neutrals blend in. Consider your workspace when choosing.
For patterned fabric, buy extra yardage to align designs across seat and back. This ensures a polished, intentional look.
Avoid Common Mistakes
Even simple projects can go wrong without attention to detail. Here are key pitfalls to avoid.
Skipping the Test Fit
Always do a dry fit. Place the fabric on the cushion without stapling. Check overhang, pattern alignment, and corner drape. Adjust before committing.
Using the Wrong Staple Gun
A weak manual staple gun may not penetrate wood frames. Use a heavy-duty manual or electric staple gun with quarter-inch to three-eighths-inch staples. Test on scrap wood first.
Ignoring Screw Holes
Never staple over screw holes. Trim fabric away from these areas so screws can re-enter cleanly. Blocked holes lead to crooked reassembly.
Overlooking Foam Condition
Old, sunken foam ruins the look of new fabric. Replace it if compressed. Add a half-inch topper for extra comfort.
Maintain Your Reupholstered Chair
A fresh look should last. With proper care, your reupholstered chair can stay sharp for five years or longer.
Spot Clean Gently
Most decor fabrics can be cleaned with a damp cloth and mild soap. Blot stains. Do not rub. Avoid soaking, as moisture can seep into foam and cause mold.
Never machine-wash unless the cushion cover is removable.
Check Staples Regularly
Every six to twelve months, flip the chair and inspect staple lines. Tighten any loose staples and re-staple if fabric sags. High-use areas wear fastest.
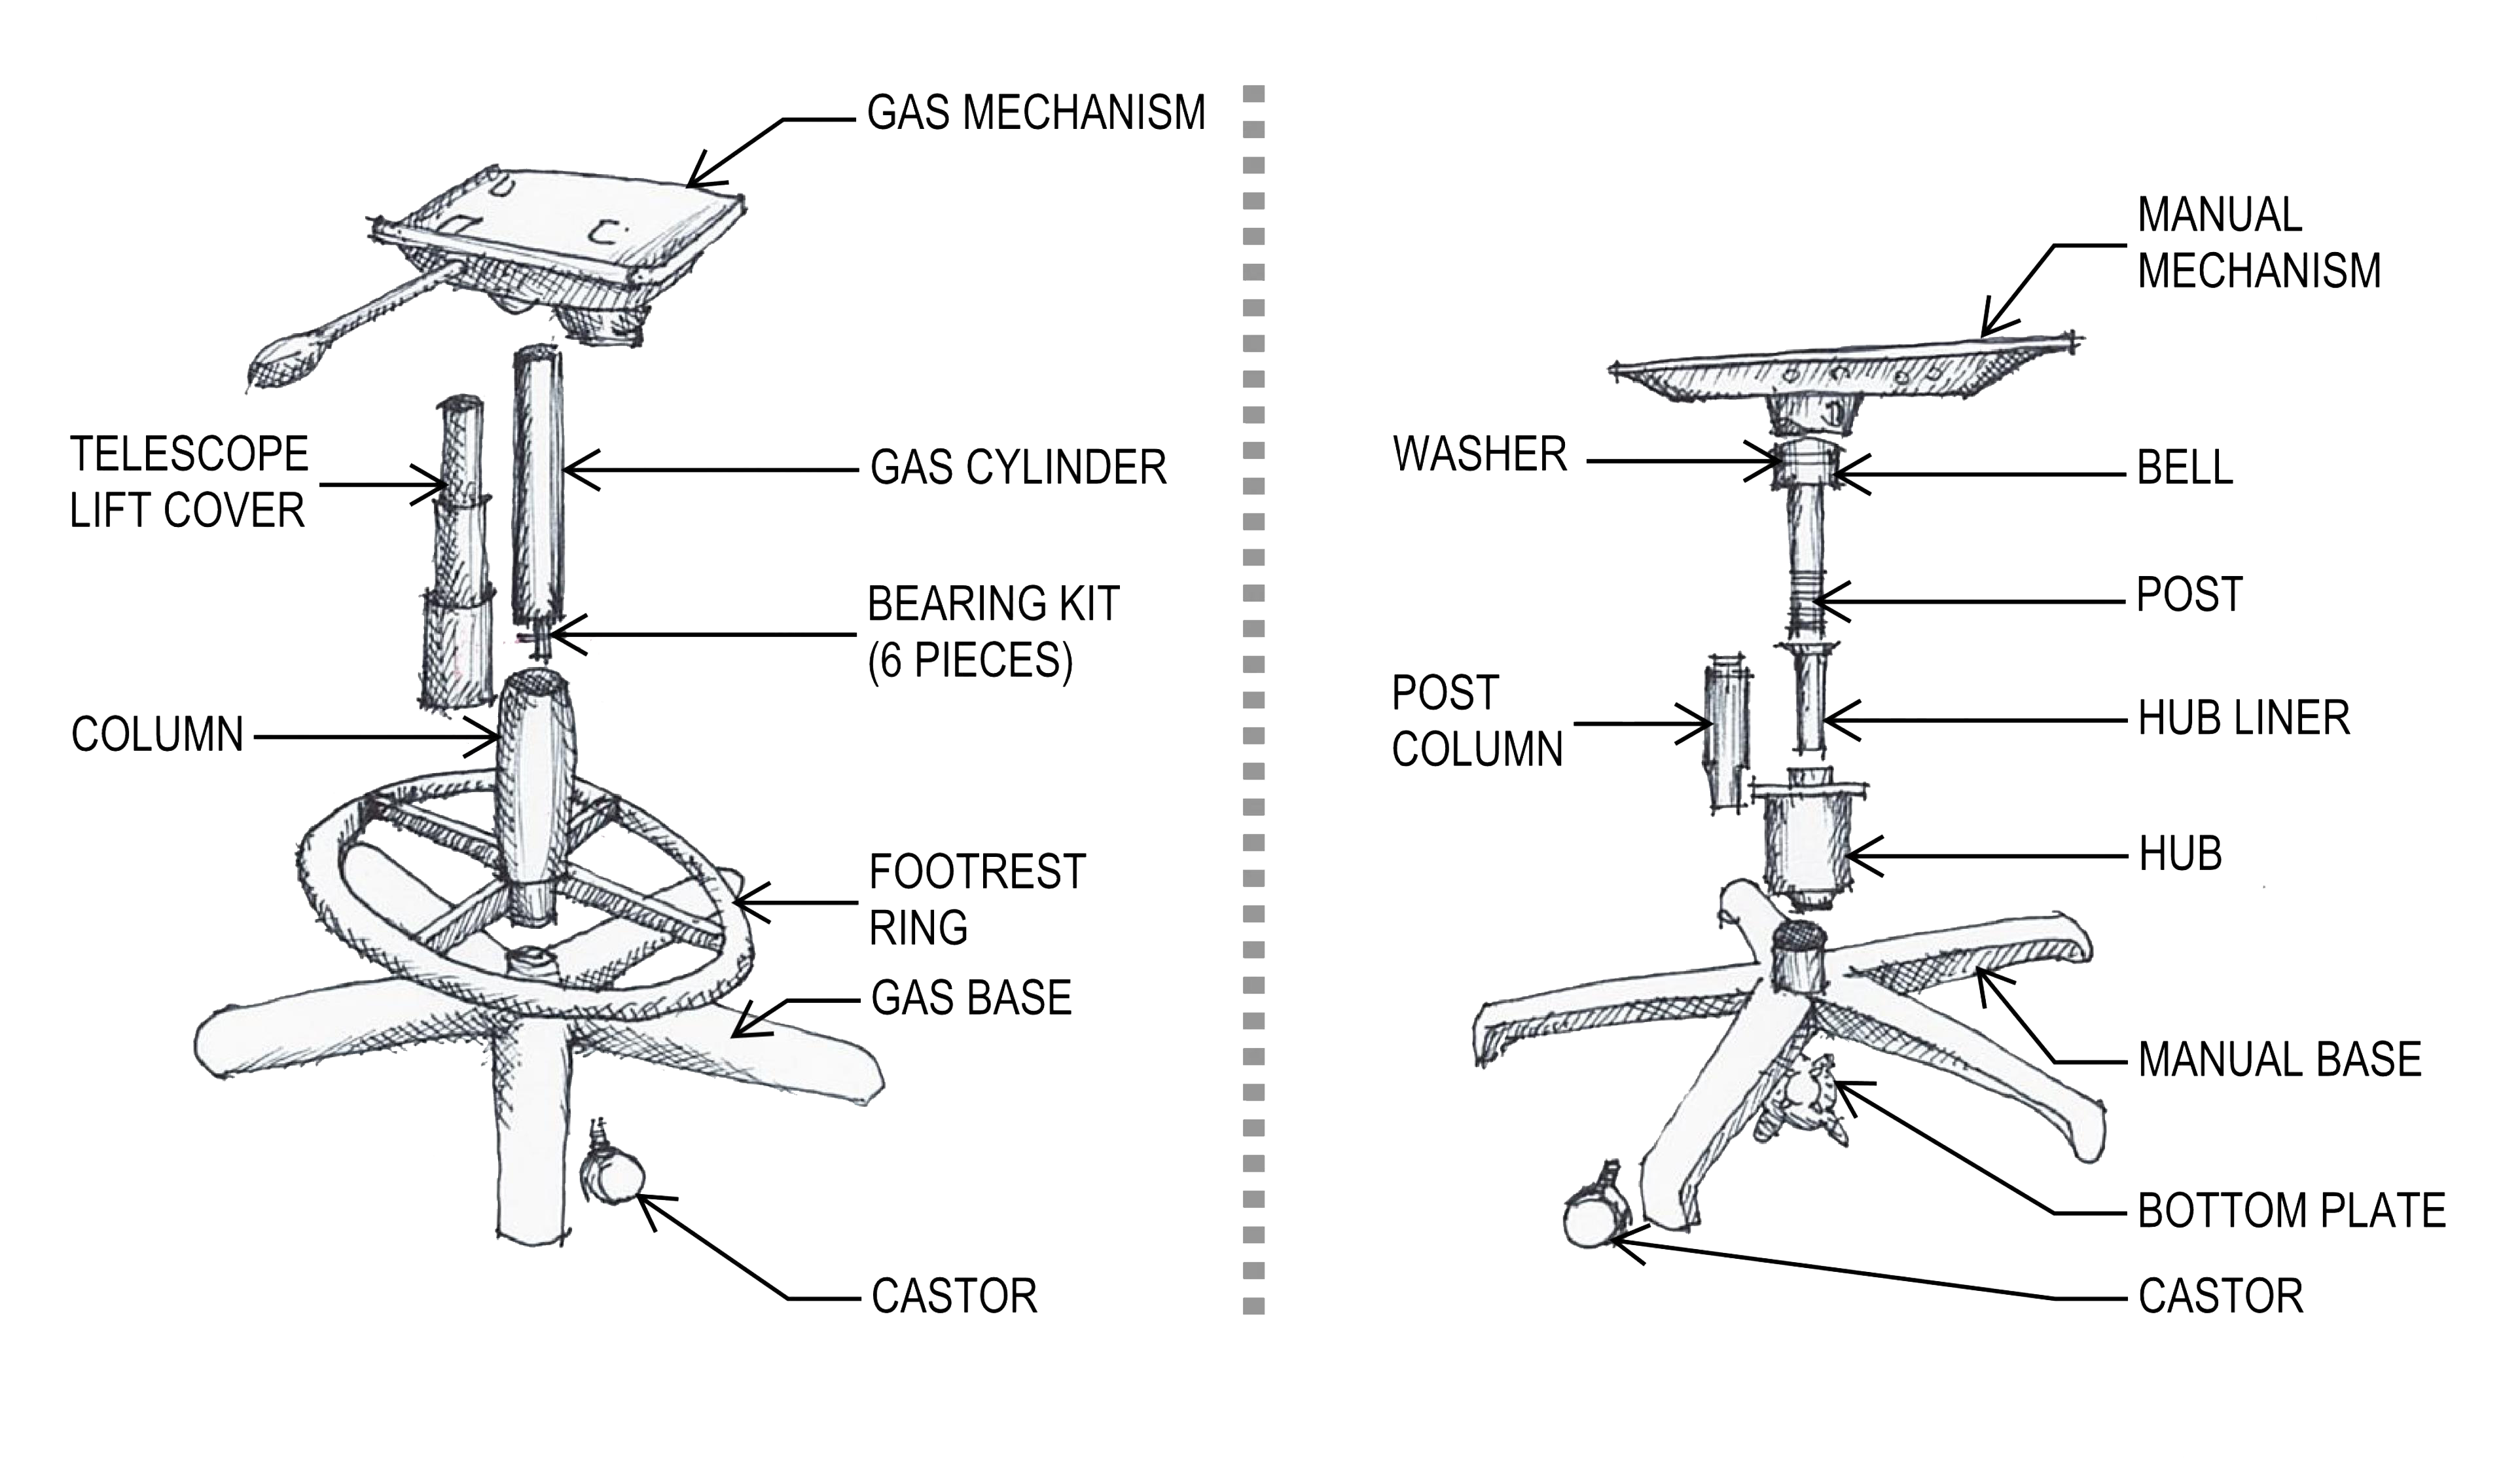
Refresh Casters and Gas Lift
While reupholstering, consider replacing worn casters or a sinking gas lift. These small upgrades restore full function and extend the chair’s life.
When to Hire a Pro
Reupholstering is DIY-friendly, but not for every chair. Consider professional help if the chair has integrated or molded fabric that is not removable, you lack tools or confidence with stapling, or the frame requires welding or complex repair.
Some users choose to remove cushions and deliver them to an upholsterer, handling disassembly and reassembly themselves. This hybrid approach saves money while ensuring quality.
Frequently Asked Questions About Reupholstering a Desk Chair
How long does it take to reupholster a desk chair?
Most projects take approximately two hours, depending on your experience level and whether you include optional refinishing steps.
What fabric is best for desk chair reupholstery?
Upholstery-grade or home decor fabric works best. Cotton canvas, linen blends, performance fabrics, and indoor/outdoor materials offer durability and style.
Can I reupholster a chair with a broken frame?
No. Reupholstering only addresses the fabric and foam. If the chair wobbles or has damaged mechanisms, repair or replace those issues first.
Do I need special tools to reupholster a desk chair?
A screwdriver, staple gun, scissors, and measuring tape are essential. Optional items include sandpaper and spray paint for refinishing.
How much fabric do I need for one desk chair?
One yard of decor-weight fabric is typically sufficient for standard desk chairs with seat and backrest cushions.
Key Takeaways for Reupholstering Your Desk Chair
Reupholstering a desk chair is more than a fix. It is a transformation. With one yard of fabric and a few tools, you can personalize your workspace, reduce waste, and save money.
The process breaks down into four main phases. First, disassemble the chair and inspect the foam. Second, optionally refinish exposed metal or plastic parts. Third, cut and staple new fabric using cross-tension for a smooth finish. Fourth, reassemble and test functionality.
Follow these steps to achieve a clean, durable finish that looks anything but DIY. Whether you are upgrading a budget chair or giving new life to a favorite seat, this project proves that small changes make a big impact.


