
You stare at your cluttered desk, cables snaking everywhere while your monitor sits buried under notebooks and coffee cups. Raising your screen to eye level could eliminate your neck pain, but commercial stands cost hundreds of dollars. The solution is building your own desk shelf. With basic tools and under $50 in materials, you can create a custom, sturdy shelf that boosts ergonomics, clears space, and matches your style perfectly. This guide walks you through every step from choosing wood to final sanding so you can build a professional-looking desk shelf in as little as 10 minutes or spend a weekend crafting a showpiece.
Choose the Right Materials for Your Build
Selecting the right wood sets the tone for durability, cost, and final appearance. The best material depends on your available tools, time, and desired finish.
Match Wood Type to Your Skill Level
Beginners should start with pre-cut pine boards from any hardware store. At around $14 for 6 feet, pine is affordable and easy to work with. Just cut to size and attach legs. For a sleek modern look, use 9 to 12mm plywood, especially if you have edge banding to hide seams. Reclaimed wood works well for eco-conscious builders who want unique grain patterns without spending much.
Intermediate and advanced builders can upgrade to hardwoods like maple, walnut, or oak. These accept stain evenly, resist wear, and deliver a premium look. A walnut top paired with black-painted legs mimics high-end brands at less than 10% of the retail price.
- Always inspect boards for warps, knots, or splits. Cut around defects during layout to avoid weak spots in your finished shelf.
Consider Alternative Materials
- Felt pads: Glue to the underside to prevent scratches and reduce vibration noise
- Edge banding: Apply iron-on strips to plywood edges for a seamless look
- Wood filler: Patch dents or gaps in reclaimed wood before sanding
- 3D-printed trays: Add custom organizers for pens, cables, or chargers
Avoid particle board unless you are doing a no-cut build. It is lightweight but swells with moisture and will not hold screws well over time.
Cut and Prepare Your Shelf Components
Precision during cutting ensures a square, level shelf. Even small misalignments can ruin the final look.
Use Standard Dimensions for Most Desks
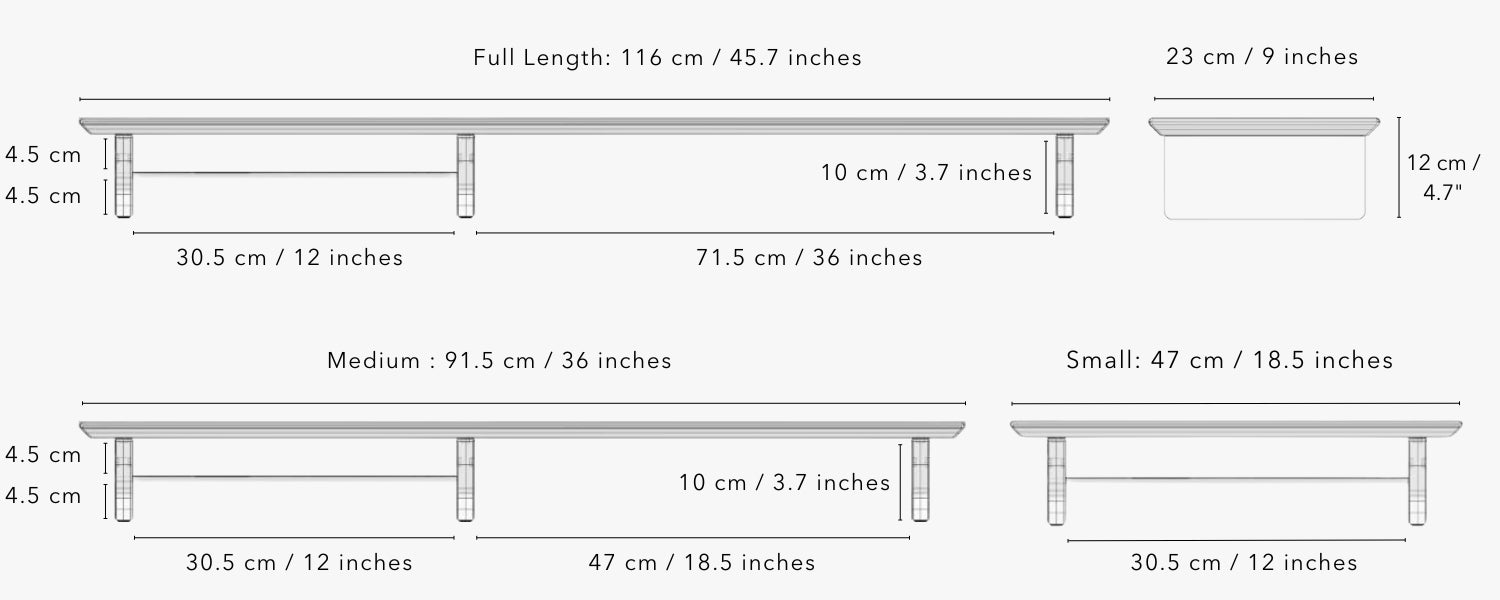
For most desk setups, use these dimensions as a starting point. Length should be 24 to 49 inches depending on your monitor setup, with 48 to 49 inches ideal for dual monitors or ultrawide displays and 24 to 30 inches sufficient for single monitor setups. Depth should be 7 to 12 inches, with 9 inches being standard for 1×10 boards. Thickness should be 0.75 inch or less to keep monitors at ergonomic height. Leg height should be 3.5 to 5 inches, with 4 inches or less being ideal to avoid neck strain.
Follow the Cascading Overhang Design
A stepped profile looks modern and balanced. The top shelf measures 48 by 9 inches. The legs are 8 inches deep, which creates a 0.5-inch overhang front and back. The lower shelf measures 29.5 by 7 inches when included, centered under the legs for additional storage.
Cut with Available Tools
You do not need a full workshop. Here is how to adapt to what you have. A table saw or circular saw provides the best straight, accurate cuts. Square one end first, then measure and cut to final length. A jigsaw or hand saw works for trimming or cutting corners. If you have no saw, ask hardware stores like Lowe’s to pre-cut lumber for free or at minimal cost.
Round Edges for a Premium Feel
Sharp edges feel industrial. Soften them for a refined look. Use a router with a 3/8-inch round over bit for the fastest method on the top shelf and leg edges. Alternatively, wrap 120-grit sandpaper around a block and sand corners into gentle curves by hand. A chamfer offers another option. Mark 45-degree lines at corners, cut with a hand saw, then sand smooth.
Leave back panels and shelf sides square since they will be hidden during assembly.
Select the Best Joinery Method
How you connect the pieces determines strength, appearance, and tool requirements.
Beginner: Pocket Holes and Screws
The Kreg Pocket Hole Jig is perfect for first-time builders. It creates strong, hidden joints. Drill holes on the inside face of legs or the back panel, clamp the shelf in place, then drive screws through the holes. Fill holes with Kreg wood plugs, apply glue, and sand flush. This method is fast, reliable, and allows disassembly if needed.
Intermediate: Wood Glue and Countersunk Screws
For a cleaner look without special jigs, apply yellow wood glue like Titebond to mating surfaces. Drill pilot holes to prevent splitting. Use countersink bits so screw heads sit flush. Cover with wood filler and sand smooth. Clamp tightly and let dry for 24 hours.
Advanced: Mortise-and-Tenon or Bridle Joints
For heirloom-quality builds, use traditional joinery. Mortise-and-tenon joints involve cutting precise slots in legs and matching tabs on shelves, then tapping them together with a mallet. Bridle joints are similar but stronger on outer members and work well when the design allows solid vertical ends. Use a slot morturer for accuracy and test fit first, adjusting with chisels if the fit is too tight.
Assemble Your Desk Shelf Step by Step

Build in sequence to avoid mistakes. Always dry fit before applying glue.
1. Dry Fit All Parts First
Lay out legs, shelves, and back panel. Check that overhangs are even, corners are square, and legs are positioned 5 inches from each end. Label pieces with pencil to avoid mix-ups during actual assembly.
2. Attach Legs to the Top Shelf
Apply wood glue to the tops of the legs. Position legs 5 inches from each end. Clamp in place and reinforce with pocket screws or countersunk screws. Wipe excess glue immediately with a damp cloth.
3. Build the Lower Shelf Unit
If your design includes a lower shelf, attach the back panel to the lower shelf using pocket holes drilled on the underside. Ensure it is centered and square, then let dry before mounting to the legs.
4. Mount Lower Shelf to Legs
Apply glue where the shelf meets the legs. Screw upward through the leg into the shelf. Clamp until the glue sets. For heavy loads, add a third central leg or support divider.
- Use bar clamps to keep everything square during glue-up. Misalignment is the number one cause of wobbly shelves.
Install and Secure the Legs
Legs affect both stability and style. Choose based on your aesthetic and load requirements.
Choose Your Leg Type
- Bookcase feet or doorstops: Ready to screw in, ideal for quick builds
- Custom-cut wooden legs: Cut from scrap wood, sanded to 240-grit, rounded for elegance
- Metal or concrete legs: For industrial aesthetics
Drill Mounting Holes Accurately
If legs block screw access, drill after assembly. Build a DIY MDF drilling jig with a fence for alignment, a stop block for consistent depth, and a bench hook to prevent slipping. This ensures every hole lines up perfectly. Use screws shorter than the shelf thickness, maximum 0.7 inches, to avoid poking through.
For monitors over 30 pounds, add a third leg or cross-brace underneath for stability.
Finish for Durability and Style
A great finish makes cheap wood look expensive.
Sand in Stages
For reclaimed wood, start with 60 to 80 grit using a belt sander, then progress to 100, 150, and 220 grit. For new wood, begin at 120 to 150 grit and finish at 220. Sand rounded edges by hand. Wipe with tack cloth to remove dust before applying finish.
Stain Without Blotches
Pine and other softwoods absorb stain unevenly. Prevent this by applying pre-stain conditioner first. Wipe on stain like MinMax Special Walnut with a lint-free rag and let dry 4 to 6 hours. For hardwoods like maple or walnut, skip the conditioner and apply clear polyurethane for a natural look.
Seal with Polyurethane
Protect against spills and scratches by applying 3 coats of water-based polyurethane. Lightly sand with 220-grit between coats and wipe dust with tack cloth. Let cure for 24 or more hours before use. Oil-based varnish dries slower but gives a deeper gloss.
Add Design Flair
- Paint legs black with spray paint for two-tone contrast
- Glue felt pads to the bottom to protect your desk surface
- Leave the underside unfinished if it will not be seen
Position for Optimal Ergonomics
Where and how you place the shelf matters for comfort and function.
Position for Eye-Level Viewing
When seated, the top of your monitor should be at or slightly below eye level. Shelf thickness of 0.75 inch or less helps avoid raising the screen too high. Excessive height causes neck strain over time, so keep the shelf low.
Maximize Cable Management
Use the rear space to route power and data cables. Cut a central hole so monitor arm poles can pass through if using a through-arm design. Install a routed channel or back panel with a hidden compartment. Add a 3D-printed tray for small items. Ensure total width does not exceed your desk’s support span.
Troubleshoot Common Build Problems
Avoid these pitfalls with simple solutions.
Blotchy Stain on Pine
The cause is uneven absorption. The fix is to always use pre-stain conditioner before applying stain.
Visible Screw Holes
The cause is exposed fasteners. The fix is to use pocket holes with wood plugs or countersink screws and fill with wood filler.
Warped or Twisted Wood
The cause is poor storage or moisture exposure. The fix is to select straight boards and acclimate them indoors for 48 hours before use.
Misaligned Joints
The cause is rushed assembly. The fix is to dry fit first, label parts, and use clamps for squareness.
Rough or Uneven Edges
The cause is inconsistent sanding. The fix is to progress through grits from 100 to 150 to 220 and use a router for uniform rounding.
- Always dry fit, clamp liberally, sand between coats, and work in a dust-free area when finishing.
Compare Build Options and Costs

Your approach depends on time, tools, and goals.
| Build Type | Time | Cost | Tools Needed | Best For |
|---|---|---|---|---|
| 5-Minute Shelf | Under 10 minutes | $13 | Screwdriver only | Quick fix, tight budget |
| Intermediate Build | 1 to 2 days | $37 to $50 | Saw, sander, drill | Balanced cost and quality |
| Advanced Build | Several hours to days | $50 to $100 | Planer, router, jig | Premium look, skill building |
Commercial shelves like Grovemade cost $390 to $505. A DIY version delivers the same function and style for under $50, representing up to 94% savings. You also gain customization, sustainability by using scrap wood, and personal pride in building it yourself.
Customize Your Shelf for Function and Style
Make it yours with smart upgrades.
Structural Enhancements
- Integrated cable routing: Cut grooves or drill pass-through holes
- Adjustable legs: Use threaded inserts for height tuning
- Multi-tier shelves: Add a third level for books or decor
Aesthetic Touches
- Chamfered edges: Modern architectural detail
- Wood plugs: Hide pocket holes with stained plugs
- Edge banding: Makes plywood look like solid wood
Material Mixes
- Glass top with wood legs: Sleek minimalist
- Concrete base: Industrial weight and stability
- Laminated strips: Adds visual interest and strength
Frequently Asked Questions About Building a Desk Shelf
What is the best wood for a beginner desk shelf project?
Pre-cut pine boards are the best choice for beginners. They are affordable at around $14 for 6 feet, easy to cut and screw into, and widely available at hardware stores. Start with a 1×10 board and attach simple legs for a functional shelf in under an hour.
How much does it cost to build a desk shelf yourself?
A basic desk shelf costs as little as $13 using an IKEA Burhult shelf plus legs. An intermediate build with custom-cut pine or maple runs $37 to $50. Advanced builds using walnut or other premium hardwoods cost $50 to $100. This represents savings of up to $476 compared to commercial options like Grovemade.
What dimensions should a desk shelf be?
For most setups, the length should be 24 to 49 inches depending on monitor count. Use 48 to 49 inches for dual or ultrawide monitors and 24 to 30 inches for single monitors. Depth should be 7 to 12 inches with 9 inches being standard. Thickness should be 0.75 inch or less to maintain ergonomic monitor height. Leg height should be 3.5 to 5 inches with 4 inches or less being ideal to prevent neck strain.
Do I need special tools to build a desk shelf?
No. A basic build requires only a screwdriver. Intermediate builds need a saw, sander, and drill. Advanced builds benefit from a planer, router, and jigs, but you can adapt to whatever tools you have. Hardware stores will also pre-cut lumber for free or cheap if you lack saws.
How long does it take to build a desk shelf?
A basic shelf using pre-cut materials takes under 10 minutes. An intermediate custom build takes 1 to 2 days including drying time for glue and finish. Advanced builds with traditional joinery and premium finishes take several hours to days depending on complexity.
How do I prevent stain from blotching on pine wood?
Always apply a pre-stain conditioner before staining pine or other softwoods. This seals the wood surface and ensures even stain absorption. Let the conditioner sit for the recommended time, then apply stain with a lint-free rag, wiping off excess after 4 to 6 hours.
Key Takeaways for Building Your Own Desk Shelf
Building a desk shelf is not just about saving money. It is about creating a workspace that works for you. With precise cuts, strong joints, and a smooth finish, your DIY shelf will support monitors, organize gear, and elevate your desk’s appearance. The project scales from a 10-minute beginner build to a weekend showpiece using traditional joinery. Choose materials that match your skill level, whether that is affordable pine or premium walnut. Pay attention to ergonomics by keeping the shelf height under 4 inches and monitor position at eye level. The result is functional, ergonomic, and uniquely yours. Start with reclaimed wood and a screwdriver, then level up as you gain confidence. Your perfect desk upgrade begins with one cut.


