
A scratch on your desk doesn’t have to mean a permanent eyesore. Whether it’s a light scuff from daily use or a deep gouge from an accident, most damage can be significantly reduced or even made invisible with the right approach. The key lies in matching the repair method to both the scratch depth and the desk material and finish. From natural oils to wax fillers and commercial touch-up products, there are proven solutions that don’t require professional refinishing.
This guide walks you through every step: diagnosing the scratch, choosing the best fix, applying it safely, and sealing the result. You’ll also learn what not to do, like using olive oil or silicone sprays that can ruin future repairs. By the end, you’ll know exactly how to fix scratches on a desk and keep it looking its best for years.
Diagnose the Scratch Type Before Choosing a Fix
Before applying any treatment, determine the scratch severity. The repair method depends entirely on how deep the damage goes, so take a moment to assess it properly.
Surface Scratches Affect Only the Finish
Surface scratches are light marks that haven’t penetrated the wood. They appear white or dull and often disappear when wet. Common causes include pens, keys, or dust particles rubbed across the surface.
To identify surface damage, run a fingernail over the scratch. If it doesn’t catch, it’s likely surface-level. Alternatively, dab water on the area. If the scratch disappears, it’s in the finish only.
Medium Scratches Reach the Wood
Medium scratches break through the protective coating and expose the wood grain. They’re darker than surface scratches and may feel slightly indented. Your fingernail will catch slightly, and exposed wood is usually lighter than the surrounding stained finish.
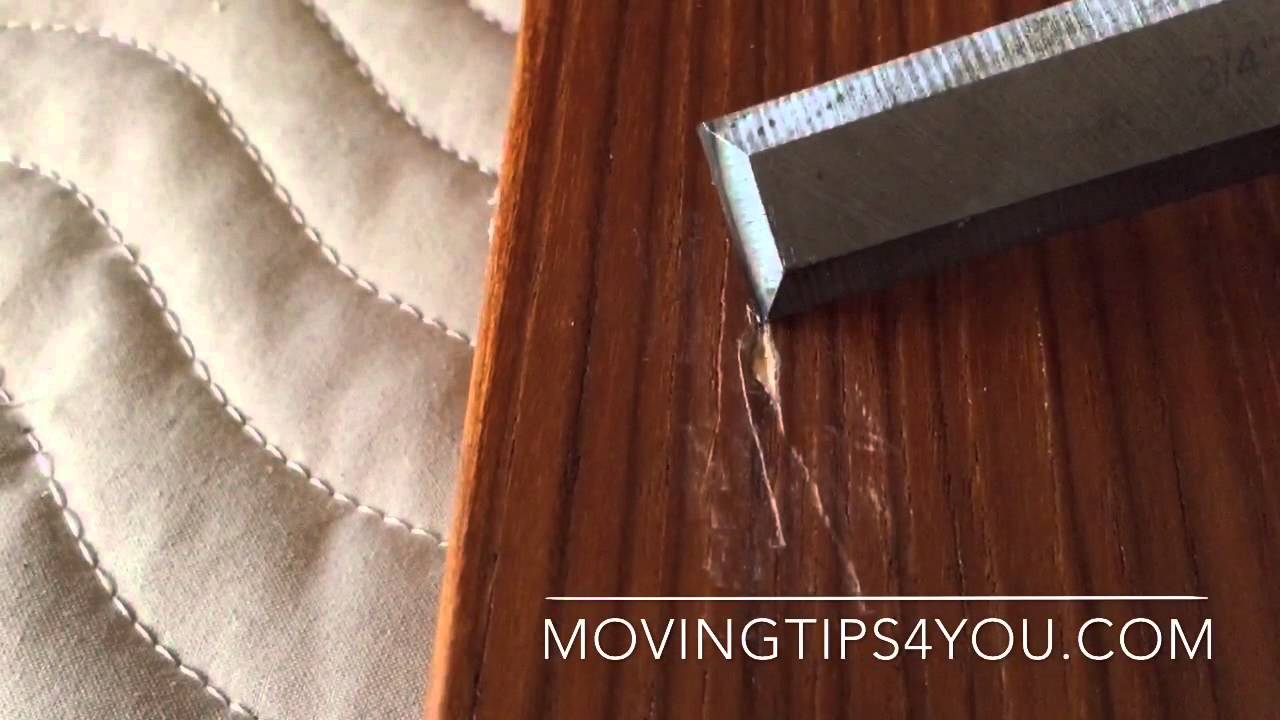
Deep Gouges Remove Material
Deep damage removes wood fibers, creating a visible indentation. These often result from impacts or sharp objects. Your nail catches noticeably, and light reflects off edges, creating a shadow line.
Cross-Grain Damage Is Hard to Hide
Even shallow scratches that cut across the wood grain are highly visible due to disrupted light reflection. These rarely blend well with spot repairs and may require full refinishing for a seamless look.
Pro Tip: Start with the least invasive fix. Try oil treatments first, and only move to fillers or stains if needed.
Match Repair to Your Desk Material

The type of desk surface determines which methods will work and which could cause more harm. Understanding your desk material is essential before attempting any repair.
Solid Wood Desks Respond Best
Oak, maple, walnut, and other solid woods absorb oils, stains, and fillers effectively. They’re the most forgiving for scratch repair. The best methods include oil treatments, stain pens, and wax fillers. Avoid over-sanding, which can create uneven spots.
Butcher Block Needs Full Refinishing
Laminated wood slats, common in maple desks, are often sealed with a UV-cured finish that is extremely hard and clear. The challenge is that spot repairs rarely blend due to optical clarity. For visible results on butcher block, full refinishing is often the only permanent fix.
Veneer Cannot Handle Aggressive Work
Veneer is a thin layer of real wood over particleboard or MDF. Too much pressure or sanding can burn through it. Use gentle colorants like stain pens or wax pencils, and avoid sanding deeply or using liquid fillers that might warp the substrate.
Laminate Is Non-Porous
Plastic-based surfaces won’t absorb any liquid, so repairs are purely cosmetic. Your only option is to use wax pencils or markers to mask the scratch. No structural fix is possible on laminate.
UV-Cured Finish Resists DIY Fixes
Found on high-end or commercial desks, this coating is harder than most tools can penetrate. True repair requires stripping and reapplying the finish. For a temporary fix, conceal the scratch with color-matched wax or marker.
Polyurethane and Oil Finishes Are Repair-Friendly
These common protective layers allow oils and stains to bond with light prep. Polyurethane tolerates light sanding before filler or stain. Oil finishes like tung and linseed are best maintained with compatible oils, and you should avoid silicone-based polishes.
Expert Note: Full refinishing is the only true structural fix for finish-level damage, especially on UV-coated surfaces.
Fix Light Scratches With Natural Oils
For surface-level marks, natural oils swell wood fibers and darken the scratch to match the surrounding area. These methods work quickly and use household items.
Try Hemp Oil First
Furniture-grade hemp oil is non-toxic, food-safe, and effective on all wood types. Apply a few drops to a soft cloth and rub into the scratch using circular motions. Wipe off all excess immediately and let dry for 6 to 12 hours.
Warning: Only use furniture-grade hemp oil. Cooking-grade can turn rancid.
Use Vinegar and Oil Mixtures
DIY blends work fast and are easy to make at home. The best formula is a 1:1 ratio of white vinegar and canola oil. Shake well in a small bottle, apply with a clean cloth, and wipe off excess thoroughly. If the spot looks darker, apply lightly to the whole surface to blend.
How it works: vinegar gently etches the surface, improving oil absorption, while oil plumps wood fibers to reduce contrast.
User Verified: This mix ranked number one in scratch reduction tests.
Rub With a Walnut or Pecan
Raw walnuts release natural oils that darken and condition wood. Cut a walnut in half and rub the meat firmly into the scratch. Wait 5 to 10 minutes, then wipe clean and buff.
Note: Not safe for nut-allergic users. Less effective on sealed finishes unless lightly sanded first.
Repair Medium Scratches With Colorants
When the scratch reaches the wood, you need a color-matching solution to reduce visibility. These methods work by darkening the exposed wood to blend with the surrounding finish.
Apply Coffee Paste for Darkening
Instant coffee acts as a natural wood dye. Mix one tablespoon of instant coffee with water to form a thick paste. Dab onto the scratch with a cotton swab and let sit 3 to 5 minutes. Longer wait time creates a darker result. Wipe clean with a damp cloth, then dry and buff.
Tip: Always test in an inconspicuous area first.
Use Iodine on Dark Wood
Tincture of iodine is a powerful darkening agent. Apply a drop with a cotton swab and wipe off excess immediately. Let dry completely, then seal with wax if desired.
Caution: Permanent staining risk. Use sparingly.
Try Black Tea But Expect Weak Results
Steep a tea bag and dab the liquid on light wood. The tannins provide mild staining, but performance is poor in real-world tests. There’s also a risk that moisture can raise the grain or damage finishes.
Verdict: Not recommended for visible results.
Conceal Scratches With Markers and Pens
For precise, defined scratches, color-matched markers offer fast cosmetic fixes. These tools give you control over exactly where the color goes.
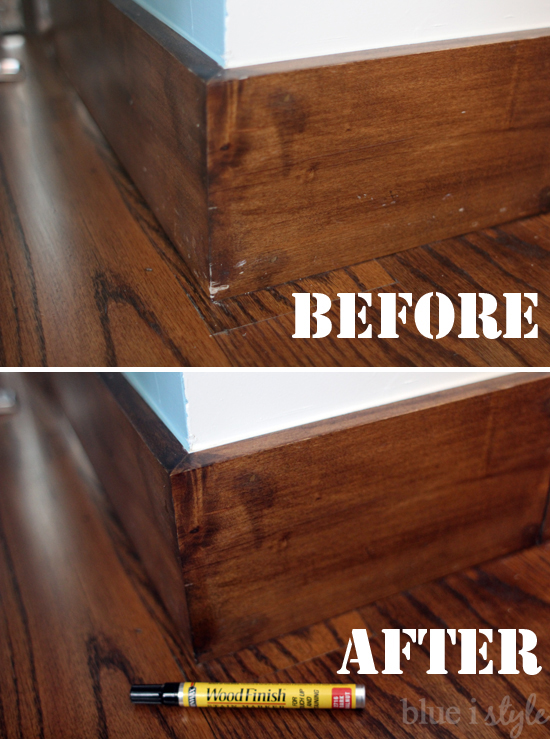
Use Stain Pens Like Minwax
Available in multiple wood tones, these pens deliver consistent color. Choose a shade matching the darkest part of the grain. Shake well, apply directly to the scratch, wipe off excess, let dry, then seal with wax or polish.
Try Wax-Based Repair Sticks
Mohawk 3-in-1 Repair Stick is a top-rated option. Heat the tip briefly with a lighter, press melted wax into the scratch, scrape off excess with the included plastic cap, then buff with a soft cloth.
User Favorite: Professionals use Trade Secret Scratch Remover for daily touch-ups.
Fill Deep Gouges With Fillers
When wood is missing, you need a material to restore the surface level. These methods add material to fill the gap rather than just coloring it.
Apply Stainable Wood Filler
Best for wide or deep indentations. Clean the gouge thoroughly, press filler into the area with a putty knife, wipe off excess with a damp cloth, then let dry for 2 to 6 hours. Sand flush with 220-grit or higher paper, apply matching wood stain, and seal with wax or polyurethane.
Pro Tip: Try staining without filler first for narrow deep scratches.
Use Colored Pencils for Veneer Wear
When the top layer is worn through, recreate the grain. Use light, medium, and dark artist-grade pencils. Scribble light color over the area and spray a thin coat of clear shellac to seal. Add medium tone to draw grain lines and smudge with a swab. Use dark pencil to connect lines across the damage, then apply a final shellac coat.
Success Story: Restored a dining table with worn veneer with results barely visible.
Smooth and Shine With Paste and Steel Wool
For scuffs and light texture damage, a gentle abrasive blend works wonders. This method combines conditioning with mild abrasion.
Make a paste using mineral oil and pumice powder. Rub into the scratch with 0000-grade steel wool, working with the grain. Wipe clean with cheesecloth and buff to a shine.
Alternative: Some recommend fine steel wool with Pledge, but avoid Pledge because it contains silicone that blocks future refinishing.
Use Commercial Polish for Dry, Aged Wood
Products like Old English and ZEP Wood Doctor penetrate deep into worn finishes, making them ideal for older desks with accumulated surface damage.
Apply Old English Furniture Polish
Available in light, dark, and cherry tones. Clean the surface, apply polish directly to the scratch, rub in with the grain, let sit 5 to 10 minutes, then buff thoroughly.
User Praise: You won’t be able to see it.
Try ZEP Wood Doctor
Found at Home Depot and Walmart. Designed for commercial furniture and works fast on light to medium scratches. Users report it works magic.
Seal and Protect the Repair
Unsealed repairs can wear off quickly, especially on high-use desks. Protection is essential for lasting results.
Apply Clear Paste Wax
Adds protection and shine. Use a soft cloth to apply a thin layer, let haze for 10 to 15 minutes, then buff to a soft sheen.
Use Compatible Oils for Maintenance
Reapply hemp or mineral oil every 6 to 12 months to keep wood conditioned. This prevents drying and new micro-scratches while maintaining luster and durability.
Avoid These Common Mistakes
Even good methods fail if you skip key precautions. Knowing what not to do is just as important as knowing the right techniques.
Never use olive oil or cooking oils because they oxidize over time and turn sticky and rancid. Use mineral oil or furniture-grade hemp oil instead.
Skip silicone-based sprays like Pledge because silicone penetrates wood and blocks future refinishing. Use paste wax or oil-based conditioners instead.
Do not sand too aggressively, especially on veneer. Light pressure with 220-grit or higher is enough.
Always match the darkest grain tone because a repair that’s too light stands out more than one that’s slightly dark.
Don’t apply filler to surface scratches because it creates unnecessary buildup. Use oil or polish instead.
Confirm finish type first because UV-cured and lacquer finishes react poorly to many products.
Step-by-Step Repair Plan
Follow this sequence for the best results when you fix scratches on a desk.
First, clean the area with a dry microfiber cloth. Second, diagnose scratch depth using fingernail and wet tests. Third, test your method on a hidden spot like the desk underside. Fourth, choose your treatment based on scratch severity. Light scratches respond to oil, walnut, or vinegar blend. Medium scratches need coffee, iodine, or stain pen. Deep gouges require filler, wax stick, or colored pencils. Dry wood benefits from Old English or ZEP Wood Doctor. Fifth, apply carefully, following the grain direction. Sixth, buff and seal with wax or polish. Seventh, repeat if needed after drying.
Final Tips and Prevention
Work with the grain and never scrub across it. Avoid excess moisture and never soak the wood. Use fine tools like 0000 steel wool and microfiber cloths.
Prevent future scratches by using felt pads under items, adding a desk mat or glass top, and trimming cat nails regularly. Accept that some wear is part of the desk’s story.
Pro Advice: For maple UV-finished butcher block desks, spot repairs may not blend. If appearance is critical, full refinishing is the only real solution.
Start small, test first, and remember: some scratches aren’t flaws. They’re proof your desk is being used and loved.
Frequently Asked Questions About Fixing Desk Scratches
Can I fix a scratch on my desk without sanding?
Yes, many scratches can be repaired without sanding. For light surface scratches, natural oils like hemp oil or a vinegar and oil mixture often work without any sanding. For medium scratches, coffee paste or iodine can darken the exposed wood without aggressive preparation. Only deep gouges typically require sanding as part of the filler process.
What household items can fix scratches on wood desks?
Several household items work effectively. A walnut rubbed directly into the scratch releases natural oils that darken and condition the wood. A mixture of white vinegar and canola oil in equal parts ranks highest in effectiveness tests. Instant coffee mixed into a thick paste works as a natural wood dye for medium-dark woods.
How do I match the repair color to my desk finish?
Match the darkest part of the grain rather than the overall color. Repairs that are slightly darker blend better than lighter spots, which stand out more dramatically. Test your color choice on an inconspicuous area first, like the underside of the desk.
Why do my spot repairs look worse than the original scratch?
This usually happens because the repair is too light, the method doesn’t match the scratch depth, or the finish type is incompatible with the product used. Cross-grain scratches are particularly difficult because they disrupt natural light reflection. Also, skipping the sealing step can cause the repair to wear off unevenly.
How do I fix scratches on a laminate desk?
Laminate is non-porous, so no liquid can penetrate it. Your only option is cosmetic concealment using wax pencils or markers that match the desk color. Apply the color directly to the scratch and buff gently. Understand that this is a temporary fix that will need reapplication over time.
When should I refinish my desk instead of repairing spots?
Refinish when you have multiple deep scratches, cross-grain damage, or when spot repairs fail to blend. UV-cured finishes and butcher block often cannot be successfully spot-repaired due to their optical clarity. Full refinishing provides a uniform result when appearance is critical.
Key Takeaways for Fixing Desk Scratches
Successfully repairing desk scratches comes down to three core principles. First, accurately diagnose the scratch depth and your desk material before choosing a method. Surface scratches need oils, medium scratches need colorants, and deep gouges need fillers. Second, start with the least invasive approach and progress only if needed. Many light scratches respond beautifully to simple natural remedies like walnut rubs or vinegar and oil blends. Third, always seal and protect your repair. Wax or oil topcoats ensure your fix lasts on high-use desks.
The best overall DIY solution for most scratches is a 1:1 mixture of white vinegar and canola oil applied with a soft cloth. For deeper damage, stainable wood filler followed by matching stain provides the most permanent results. Remember that some wear adds character, and your desk’s story is worth preserving.


