
A sinking desk chair is one of the most frustrating office problems you can face. One minute you’re sitting comfortably at your ideal height, and the next you’re slowly dropping toward the floor as you work. This happens because the pneumatic gas cylinder inside your chair loses pressure over time, but the good news is that most desk chair sinking issues can be fixed yourself without buying a new chair.
In this guide, you’ll learn exactly how to diagnose what’s wrong with your chair, apply free fixes that work in minutes, and replace the gas cylinder permanently if needed. We’ll cover every solution from simple no-tool tricks to complete component replacement, plus tips to prevent the problem from happening again.
Diagnose Why Your Desk Chair Is Sinking
Before trying any fix, you need to identify the actual cause. A sinking chair isn’t always a gas cylinder problem, and applying the wrong fix wastes time.
Check the Height Adjustment Lever
The lever under your seat controls height through a linkage connected to the cylinder. If this linkage comes loose, the chair may feel like it’s sinking when it’s actually just stuck at one height.
Test the lever by pulling it up and down while someone sits in the chair. Watch for these signs of a loose linkage:
- The lever moves freely without any resistance
- It flops around without connecting to the mechanism
- The chair doesn’t change height when the lever is pulled
If the lever feels loose, locate the linkage screw beneath the seat and tighten it with an Allen wrench. This is a common fix that takes seconds and requires no parts.
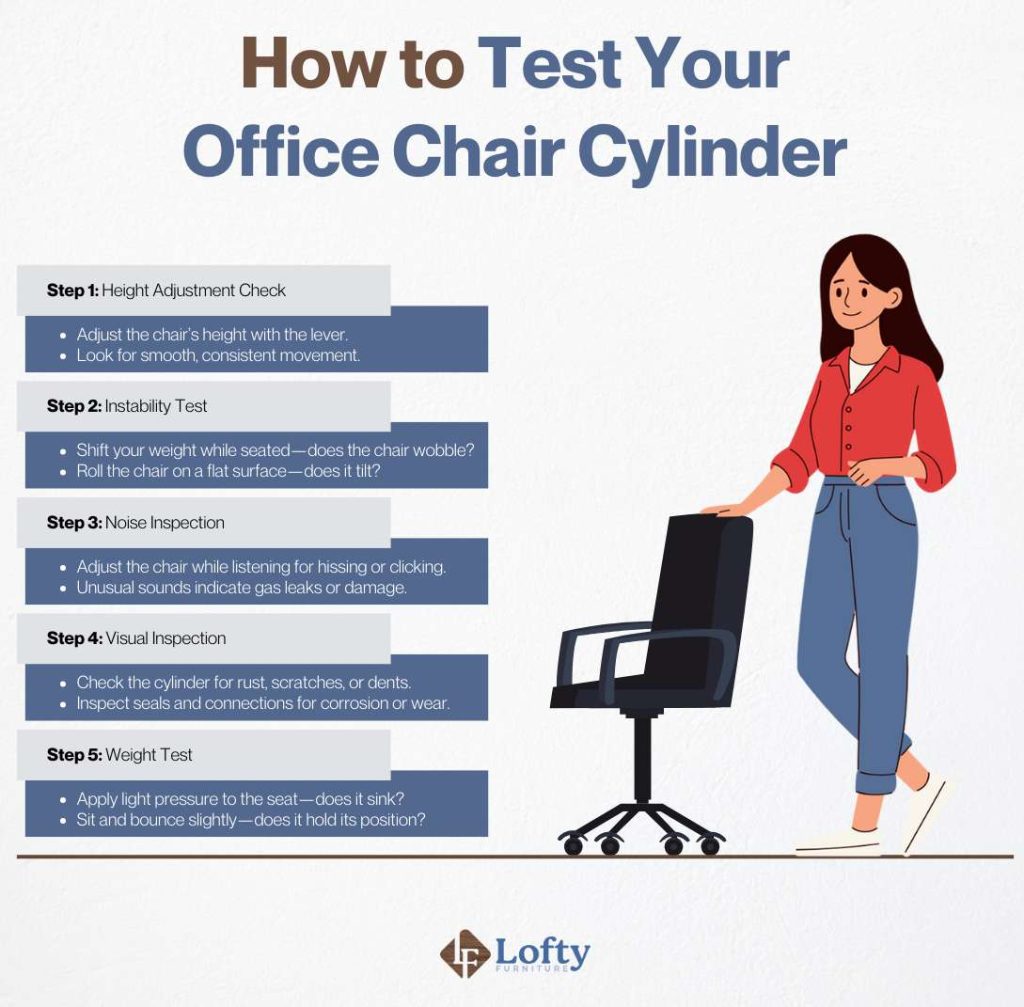
Inspect the Gas Cylinder
Flip your chair upside down to examine the chrome piston rod. This is the visible part of the gas lift that moves up and down inside the base.
Look for these warning signs that indicate cylinder failure:
- Scratches or grooves on the chrome surface
- Rust or corrosion spots
- Dents or deformation on the shaft
- Oil residue wiped away with a dry cloth
Listen carefully when adjusting height. A faint hissing sound means gas is escaping from the cylinder, which confirms it’s failing.
Rule Out Other Problems
Check these less common issues that can mimic sinking:
- Cracked base: Inspect the five-star hub for any splits or warping
- Stuck casters: Wheels that don’t roll freely can make the chair feel unstable
- Missing retaining clip: This metal ring keeps the cylinder seated in the base
If the lever works properly, the base is intact, and you see no visible damage to the piston, the gas cylinder is failing and needs attention.
Restore Chair Height with the Free Inversion Method
If your chair recently started sinking and shows no visible damage, the problem might be settled lubricant inside the cylinder. This free method redistributes the internal oil back toward the seal.
Invert the Chair Overnight
This technique works because gravity pulls the internal lubricant back toward the top of the cylinder where the seal operates.
Follow these steps:
- Lower the chair to its shortest position
- Carefully flip the chair upside down
- Prop it securely against a wall or workbench so it won’t fall
- Leave it inverted for 8 to 12 hours, overnight works best
Extend Before Uprighting
The next morning, do not flip the chair upright yet. Instead, use the height lever to fully extend the cylinder while the chair is still upside down. This draws the lubricated section through the seal to re-establish contact.
After extending, flip the chair upright and sit down gently to test. Many users report immediate stabilization, especially on chairs less than three years old.
Repeat if Needed
For stubborn cases, repeat the inversion process. Some chairs need two or three cycles to fully redistribute the lubricant. While inverted, you can also rotate the piston slightly with pliers wrapped in cloth to align the seal with a different section of the cylinder wall.
Lock Height with a Hose Clamp
A hose clamp provides a fast, inexpensive way to fix a desk chair that won’t stay up. This method permanently locks the chair at your ideal height without requiring any special skills.
Choose the Right Clamp
Select a stainless steel hose clamp with these specifications:
- Diameter: 1/2 inch to 1-1/4 inch
- Material: Stainless steel to resist rust
- Lined or cushioned interior to prevent scratching
These clamps are available at hardware stores, auto parts shops, and online for under five dollars.
Install in Five Minutes
- Adjust the chair to your perfect working height with feet flat on the floor, thighs parallel to the ground, and elbows at 90 degrees when typing
- Clean the cylinder surface with degreaser or alcohol to remove oils
- Position the clamp where the inner piston meets the outer tube
- Tighten gradually with a screwdriver until snug, avoiding overtightening
- Test by sitting in the chair with full body weight
The clamp acts as a mechanical stop that prevents the cylinder from compressing further. One user reported painting their clamp black to blend with the chair, and it still works after ten years.
This method works best for single-user chairs where height adjustment isn’t needed frequently.
Use PVC Pipe as a Permanent Spacer
For a sturdier fixed-height solution, PVC pipe creates a durable mechanical stop that resists compression over years of daily use.
Cut and Fit the Sleeve
- Measure the exposed cylinder length at your desired seat height
- Cut a section of PVC pipe with an inner diameter slightly larger than the piston
- Use a hacksaw to make a lengthwise cut, turning it into a C-shaped sleeve
- Snap the sleeve over the cylinder at the base
For fine-tuning, you can use multiple short segments. Sand the edges smooth and paint the pipe to match your chair if desired.
Why PVC Lasts So Long
PVC pipe has high compressive strength that resists body weight, making it ideal for this application. It doesn’t degrade like tape and resists weather and temperature changes. Several users report PVC spacers still working after a decade of daily use.
Avoid oversized pipes that prevent the cylinder from retracting fully. If the chair won’t lower enough, trim the spacer shorter.
Emergency Fix: Duct Tape Wrap
When you need a immediate solution and nothing else is available, duct tape can provide temporary stability.
Apply Correctly
- Wipe the cylinder clean
- Wrap 5 to 10 tight layers around the piston at your desired height
- Overlap each layer by half
- Press firmly to eliminate air pockets
This is not a long-term solution. The tape degrades under pressure and leaves sticky residue. Use it only as a holding measure while waiting for proper parts.
For better results, apply tape first as a grip layer, then install a hose clamp over it. The tape fills micro-gaps and improves clamp hold.
Replace the Gas Cylinder for a Permanent Fix

Replacing the gas lift cylinder is the only solution that restores full height adjustability and long-term reliability. This costs far less than buying a new chair.
Why Replace Instead of Buying New
Replacement cylinders cost between $14 and $40, while new ergonomic chairs range from $100 to over $500. Replacing the cylinder also keeps your preferred seat shape, backrest contour, and armrest position. You can even upgrade to a higher-capacity cylinder if needed.
A user who weighs over 250 pounds replaced his cylinder with a 1,000-pound capacity model for just $14 and now has effortless support.
Choose the Right Replacement Cylinder
Not all cylinders fit all chairs. You need to match several specifications.
What to Measure
| Specification | How to Measure | Common Values |
|---|---|---|
| Diameter | Width of piston shaft | 50mm most common |
| Collapsed Length | Compressed height | 170-200mm |
| Extended Length | Raised height | Varies by model |
| Top Cap Shape | Connection to seat | Flat, cross, or T |
| Bottom Base | Attaches to wheel hub | Ball socket (95%) |
| Weight Rating | Max user weight | 250-1000 lb |
Always measure your old cylinder before purchasing. Opt for Class 4 rated cylinders, which last up to 10 years and often include a warranty.
Tools You Need for Cylinder Replacement
While some installations require only basic tools, having the right equipment makes the job easier.
Essential tools include:
- Cylinder removal kit with extraction screws and collars
- Rubber mallet or dead blow hammer
- Pipe wrench for stuck bases
- Allen wrench set
- Silicone lubricant for the new cylinder
Wear gloves and eye protection during this repair. Apply silicone lubricant to both ends of the new cylinder before insertion to ease installation and prolong seal life.
Step-by-Step Cylinder Replacement
Plan for 15 to 30 minutes for this moderate-difficulty repair.
Remove the Old Cylinder
Using a removal tool is the best approach. Attach shaft collars to the piston near the base, insert extraction screws into the tool, and turn clockwise with an Allen key. The screws push the cylinder out safely.
For manual removal, place the base on a solid surface and strike the bottom of the cylinder with a rubber mallet. Alternate sides until it pops free. Never use a metal hammer directly on the piston.
Install the New Cylinder
- Verify the top cap matches your seat mechanism
- Insert the piston into the base until fully seated
- Reinstall the washer and retaining clip
- Flip the chair upright
- Test height adjustment with full body weight
Ensure smooth extension and secure locking at all heights. Don’t lose the small bearing inside the base that prevents wobble.
Prevent Your Desk Chair from Sinking Again
Extend your new cylinder’s life with these habits:
- Sit gently into the chair rather than dropping down
- Clean the piston shaft weekly with a dry cloth
- Never apply WD40 or oil to the cylinder
- Choose 500 to 1000 pound rated cylinders if you weigh over 250 pounds
- Store the chair away from heaters and windows
- Lift the chair when moving it rather than rolling over rough surfaces
WD40 is fine for stiff levers or pivot points but never use it on the piston shaft.
Repair vs Replace: Making the Right Decision
| Factor | Repair | Replace |
|---|---|---|
| Cost | $0-$40 | $100-$500+ |
| Time | Minutes to hours | 3-7 days shipping |
| Adjustability | Full after replacement | Full |
| Durability | 3-10 years | 5-10 year warranty |
Replace your chair if it’s over 5-7 years old with multiple issues, if cylinders are proprietary or unavailable, or if you need advanced ergonomic features like lumbar support, headrest, or seat depth adjustment.
Frequently Asked Questions About Fixing a Desk Chair
Can I fix a desk chair without replacing the cylinder?
Yes. Try the free inversion method first for early-stage sinking caused by settled lubricant. Hose clamps and PVC spacers work for temporary fixes without replacing the cylinder.
How do I know if the gas cylinder is bad?
Signs include immediate sinking when you sit down, inability to hold any height, hissing sounds during adjustment, and visible damage to the chrome piston shaft.
Is a hose clamp safe for fixing a desk chair?
Yes, when properly installed. Use a correctly sized stainless steel clamp and avoid overtightening. A lined clamp prevents scratching the cylinder.
Can I repair the inside of a gas cylinder?
No. Gas cylinders are sealed units and cannot be opened safely. Internal repair is impossible and risks injury from pressurized gas.
How long does a gas lift cylinder last?
Under normal use, expect 3 to 7 years. High-quality Class 4 cylinders can last up to 10 years.
Are all replacement cylinders interchangeable?
No. You must match the diameter, collapsed length, extended length, top cap type, and bottom base type. Always measure your existing cylinder before buying.
Key Takeaways for Fixing Your Desk Chair
The most important thing to remember is that a sinking desk chair is almost always fixable, and you likely won’t need to buy a new chair. Start with the free inversion method if your chair recently started sinking with no visible damage. This works surprisingly well for many users and costs nothing.
For a quick permanent fix, the hose clamp method costs under five dollars and takes five minutes to install. It locks your chair at the perfect height indefinitely. PVC pipe offers an even more durable alternative that can last over a decade.
When you need full height adjustability back, replace the gas cylinder for $14 to $40. This is far cheaper than a new chair and restores everything to working condition. Choose a higher-capacity cylinder if you weigh over 250 pounds.
With the right approach, you can save money, reduce waste, and keep the comfortable chair you’ve already broken in. Now go fix that chair and sit tall again.


