
You’ve powered on your mixing desk, mics are live, and the band is waiting for sound check. But where do you actually start? Whether you’re setting up for a live show, podcast, or studio session, knowing how to use a mixing desk is essential for clean, balanced audio. This guide cuts through the complexity with clear, actionable steps based on professional workflows. You’ll learn exactly how to set gain, route signals, apply EQ, manage monitors, and avoid common pitfalls like feedback and distortion.
By the end, you’ll confidently set up any analog or digital mixer, from a compact 6-channel board to a full digital console. Let’s get your mix sounding professional.
Set Up Your Mixer Safely
Before connecting anything, follow the correct power-up sequence to protect your ears and equipment. Starting with all levels at zero prevents loud pops, feedback, or speaker damage.
Power-Down Safety Protocol
Always begin with all levels at minimum:
- Pull channel faders, aux sends, and master fader down completely
- Keep phantom power off until microphones are connected
- This prevents sudden loud noises that can damage speakers
Pro Tip: Label each channel with tape or digital tags so you never lose track during a live set.
Connect Speakers and Monitors
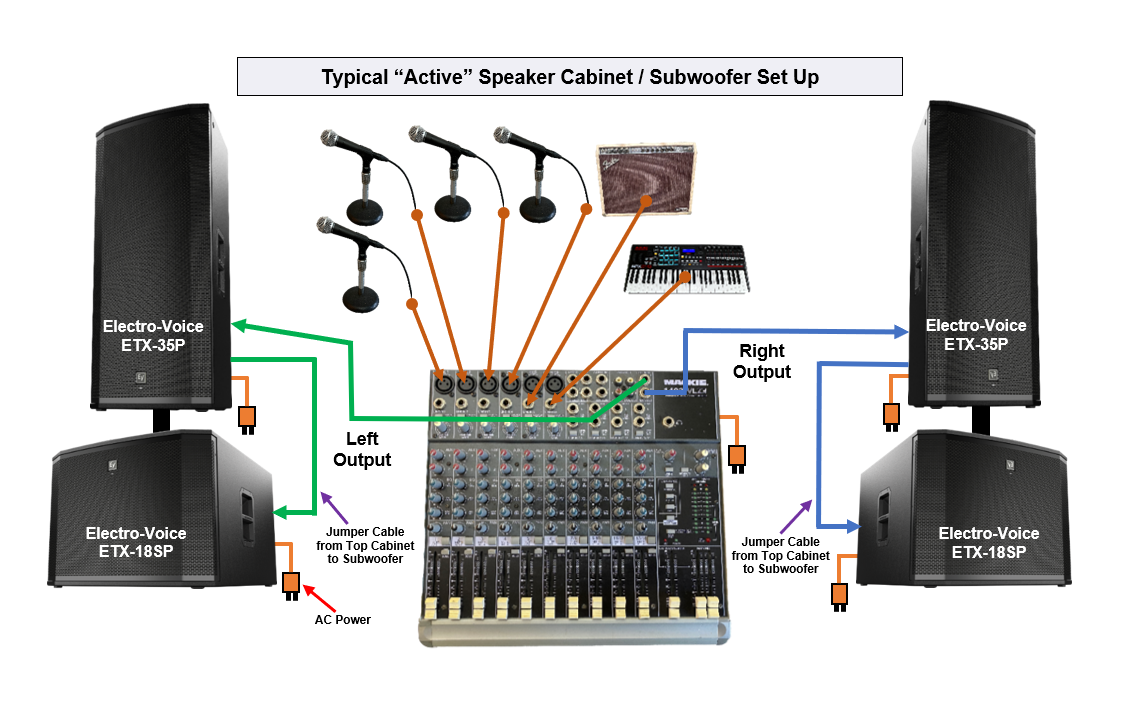
The way you connect outputs determines your entire sound system’s performance. Proper connection prevents damage and ensures optimal audio quality.
Hook Up Main Speakers
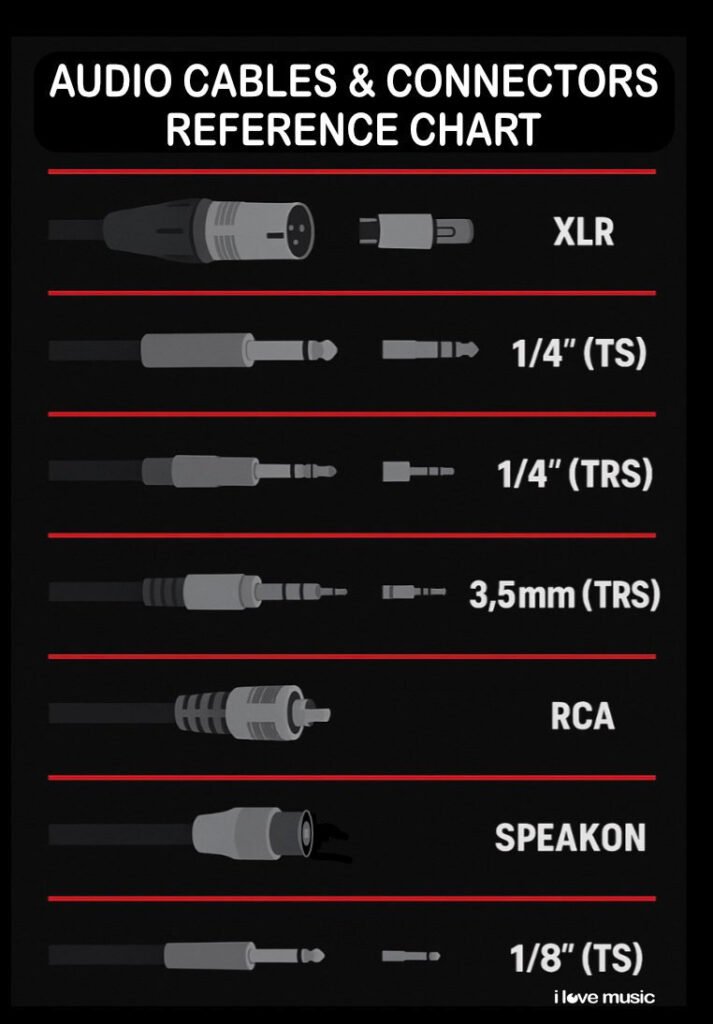
For powered speakers, use XLR or TRS cables from Main Out L/R to speaker inputs. Power on speakers after cabling is complete.
For passive speakers, connect Main Out to Power Amp Input, then Amp Output to Speaker. Match impedance such as 8Ω amp to 8Ω speaker.
Warning: Never plug headphones directly into main outputs. Use the dedicated headphone jack instead.
Route Stage Monitors
Use aux sends to create custom monitor mixes. Connect Aux Send Output to Monitor Input. Set Pre-fader so monitor levels remain consistent even if front-of-house fader moves. Adjust Aux Master knob for overall monitor volume.
Best Practice: Send dry unprocessed signals to monitors. Reverb can confuse performers on stage.
Plug in Your Audio Sources
Each input type requires specific settings to avoid noise, distortion, or damage. Understanding input types is crucial for clean audio.
Connect Microphones
Use XLR cable to XLR input. Dynamic microphones do not need phantom power. Condenser microphones require +48V Phantom Power pressed only after mic is plugged in. Engage Low-Cut Filter on vocal channels to reduce plosives and stage rumble.
Critical Rule: Never engage phantom power on a mic that’s already connected. Risk of pop or damage exists.
Hook Up Instruments
| Instrument | Input Type | Setting |
|---|---|---|
| Electric Guitar/Bass | 1/4″ TS | Press Hi-Z button |
| Keyboard | 1/4″ TRS | Use balanced cable |
| Acoustic Guitar with pickup | XLR or TRS | Use DI box for long runs |
Pro Tip: For instrument runs over 20 feet, use a DI box to convert unbalanced to balanced signal and reduce noise.
Link Playback Devices
To play music or backing tracks, use 3.5mm to dual 1/4″ TRS or RCA to 1/4″ adapter. Connect to 2-Track In or line inputs. Label the channel clearly.
For USB integration, connect mixer USB to computer. Set mixer as default audio device in operating system. In DAW, select mixer as input/output interface.
Master Gain Staging
This is the foundation of a clean mix. Poor gain causes noise or clipping, and no amount of EQ can fix it afterward.
Set Channel Gain Correctly
- Mute other channels or use PFL to isolate the signal
- Set fader at 0 dB, EQ flat, aux sends off
- Ask performer to hit peak level by shouting or strumming hard
- Slowly turn Gain knob until Clip LED flashes occasionally, analog meter peaks at 0 dB, or digital meter hits -12 dBFS to -6 dBFS for headroom
- If signal clips at low gain, press Pad button for -20dB attenuation
Golden Rule: Gain should be set before touching faders. This fundamental principle is called gain staging.
Warning: Never raise the fader to compensate for low gain. This only amplifies noise.
Balance the Main Mix
Now that inputs are hot but clean, build your stereo mix systematically. Proper balance creates clarity and prevents individual elements from drowning others out.
Use Faders and Panning
Raise channel faders to balance levels. Start with rhythm section at 0 dB, then bring others in gradually. Use Pan control to place sounds across the stereo field. Center placement works for lead vocal, kick, and snare. Slight left or right works for rhythm guitar and keys. Hard left or right works for hi-hat and backing vocals.
Pro Tip: Pan in a way that mirrors the stage layout. Audience expects natural placement.
Route to Main Output
Press L/R button on each channel to send to main mix. Avoid routing to subgroups unless recording or processing stems specifically requires it.
Apply EQ Like a Pro
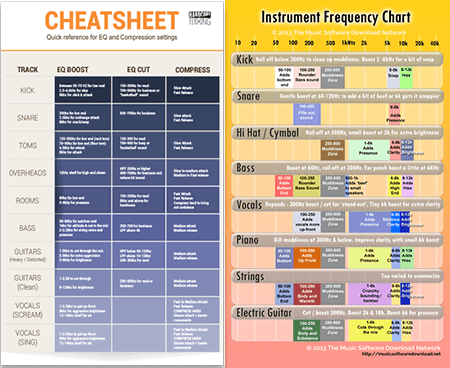
Tone shaping makes or breaks clarity. Use subtractive EQ first for cleaner results.
Use 3-Band or Sweepable EQ
Most mixers offer Low at 80-120 Hz for kick adjustment, Mid at adjustable or fixed frequency for vocal presence, and High at 10-12 kHz for adding air or cutting harshness.
EQ Best Practices: Cut before you boost. Removing boxiness at 200-500 Hz clears space in the mix. Apply HPF on all non-bass channels at 75-100 Hz to remove rumble. Boost 1-3 kHz on vocals for intelligibility. Add 4-6 kHz on snare for attack. Use 8-12 kHz sparingly because too much causes listener fatigue.
Example: On a muddy vocal, cut 300 Hz by 3 dB instead of boosting highs.
Use Aux Sends for Monitors and Effects

Aux buses are powerful tools for routing audio where it’s needed. Understanding aux routing separates amateur operators from professionals.
Create Monitor Mixes
Set Aux Send to Pre-fader position. Turn up send level on vocal and guitar channels. Adjust Aux Master knob for final monitor volume. Repeat process for multiple monitor mixes such as separate mixes for drummer versus singer.
Tip: Use separate aux buses for monitors and effects to avoid crosstalk between the two.
Send to Reverb or Delay
For post-fader effects where wet/dry follows fader position, connect FX Send Out to Reverb Unit Input. Connect Reverb Output to FX Return on mixer. Unmute FX Return channel and set fader to 0 dB. Turn up FX Send on desired channels starting at 20-30%, then increase subtly to taste.
Best Practice: Keep reverb light. Just enough to add space, not drown the mix.
Control Dynamics with Compression
Some mixers have built-in compressors. Use them wisely to enhance rather than destroy your audio.
One-Knob Compressor Settings
Engage on dynamic vocals that go from soft to loud. Adjust until gain reduction hits 2-4 dB on peaks. Use makeup gain to restore volume. Disable if voice sounds squashed or unnatural.
Warning: Over-compression kills dynamics. Only use when necessary.
For gating, use on drum mics to reduce bleed. Set threshold so mic mutes when not being played.
Record Your Mix
Whether podcasting or recording live tracks, correct routing ensures you capture your mix properly.
USB Recording Stereo Mix
On mixers with USB capability, the main L/R mix records directly to computer or USB drive. This is ideal for podcasts, live streams, and simple backups. In DAW, set mixer as interface and arm stereo track.
Multitrack Recording via Subgroups
For post-production flexibility, assign drums to Sub 1/2 and vocals to Sub 3/4. Connect Sub Out to Audio Interface. In DAW, arm separate tracks for each input. Keep sub faders at 0 dB for unity gain.
Pro Tip: Use direct outs if available to record unprocessed signals for reamping later.
Prevent Feedback
Feedback ruins live sound. Stop it before it starts by following these prevention tactics.
Feedback Prevention Strategies
Position speakers in front of mics, facing audience. Use cardioid microphones because they reject rear sound. Engage Low-Cut Filter on all vocal channels. Keep monitor volume at reasonable levels. During soundcheck, slowly raise master fader until feedback starts, then use sweepable mid EQ to cut 3-6 dB at the ringing frequency.
Pro Tip: Save a feedback sweep scene on digital mixers for quick recall during shows.
Monitor and Solo Correctly
Use PFL and AFL to troubleshoot and refine your mix without disturbing the audience.
Use PFL for Gain Checks
Press PFL button to hear signal before the fader. This is perfect for setting gain without affecting main mix. Check each channel during soundcheck using this method.
Use AFL for Mix Balance
Press AFL button to hear channel in context after the fader. Verify balance and panning decisions. Use with headphones while audience is present.
Warning: Do not leave PFL active. It sends full signal to headphones and may cause feedback loops.
Final Sound Check Routine
Test everything before going live. A thorough sound check prevents disasters during the actual performance.
Complete Sound Check Steps
- Set master fader to 0 dB
- Bring up one channel at a time and ask Can you hear yourself
- Play full song and check for clipping, muddiness, and feedback
- Walk into audience area and listen from their perspective
- Save scene on digital mixers for quick recall
Pro Tip: Save multiple scenes such as Soundcheck, Live, and Speech for different modes.
Maintain Your Mixer
Long-term care keeps your desk reliable and performing at its best.
Daily Best Practices
Follow correct power-on order with speakers last and mixer first off. Label all channels clearly. Use gaffer tape for cable management. Cover mixer when not in use.
Long-Term Maintenance
Clean faders and knobs every 6-12 months with contact cleaner such as DeoxIT. Store in dry, temperature-controlled space. Update firmware on digital mixers regularly.
Troubleshoot Common Issues
Fix problems fast with this quick-reference guide.
No Sound
Check mute button, fader position, and routing such as L/R button pressed. Verify speaker power and cable connections.
Distortion
Gain is too high, so lower and re-set. Engage Pad for line-level signals. Check master fader isn’t overdriving output.
Hum or Buzz
Likely ground loop, so use balanced cables. Try lifting ground on DI box or amp. Avoid running audio cables next to power cables.
USB Not Working
Install manufacturer driver for Windows. Set mixer as default audio device. Restart DAW application.
Know Your Mixer Type
Choose the right tool for your specific job.
Analog Mixers
Analog mixers offer hands-on control, zero latency, and warm sound character. Best for simple setups, live speech, and small bands. Examples include Mackie ProFX12v3 and Yamaha MG10XU.
Digital Mixers
Digital mixers offer scene recall, built-in effects, USB multi-track, and remote control. Best for complex shows, touring, and recording. Examples include Behringer X32 and Allen & Heath Qu-16.
Key Insight: Digital doesn’t replace analog. It expands possibilities. Use digital when you need recall, routing flexibility, or remote control.
Optimize for Different Uses
Tailor your setup to the specific application.
For Podcasting
Use 2-4 microphones and enable gating to mute unused mics. Route music to 2-Track In and duck under voice. Record stereo mix via USB.
For Live Band
Group drums to subgroup and control as one unit. Send reverb to vocals and snare only. Use aux monitors for each performer.
For DJing
Route turntables to phono inputs with RIAA EQ. Use crossfader for track blending. Add effects via aux sends.
Frequently Asked Questions About Mixing Desks
What is a mixing desk used for?
A mixing desk combines multiple audio signals from microphones, instruments, and playback devices. It controls volume, applies EQ, routes signals to speakers or monitors, and can send audio to recording devices. Mixers are essential for live sound, recording, podcasting, and broadcasting.
How many channels do I need for a band?
A typical band with drums, two vocalists, two guitars, and keyboard needs 12-16 channels minimum. Add extra channels for backup mics and playback. Always have 2 extra channels available for flexibility.
Do I need phantom power for all microphones?
No. Dynamic microphones do not need phantom power and can be damaged by it. Condenser microphones require +48V phantom power. Only enable phantom power on channels with condenser mics connected.
Can I use a mixing desk with a computer DAW?
Yes. Modern mixers connect via USB and function as audio interfaces. You can record multiple inputs to your DAW while using the mixer for real-time monitoring. Install manufacturer drivers for best performance on Windows systems.
What is gain staging and why does it matter?
Gain staging sets the input sensitivity for each channel so the signal is strong without clipping. Proper gain ensures optimal signal-to-noise ratio. Poor gain causes hiss or distortion that EQ cannot fix later.
How do I prevent audio feedback?
Position speakers in front of microphones facing the audience. Use directional cardioid microphones. Engage low-cut filters on vocal channels. Keep monitor volumes moderate. Use EQ to cut ringing frequencies during soundcheck.
Key Takeaways for Using a Mixing Desk
Mastering how to use a mixing desk isn’t about memorizing every knob. It’s about understanding signal flow, gain staging, and routing fundamentals. Once you’ve set gain correctly and routed signals properly, everything else falls into place naturally.
The most critical steps are setting gain before touching faders, routing channels to main outputs, using aux sends for monitors separately from effects, and applying subtle EQ rather than extreme changes. Practice with one mic and one instrument first, then scale up to more complex setups.
With this guide, you’re ready to mix confidently in any environment from small podcast setups to full live concerts.


