
You just unboxed your new standing desk and are ready to upgrade your workspace, but one question remains: how do you actually set the height? Getting this right is not just about comfort, it is about protecting your posture, preventing strain, and making the most of your investment. Whether you are switching from sitting to standing, sharing the desk with others, or programming memory presets for seamless transitions, knowing how to correctly set and save your ideal height is essential for long-term health and productivity.
Most electric standing desks come with programmable memory buttons like M1 and M2, plus digital controls that make adjusting easy, but only if you know how to use them. This guide walks you through everything: measuring your perfect ergonomic height based on your body type, saving presets, setting safety limits, and troubleshooting common issues. You will also learn how accessories, footwear, and posture affect your setup so you can fine-tune your desk like a pro.
Find Your Ideal Desk Height
Use the 90-Degree Elbow Rule
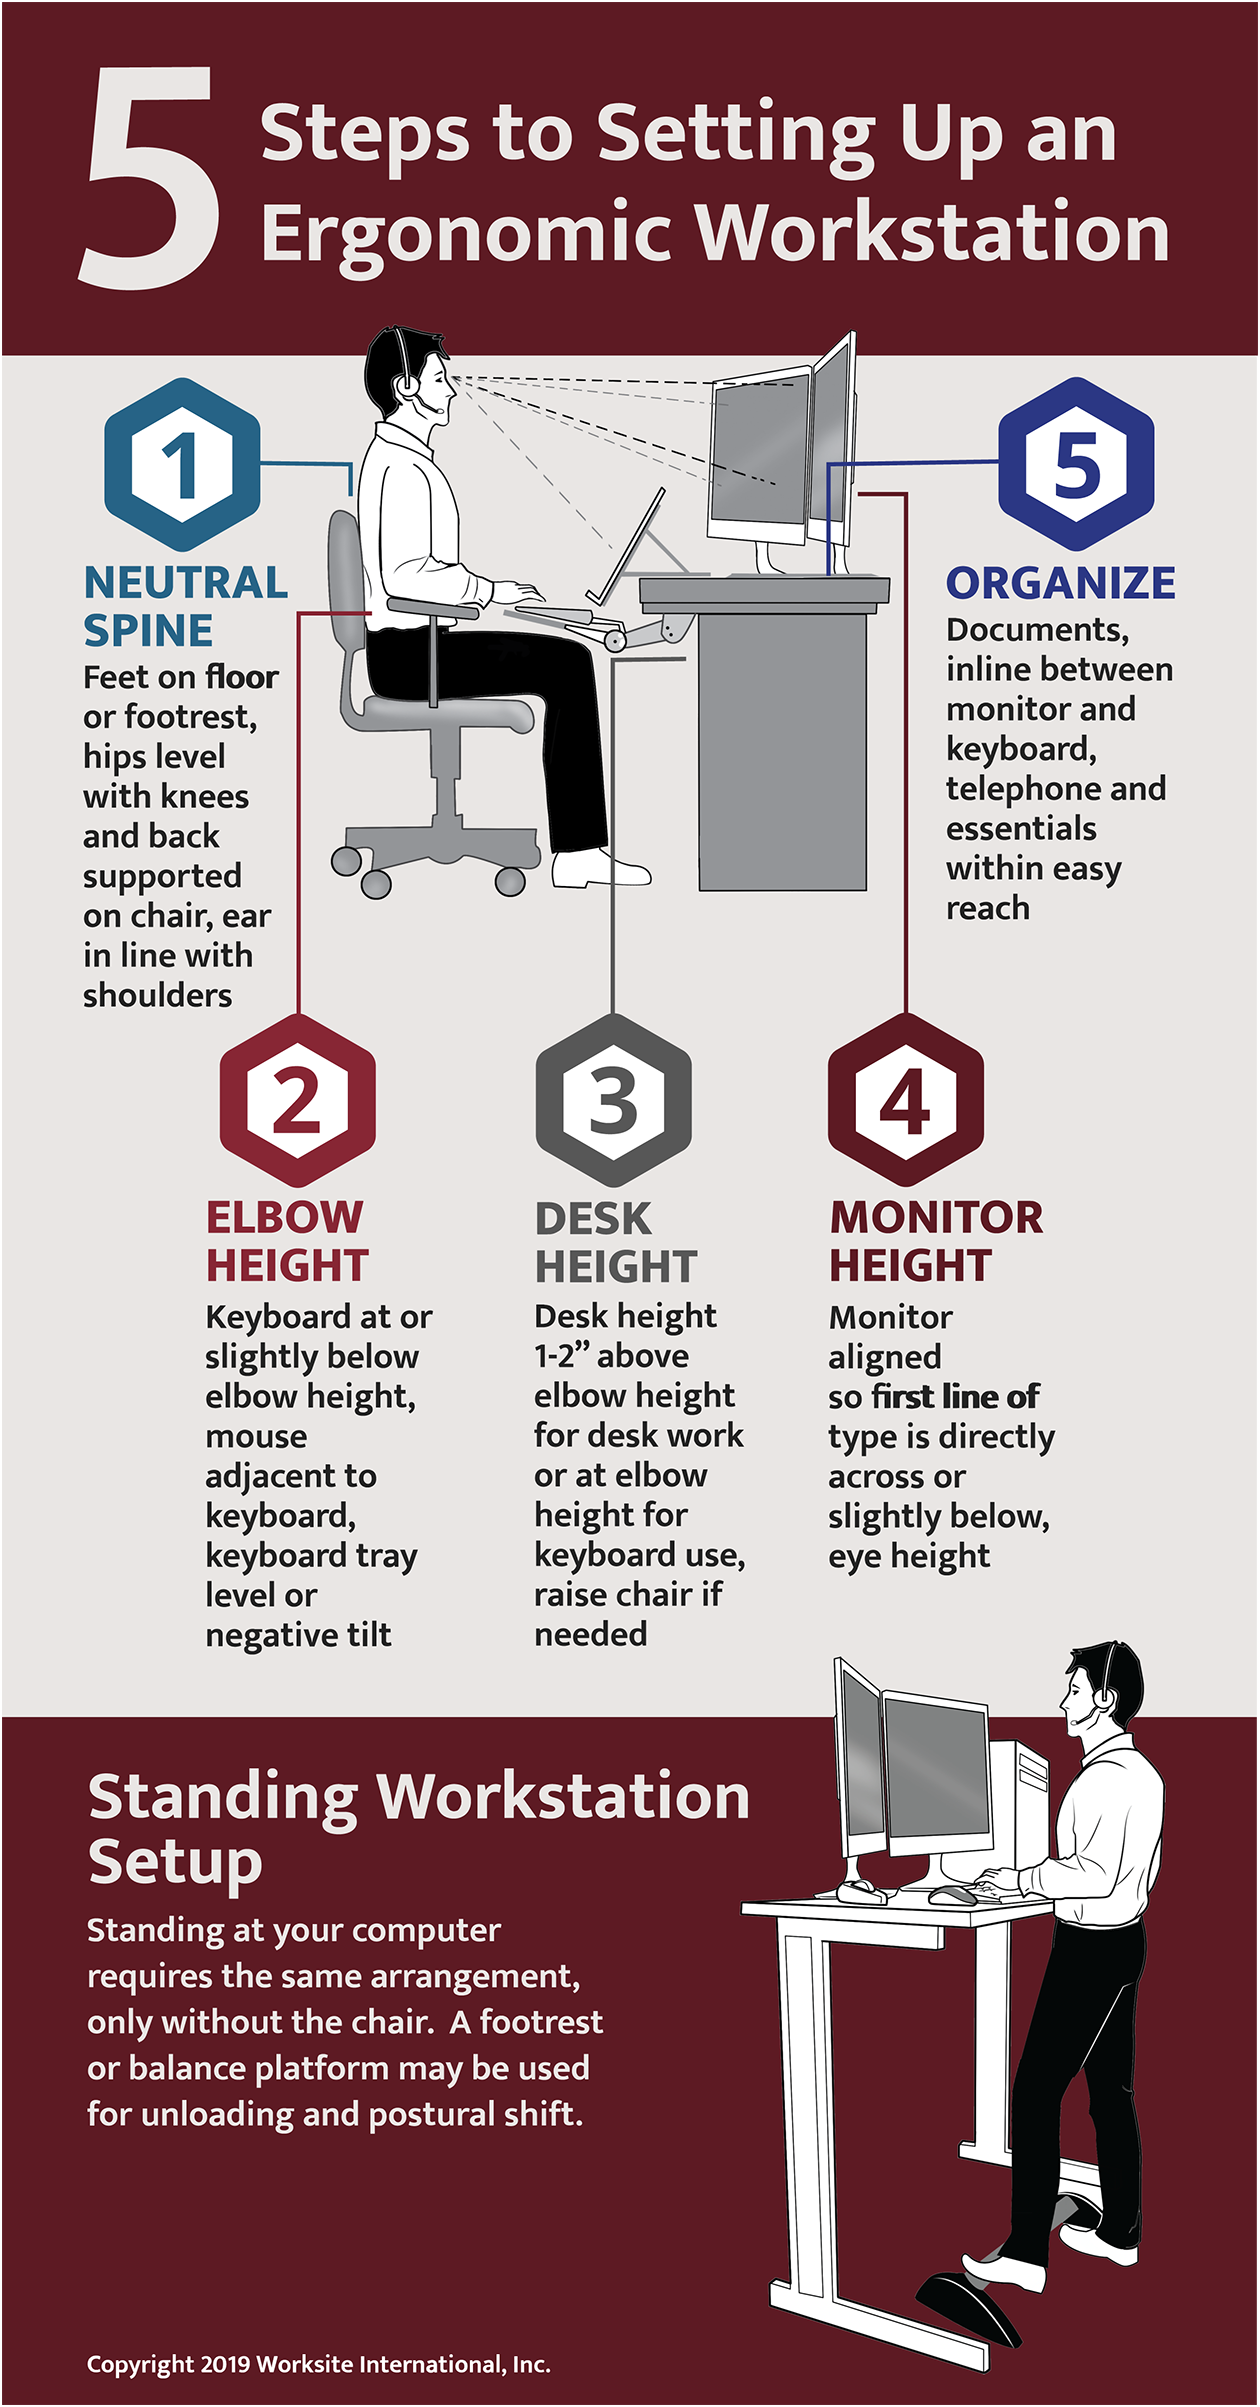
The fastest way to set your desk height is the elbow rule: adjust the desk so your elbows form a 90-degree angle when typing. This keeps your shoulders relaxed, wrists neutral, and arms parallel to the floor.
For standing, stand barefoot or in typical work shoes, arms at your sides, and bend your elbows as if typing. Measure from the floor to your elbow. That is your baseline. Add 1 to 2 inches to account for keyboard thickness and wrist alignment.
For sitting, sit in your usual chair with feet flat and knees at 90 degrees. Bend your elbows to 90 degrees and measure from the floor to your elbow. Match the desk to this height.
Pro Tip: Always measure while wearing your regular work shoes. Heels or thick soles can add up to 2 inches, throwing off your entire setup.
Match Height to Your Stature
If you want a quick starting point, use this height guide based on user height:
| User Height | Standing Desk Height | Seated Desk Height |
|---|---|---|
| 5’0″–5’3″ | 36–39 inches | 22–25 inches |
| 5’4″–5’7″ | 38–42 inches | 23–26 inches |
| 5’8″–5’11” | 41–45 inches | 25–28 inches |
| 6’0″–6’3″ | 43–47 inches | 27–30 inches |
| 6’4″+ | 46–49 inches | 28–31 inches |
These ranges are based on anthropometric data and include room for monitor stands, keyboard trays, and shoe height. But remember, charts are just estimates. Always verify with personal measurement.
Adjust for Accessories and Posture
Your ideal height changes if you use a thick desktop, which adds 1 to 2 inches. A keyboard tray may lower effective height. An ergonomic or split keyboard is often thinner. A wrist rest requires slight desk lowering.
Even your posture matters. Slouching or leaning forward means your arms are not in a true 90-degree position. Stand or sit naturally with spine neutral and shoulders relaxed before measuring.
Warning: Never copy a coworker is preset. Two people the same height can have different arm lengths or sitting styles, leading to poor ergonomics.
Program Memory Presets
Save Your Sitting Height
Follow these steps to save your seated position:
- Lower the desk to your seated working height.
- Sit in your chair with feet flat and elbows at 90 degrees.
- Press and hold M1 for 5 to 6 seconds until you hear a beep.
- The sitting height is now saved.
Note: On UPLIFT or FlexiSpot desks, the display may flash or show a confirmation code like SA or S-.
Save Your Standing Height
Follow these steps to save your standing position:
- Raise the desk to your standing position.
- Stand naturally with arms bent at 90 degrees and wrists neutral.
- Press and hold M2 for 5 to 6 seconds until it beeps.
- The standing height is now stored.
Test and Refine Presets
Press M1 and M2 to confirm smooth transitions. If the height feels off, make small adjustments using the Up/Down buttons. Reprogram the button by holding it again for 5 to 6 seconds. Retest until the position feels natural.
Pro Tip: Use M3 or M4 for alternate positions, like a higher setting for writing or a lower one for focused typing.
Reprogram When Needed
Update for New Equipment
Any change in your setup may require reprogramming. This includes a new chair or stool, a thicker desk surface, a monitor riser or dual-arm mount, or a footrest or anti-fatigue mat. Simply move the desk to the new ideal height and hold the memory button to overwrite the old setting.
Adjust for Shared Use
In shared offices or home workspaces, assign each user their own preset. Label buttons with names or colors if needed. Each user should measure their height independently, not guess.
Expert Note: Some desks like UPLIFT support companion apps that store user profiles, making switching even easier.
Set Min and Max Height Limits
Limit Travel Range on UPLIFT Desks
High-end desks let you cap how high or low the desk moves. This is useful for avoiding collisions or saving time.
To set maximum height, raise the desk to your desired max height. Ensure the last button pressed was UP. Press and hold M until the display flashes S-. Release, then press M two more times quickly. The display shows 999, and the max height is set.
To set minimum height, lower the desk to your desired minimum. Ensure the last button pressed was DOWN. Press and hold M until S- appears. Press M twice more. The display shows 000, and the min height is set.
Caution: Saved presets outside the new range will fail. Reset them after setting limits.
Remove Height Restrictions
To restore full range, move the desk outside current limits. Press and hold M until S- flashes. Press M repeatedly until the display shows 555. Wait a few seconds, and limits are cleared.
Important: You must remove min/max limits before performing a factory reset, which requires the desk to reach its lowest point.
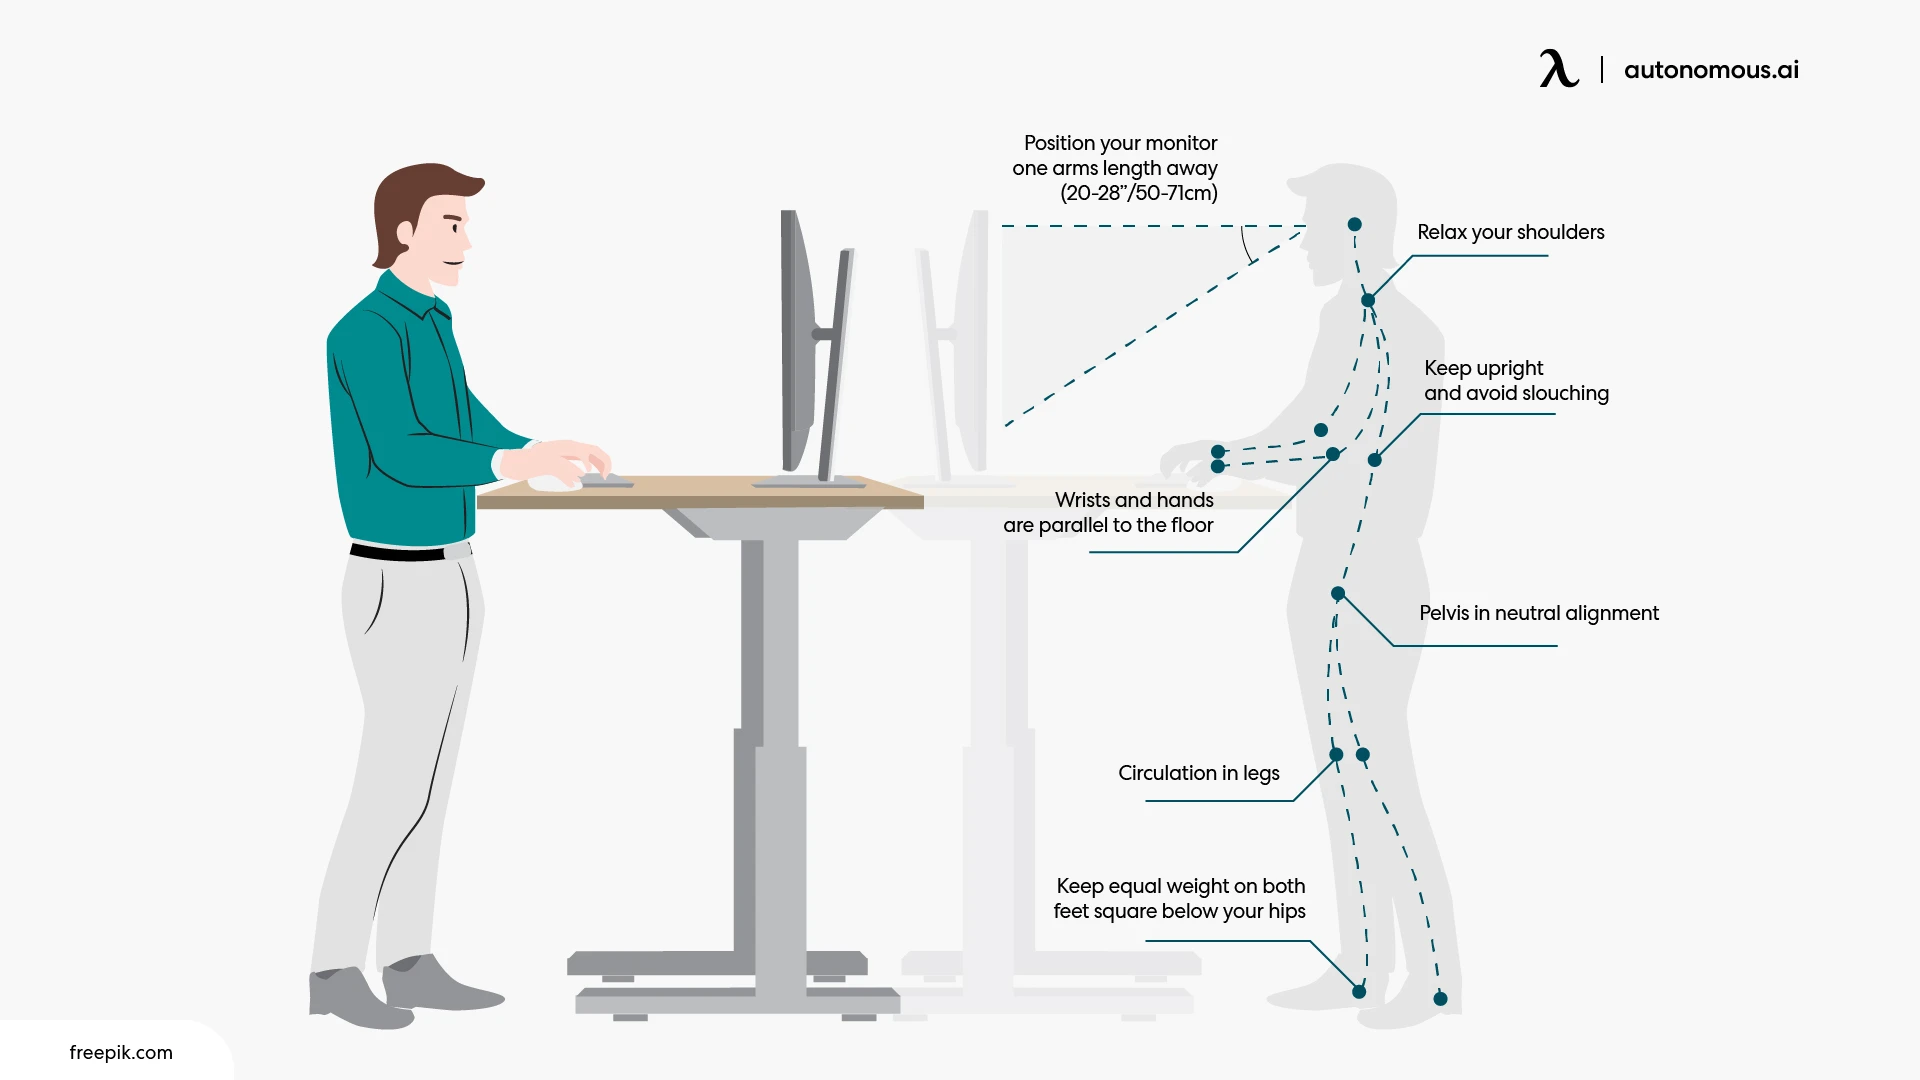
Optimize Your Ergonomic Setup
Position Your Monitor Correctly
The top of your screen should be at or slightly below eye level. Distance should be 18 to 30 inches from your face. Tilt the screen back 10 to 20 degrees to reduce glare. Use a monitor arm for precise height and angle control.
Why it matters: A screen that is too high causes neck strain. Too low leads to hunching.
Align Keyboard and Mouse
Keep both on the same plane as your desk. Elbows should be close to your body with forearms parallel to the floor. Wrists should stay straight with no upward or sideways bending. Use negative tilt if possible, where the front of the keyboard is lower than the back.
Consider an ergonomic keyboard or split design for long-term comfort.
Choose the Right Chair and Accessories
Chair height should allow feet flat on the floor with knees at 90 degrees and thighs parallel to the floor. Lumbar support should match your lower back curve. When standing, use an anti-fatigue mat to reduce leg strain. When sitting, add a footrest if your feet do not reach the floor.
Bonus: Use a balance board or under-desk bike to stay active while working.
Control Lighting and Glare
Avoid overhead lights shining directly on your screen. Use dual lighting with ambient plus task lamp. Place lights to the side of the monitor. Consider blue light filters or warm-toned bulbs.
Avoid Common Mistakes
These errors can undermine your ergonomic setup:
- Relying only on charts, which do not account for arm length, chair height, or posture.
- Ignoring your shoes, since wearing heels changes your effective height.
- Skipping accessory adjustments when adding a thick desktop or monitor riser.
- Copying presets from a coworker instead of measuring your own height.
- Letting presets go stale without rechecking every 6 months or after major changes.
Key Point: Always use your own body as the guide. Your body changes over time, and so should your desk settings.
Troubleshoot Height Issues
Preset Will Not Save
Cause: Button not held long enough. Fix: Press and hold the memory button for a full 5 to 6 seconds until you hear a beep.
Controller Is Unresponsive
Cause: Sleep mode or power glitch. Fix: Press any button to wake it. If still dead, unplug for 30 seconds, then reconnect.
Presets Reset After Power Outage
Cause: Power surge or loss. Fix: Use a surge protector or UPS. Reprogram presets after power returns.
Desk Stops Mid-Movement
Cause: Anti-collision sensor triggered. Fix: Check for cables, rugs, or furniture blocking the legs. Clear the obstruction and retry.
Uneven Movement or Noise
Cause: Misaligned legs or debris in the track. Fix: Inspect the frame, clean the sliders, and tighten bolts. Contact support if wobbling persists.
Maintain Your Desk
Clean Regularly
Wipe the control panel with a dry or slightly damp cloth. Dust the frame and motor housings monthly. Avoid harsh cleaners or excess moisture.
Inspect Cables and Connections
Check the power cord for fraying. Ensure the plug fits snugly into the outlet. Use a surge protector to prevent electrical damage.
Test Features Monthly
Run the desk through its full range of motion. Verify presets respond correctly. Recalibrate anti-collision if needed.
Pro Tip: Schedule a desk checkup every 3 months, like a tune-up for your workspace.
Model-Specific Tips
FlexiSpot Desks
The E5, E7, and E7 Plus models feature M1, M2, and M3 for three presets. The E7 Plus reaches up to 51.6 inches, which is enough for tall users. The 47-inch mark is sufficient for most users, with extra height reserved for monitors and stands.
UPLIFT Desks
UPLIFT desks feature a digital display showing exact height in inches. The min/max limits use a unique programming sequence via the M button. You must remove min/max limits before performing a factory reset. Call 1-800-531-3746 for help with advanced features.
Maximize Comfort and Productivity
Use an Anti-Fatigue Mat
Standing all day is tough. A cushioned mat reduces pressure on joints and encourages subtle movement, keeping you comfortable longer.
Transition Gradually
Start with 15 to 30 minutes of standing per hour. Increase over 2 to 4 weeks to avoid soreness.
Alternate Every 30 to 60 Minutes
Use a timer or app to prompt position changes. Frequent shifts reduce fatigue and boost circulation.
Move While Standing
Shift your weight, stretch, or use a balance board. Movement prevents stiffness and improves focus.
Reassess Regularly
Your body changes. Recheck your desk height every 6 months or after new shoes, a new chair, an injury, or a change in work routine.
Try a Desk Height Calculator
Many brands offer online tools. Input your height with shoes and get a personalized recommendation, which serves as a great starting point before fine-tuning.
Frequently Asked Questions About Setting Standing Desk Height
How do I set the memory on a standing desk?
Adjust the desk to your desired height using the Up or Down buttons. Then press and hold a memory button like M1 for 5 to 6 seconds until you hear a confirmation beep. The height is now saved.
How do I reprogram a preset?
Move the desk to the new desired height. Press and hold the memory button for 5 to 6 seconds to overwrite the old setting. Wait for the beep, then test the updated preset.
Should I adjust desk height for a wrist rest or ergonomic keyboard?
Yes. A thick wrist rest may require lowering the desk by about half an inch. Angled or split keyboards may also need minor height adjustments to maintain neutral wrist position.
Is 47 inches high enough for tall users?
Yes. Even users over 6 feet tall typically need only 43 to 45 inches for proper ergonomics. Higher settings accommodate monitors, stands, and other accessories.
How often should I check my desk height?
At least twice a year, or whenever you change shoes, chairs, or add new desk accessories. Physical changes like posture improvements or weight shifts may also warrant recalibration.
Can I set minimum and maximum height limits?
Yes, on certain models like UPLIFT and some FlexiSpot desks. This restricts the desk is range to prevent overextension or collisions with overhead objects.
Key Takeaways for Perfect Standing Desk Height
Setting the right height on your standing desk is more than a one-time adjustment. It is an ongoing process of personalization and refinement. By combining data-driven guidelines with real-world testing, you can create a workspace that supports your body, boosts your energy, and enhances your productivity.
The most important points to remember are these. First, use the 90-degree elbow rule plus 1 to 2 inches as your foundation, and always measure while wearing your typical work shoes. Second, program your presets using M1 and M2 for seamless transitions between sitting and standing throughout the day. Third, account for shoes, accessories, and posture when setting and reprogramming, and recheck your settings every 6 months or after major equipment changes.
Now that you know how to set height on a standing desk the right way, you are ready to stand taller, literally and figuratively, in your workday. Take 15 minutes to measure, program, and test your setup today. Your back, neck, and productivity will thank you.


