
Mounting a surge protector under your desk is one of the simplest ways to eliminate cable clutter and reduce tripping hazards in your workspace. If cords are dangling from your desk edge or tangling across the floor, securing a surge protector underneath creates a clean, organized setup that improves both function and aesthetics. This guide covers every proven mounting method, from screw installation to adhesive strips and zip ties, so you can choose the approach that fits your desk type, tools, and long-term needs.
Choose the Right Surge Protector for Under-Desk Mounting
Not every surge protector works for under-desk installation. Selecting the right model before you begin determines how securely it will attach and how well it performs over time.
Look for Mounting Holes
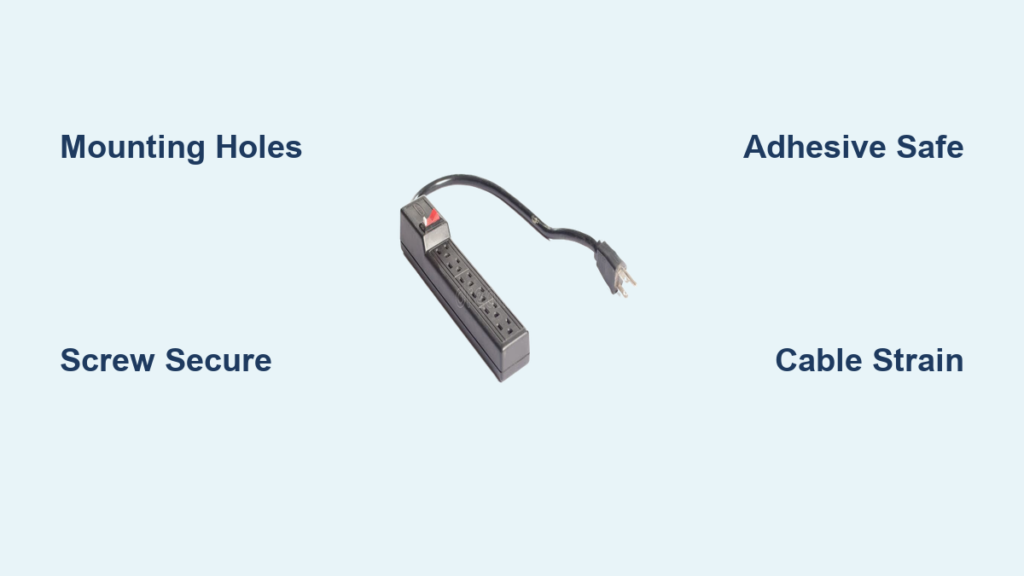
The ideal surge protector has keyhole slots or round mounting holes at both ends. These allow you to secure the unit with screws or zip ties. The ED-SURGE-615 model features dual mounting slots specifically designed for this purpose. The UPLIFT 8-outlet surge protector also includes pre-drilled holes for secure attachment to desks.
Prioritize Perpendicular Outlets
Surge protectors with perpendicular outlets let large AC adapters plug in without blocking adjacent outlets. This design reduces strain on cords and makes every outlet accessible. Standard parallel outlets often cause bulky transformers to occupy two spots simultaneously.
Check Build Quality and Protection Rating
Metal-cased models offer superior durability for under-desk use. Higher joule ratings, such as 1150J, indicate stronger surge protection capability. Look for indicator lights that confirm active protection status, so you know your devices remain safe.
Pro Tip: Avoid cheap power strips without mounting options. They lack secure attachment points and often fail under the weight and pull of multiple cables.
Assess Your Desk Material and Thickness Before Installing
Your desk material determines which mounting methods will hold securely over time. Taking a few minutes to evaluate your desk prevents installation failures.
Common Desk Types and Their Properties
Particleboard and MDF desks are common in budget furniture like the IKEA Trotten. These materials typically measure 0.75 to 0.8 inches thick and can split under screw tension. Solid wood and plywood desks offer stronger holding power for screws. Laminate desks have a decorative surface that may hide weaker core material.
Measure Before You Commit
Use a ruler or caliper to measure your desk thickness. For screw mounting, ensure at least half an inch of solid material exists behind the surface. Thin desks under half an inch cannot hold screws securely and will pull through over time.
Warning: Screws in thin particleboard desks can loosen and pull through, especially when you frequently plug and unplug devices.
Screw Mounting: The Most Reliable Method

Screw mounting provides maximum stability and long-term reliability for permanent desk setups. This method outperforms all adhesive options when properly installed.
When to Choose Screw Mounting
Screw mounting works best on solid wood, thick plywood, or metal-framed desks. Choose this method for home offices where permanence is acceptable. It pairs perfectly with surge protectors that have dual mounting holes on both ends.
Installation Steps
Position the surge protector where cables reach comfortably without stretching. Mark the hole locations using the tape alignment technique described in the next section. Drive pan-head wood screws flush into the desk underside, using 5/8-inch screws for 1-inch thick desks. Slide the surge protector onto the screws and tighten until secure. Use washers or nuts if your model includes them for added stability.
Pros and Cons of Screw Mounting
This method delivers unmatched durability and handles heavy cable loads without maintenance. However, it leaves permanent holes in your desk and may violate rental agreements. The risk of splitting exists on thin particleboard desks.
Tape Alignment Technique for Perfect Screw Placement
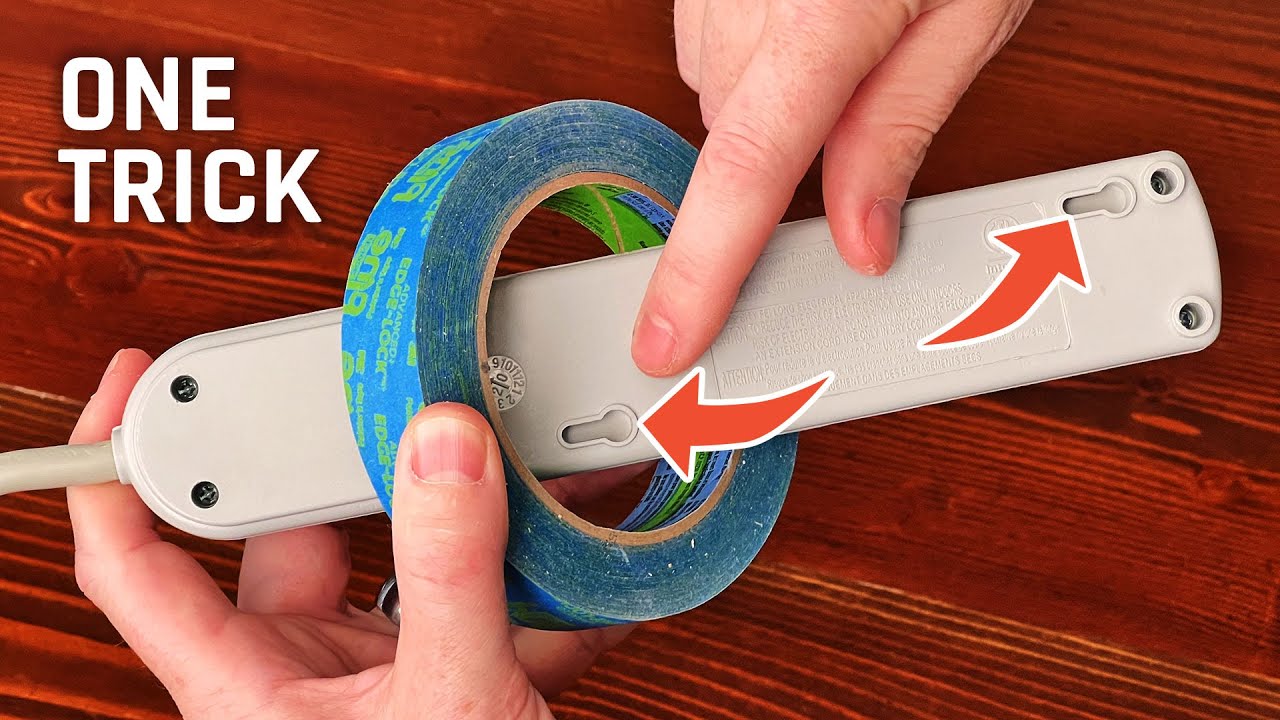
The tape method eliminates measuring and guesswork, ensuring your screws align perfectly with the mounting holes every time.
Why Tape Works Better Than Measuring
Holding a ruler under a desk while marking positions invites misalignment. The tape method uses the surge protector itself as the template, guaranteeing accurate hole placement without special tools.
Step-by-Step Tape Process
Cut a piece of painter’s tape and stick it over one mounting hole on the surge protector. Hold the unit in position under the desk. Press a pencil or screwdriver tip through the tape into the hole to mark the spot. Remove the surge protector and repeat for the second hole. Drill or drive screws into the marked positions, then slide the unit onto the screws and tighten.
Expert Note: Use pan-head wood screws ranging from 1/4 inch to 5/8 inch long. Avoid oversized screws that could pierce through the desk surface.
Adhesive Solutions for No-Drill Mounting
When you cannot drill into your desk, adhesives provide an alternative that leaves no permanent damage. These work best for lighter loads in appropriate environments.
Best Adhesive Options
3M Command Strips offer clean, residue-free removal. 3M High-Bond Tape provides industrial-strength holding power. Alien Tape delivers high shear resistance used in commercial spaces. Heavy-duty Velcro strips allow reuse but can degrade in warm conditions.
How to Apply Adhesives Correctly
Clean the desk surface with isopropyl alcohol to remove dust and oils. Wipe dry and allow complete drying time. Apply tape or strips across the entire back of the surge protector, not just the edges. Press firmly for 30 seconds to ensure contact. Wait 24 hours before plugging in any devices to let the adhesive cure fully.
Why Adhesives Eventually Fail
Heat buildup from electronics weakens glue bonds over time. Cable pull creates constant strain that adhesives cannot withstand indefinitely. Limited surface contact reduces grip strength. Warm rooms accelerate adhesive degradation significantly.
User Feedback: One user reported that adhesive mounting “works for a few months maybe and then the adhesive gives way.”
Velcro and Double-Sided Tape Options
Velcro and tape solutions work for temporary setups but require careful application to maximize their limited lifespan.
Velcro: Application and Limitations
Use industrial-strength hook-and-loop strips for the best results. Apply three full-length strips along the back of the surge protector rather than small squares. This method works well in cool, dry environments but fails faster in warm rooms or direct sunlight.
Double-Sided Tape Best Practices
Premium brands like SANKA waterproof tape outperform generic versions. Ensure full contact with no air bubbles between the tape and desk surface. Avoid applying tape on curved or uneven surfaces where contact will be incomplete.
Pro Tip: Combine Velcro with zip ties threaded through the mounting holes for hybrid security that resists both sliding and pulling.
Clamp-On Cable Trays for Easy Installation
Cable management trays with clamp mechanisms offer a no-drill solution that provides both mounting and organization.
How Clamp Trays Work
These trays attach to desk edges using a C-clamp mechanism. The clamp tightens onto the desk lip to create a stable platform. Some models include built-in retention clips to hold the surge protector in place.
Installation Guide
Open the clamp and position it on the desk edge where desired. Tighten the screw until snug but avoid overtightening, which can damage the desk edge. Place the surge protector inside the tray. Secure with zip ties or Velcro to prevent the unit from sliding during use.
Advantages and Risks
This method requires no drilling or adhesives and adds cable organization to your setup. However, clamps may scratch desk edges and the tray adds visual bulk beneath your desk. Thicker or irregular desk edges may cause wobbling.
User Insight: One Reddit user noted they would “go with a clamp support” for their setup.
Zip Ties for Metal Desk Frames

Zip ties provide a low-cost, high-effectiveness solution especially suited for metal-framed desks found in many standing desks.
Ideal Applications
This method works perfectly on UPLIFT, Fully, and IKEA Bekant frames that have exposed metal supports. Thread ties through the mounting holes and around crossbars or legs for secure attachment.
Step-by-Step Zip Tie Mounting
Position the surge protector under the desk near a support beam. Thread a heavy-duty zip tie through a mounting hole. Loop the tie around the desk leg or frame member. Pull tight and trim the excess length. Repeat on the opposite end for balanced support.
Upgrade to Reusable Straps
Releasable nylon straps allow easier removal for adjustments or desk relocation. Combine these with cable clips to manage strain and keep cords organized.
User Insight: A Reddit user reported successfully using “zip ties to attach them to legs and metal supports.”
3D-Printed Mounts for Custom Fit
If you have access to a 3D printer, custom brackets offer precision mounting tailored to your specific surge protector model.
Benefits of 3D-Printed Solutions
Custom mounts fit exact dimensions of models like the ED-SURGE-615. You can design cable routing channels directly into the bracket. The mount attaches using screws, Command strips, or Velcro depending on your needs.
Design Considerations
Use parametric models that adjust to your specific width and height requirements. Print with PLA or ABS material for durability. Add ventilation gaps if the mount will be near heat sources.
User Insight: One user created “a parametric holder” for their surge protector and shared it publicly.
Common Mounting Mistakes to Avoid
Small errors during installation lead to failure, damage, or safety risks. Knowing what to avoid saves time and prevents frustration.
One-Sided Mounting
Mounting only one end creates leverage that stresses the attachment point. Always use both mounting points to distribute load evenly.
Ignoring Cable Strain
Unmanaged cords pull on the surge protector with every movement. Use cable ties, clips, or Velcro to anchor cords away from the unit and reduce strain on the mount.
Over-Tightening Fasteners
Excessive force cracks particleboard and strips screw threads. Tighten until firm without forcing the connection.
Using Weak Adhesives on Heavy Loads
Standard office tape cannot handle the combined weight and pull of multiple devices. Never rely on adhesive for permanent or heavy installations.
Compare Methods: Find Your Best Option
| Method | Best For | Longevity | Renter-Friendly |
|---|---|---|---|
| Screws | Permanent, sturdy desks | Permanent | No |
| Velcro | Temporary, cool environments | 3-6 months | Yes |
| Command Strips | Clean removal needed | 6+ months | Yes |
| Zip Ties | Metal frames, legs | Permanent | Yes |
| Clamp Trays | No-drill organization | Long-term | Yes |
| 3D-Printed Mounts | Custom fit, tech users | Permanent | Yes |
Match Your Mounting Method to Your Situation
Renters: Clamp Trays or Zip Ties
Avoid drilling or adhesive residue by using clamp trays combined with zip ties for stability. This approach removes cleanly when you move.
Thin Desks: Skip Screw Mounting
Particleboard desks like those from IKEA cannot support screw tension. Use zip ties to the frame or clamp trays instead.
Warm Rooms: Avoid Adhesives
Heat degrades glue bonds quickly. Choose zip ties or 3D-printed mounts for reliable performance in warm environments.
Industrial Use: Metal and Screws
Select the ED-SURGE-615 with metal casing and install with screws into solid wood or steel supports for maximum durability.
Want Clean, Removable Setup
Try 3M Command Strips but limit the load to lightweight devices. Check monthly for any slippage.
Final Tips for Long-Lasting Installation
Inspect Periodically
Check all mounts every 3-6 months. Look for loosening screws, peeling tape, or sagging units that need reinforcement.
Manage Heat and Ventilation
Leave space around the surge protector for airflow. Do not cover the unit with paper or fabric that traps heat.
Label Your Outlets
Use colored tags to identify which device uses which outlet. This helps with troubleshooting and energy management.
Test Stability
Gently tug the surge protector after installation. If it moves, reinforce the mount immediately rather than waiting for failure.
Frequently Asked Questions About Mounting Surge Protectors Under Desks
What is the most secure way to mount a surge protector under a desk?
Screw mounting provides the most secure and permanent installation. Use pan-head wood screws through the mounting holes into solid wood or thick plywood. This method handles heavy cable loads without maintenance.
Can I mount a surge protector under my desk without drilling?
Yes, multiple no-drill options exist. Use clamp-on cable trays, zip ties to desk legs or frames, or adhesive strips like 3M Command strips. These methods work well for renters or temporary setups.
Will adhesive mounting hold a surge protector long-term?
Adhesive mounting typically lasts 3-6 months before failing, especially in warm environments or under cable strain. Heavy-duty Velcro and industrial tape perform better but still require monitoring.
What type of surge protector is best for under-desk mounting?
Choose a model with mounting holes on both ends, perpendicular outlets for bulky adapters, and durable construction. The ED-SURGE-615 and UPLIFT 8-outlet models are specifically designed for this purpose.
How do I prevent my mounted surge protector from falling?
Use both mounting points to distribute weight evenly. Manage cable strain with zip ties or clips so cords do not pull on the unit. Inspect connections regularly and reinforce if you notice any movement.
Can I mount a surge protector on an IKEA desk?
IKEA desks made from thin particleboard cannot hold screws securely. Use clamp trays, zip ties to the frame, or adhesive strips instead. The thin material risks splitting under screw tension.
Key Takeaways for Mounting a Surge Protector Under Your Desk
Choosing the right mounting method depends on your desk type, whether you can drill holes, and your long-term plans for the space. Screw mounting offers unmatched reliability for permanent setups, while clamp trays and zip ties provide strong alternatives that leave no damage. Always select a surge protector with mounting holes and perpendicular outlets, and never ignore cable strain management. With proper installation, your mounted surge protector creates a cleaner, safer workspace that lasts for years.


