If you’re trying to maximize space in a small bedroom, dorm, or kids’ room, building a bunk bed with desk is one of the smartest DIY projects you can tackle. Unlike traditional bunk beds, this design usually takes the form of a loft bed with a built-in desk underneath, turning vertical dead space into a functional sleep-and-study zone. The result is a sturdy, space-saving solution that supports a twin or full mattress above and creates a dedicated workspace below.
This guide walks you through every step of building your own loft-style bunk bed with desk, using only common tools and affordable materials. You will learn how to construct a rock-solid frame, integrate a comfortable desk, add storage, and finish it with professional-level aesthetics.
Choose Your Design Layout
Loft-Style vs. True Bunk Bed
Most bunk beds with desks are actually loft beds, which is an elevated sleeping platform with open space underneath. This layout is ideal for adding a desk, seating, or storage. A true bunk bed with desk includes both an upper and lower bed, with the desk tucked beside or beneath one end.
Consider these two main options:
• Loft plus desk: Best for single sleepers and maximizes floor space
• Bunk plus desk: Fits two sleepers but requires more headroom and structural support
For most DIYers, the loft bed with under-bed desk is simpler, safer, and more practical.
Determine Bed Size and Clearance
Measure your mattress before purchasing lumber. Standard sizes include twin at 38 inches wide by 75 inches long, and full at 54 inches wide by 75 inches long. The full size requires stronger supports and a larger overall footprint.
Minimum clearance under the bed should be 50 to 55 inches from floor to bottom of frame. This allows room for a chair and adequate legroom. Total loft height typically reaches 75 to 80 inches from floor to top of mattress, which works best with 8-foot ceilings.
Plan for Stairs or Ladder
Stairs are safer and more comfortable, especially for children. Ladders save space but are harder to climb when carrying items. Stair width should be 24 to 36 inches with tread depth of 10 to 12 inches and riser height of 7 to 8 inches. Place stairs on the side or end of the bed, ensuring a clear path for climbing.
Gather Materials and Tools
Lumber and Hardware List
Stock up on these materials before starting your build. Having everything on hand prevents project delays.
• Legs and frame: 2×4, 2×6, or 2×10 lumber. Use 2×10s for main supports
• Bed frame: 2×4 or 2×6
• Bed slats: 1×4 or 2×2, spaced 2 to 3 inches apart, or 3/4-inch plywood
• Desktop: 3/4-inch plywood, melamine board, or pre-cut lumber
• Desk frame: 2×4 or leftover lumber
• Wall paneling (optional): 1×6 or 1×8 tongue-and-groove shiplap
• Trim: Primed pine in 1×4, 1×6, or 1×8
• Fasteners: 2.5-inch to 4-inch wood screws, pocket-hole screws, lag screws
• Wall anchors: 3-inch to 4-inch lag screws for stud attachment
• Finish: BIN primer, semi-gloss latex paint, spackle
Essential Tools
These tools make the build significantly easier.
• Drill and impact driver
• Circular saw or miter saw
• Pocket-hole jig (Kreg Jig recommended)
• Jigsaw for stair stringers
• Oscillating multi-tool for cutting base molding
• Stud finder
• Laser level or chalk line
• Sander (orbital or hand)
• Right-angle drill attachment for tight spaces
Build the Bed Frame

Cut Lumber to Size
Measure your mattress carefully before making any cuts. Cut two side rails and two end rails from 2×4s to match your mattress dimensions. Label each piece to avoid confusion during assembly.
For a twin mattress, cut rails to 38 inches by 75 inches. For a full mattress, cut to 54 inches by 75 inches.
Assemble the Frame
Drill pocket holes, three per end, on the inside of each rail. Use 2.5-inch pocket screws to join the frame into a rectangle. Reinforce each corner with six screws per joint for overkill strength. Check that the frame is square by measuring diagonally; both measurements should be equal.
Install Main Support Beam
Cut a 2×10 beam to span the width of the bed, running perpendicular to the rails. Center it under the frame and secure it in place with 3-inch wood screws. This beam prevents racking and supports the legs.
Attach Legs and Anchor to Wall
Install Vertical Legs
Cut four legs from 2×4 or 2×6 lumber to your desired height, typically 50 to 60 inches. Attach legs to each corner of the frame using pocket screws and toe-screwing into the main support beam. Use a level to ensure legs are perfectly plumb.
Secure to Wall Studs
Use a stud finder to locate wall studs behind the headboard side. Use an oscillating tool to cut recesses in base molding so the 2×10 beam sits flush against the wall. Pre-drill holes in the beam and drive 3-inch to 4-inch lag screws into at least two wall studs.
Never skip wall anchoring. A freestanding loft bed can tip forward, creating a serious safety hazard.
Install Bed Slats or Solid Base
Option 1: Wooden Slats
Cut 1×4 or 2×2 slats to fit the bed width. Space them 2 to 3 inches apart for airflow. Attach to the frame and wall-mounted runners using screws.
Caution: 1×4 slats may sag under heavy loads above 195 pounds. For adults or full mattresses, use thicker supports or a solid base.
Option 2: Solid Plywood Base
Cut 3/4-inch plywood or OSB to match mattress size. Screw it directly to the frame every 6 to 8 inches. This provides even support and prevents sagging. Properly anchored frame supports up to 450 pounds.
Build the Stairs
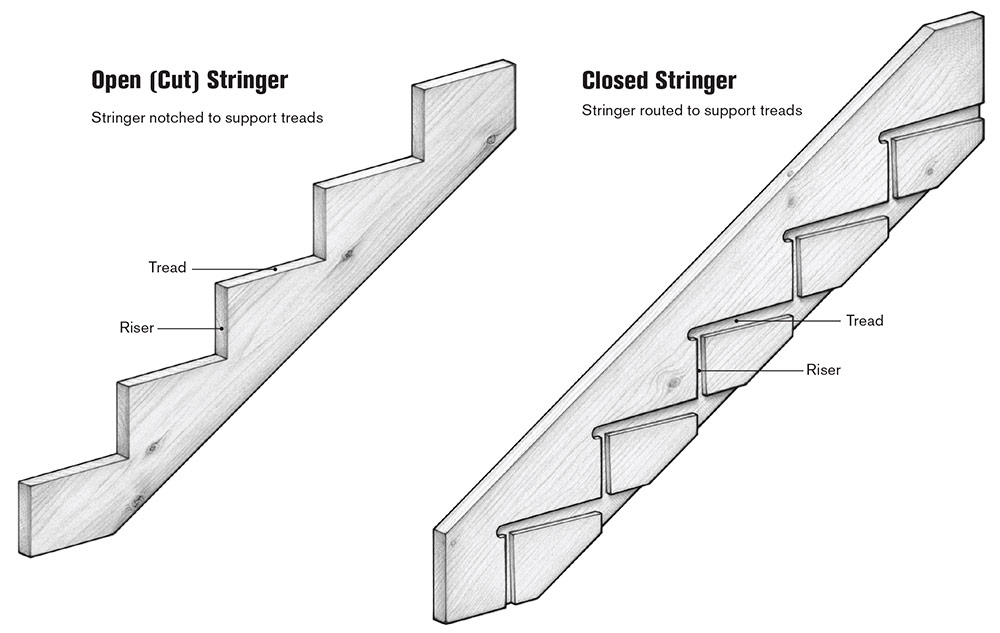
Cut and Notch Stringers
Use 2×10 or 2×12 lumber for stringers. Mark tread and riser layout with 7 to 8 inches rise and 10 to 12 inches run. Use a jigsaw to cut the notches.
Install Treads
Cut treads from 2×6 or 2×8 for added thickness and comfort. Secure to stringers with pocket screws or deck screws. Add a 2×4 side support to prevent wobbling.
Anchor and Finish
Attach stairs to the bed frame or wall. Add non-slip tape or rubber treads for safety. Consider installing a handrail for young children.
Construct the Under-Bed Desk
Frame the Desk
Build a rectangular frame from 2×4s to match your desired desk size, typically 48 inches by 24 inches. Use pocket-hole joinery for strong, hidden connections. Attach one leg to the bed frame and the other to the wall for stability.
Install the Desktop
Cut plywood or melamine to size. Increase depth to 30 inches if possible because 24 inches is often too shallow for comfortable use. Attach the top to the frame by driving pocket screws upward into the underside.
Pro tip: Drill a 1-inch hole in the desktop for cable management.
Customize for Use
Apply vinyl wrap (contact paper) to the desktop surface for a waterproof, easy-to-clean finish. Add a monitor stand built from scrap wood. Install a cable management kit for a clean look. Mount LED strip lights under the bed for task lighting.
Add Storage and Accessories
Build a Headboard Storage Box
Use scrap wood to build a box at the head of the bed. Enclose it on three sides and leave the front open or add doors. The top doubles as a shelf for books, decor, or extra pillows.
Install Shelves
Cut 1×4s to desired length. Mount to wall or bed frame with brackets. Finish with vinyl wrap for durability.
Personalize with Lighting
Add puck lights or LED strips under the bed. Create a custom name plaque using a laser cutter or order one online. Attach with double-sided tape and screws.
Finish with Paint and Trim
Panel Walls
Cut shiplap boards to fit. Paint before installation with your chosen color. Nail to wall with 1/8-inch gap between boards. Fill nail holes with spackle and wipe clean with a baby wipe.
Add Trim
Use primed pine for finished edges. Test fit, then paint to match. Nail or screw into place.
Paint Like a Pro
Use BIN shellac-based primer to block knot bleed-through. Apply two coats of semi-gloss latex paint for durability. Let dry completely before final assembly.
Ensure Safety and Stability
Critical Safety Steps
Always anchor to wall studs because drywall anchors are not enough. Install a railing on open sides, especially for children. Keep ceiling fans and lights at least 30 inches from the bed edge. Test the build with your own weight before use.
Prevent Common Issues
Address these problems before they become serious.
• Sagging slats: Add center support beam or use plywood base
• Shallow desk: Increase depth during planning
• Stair discomfort: Use 2×6 treads and add side support
• Knot bleed-through: Seal with BIN primer before painting
Customize and Upgrade
Mini-Bed for Toddlers
Use a half-size twin frame. Build wider, lower steps. Add double safety rails and a climbing handrail.
Industrial Look
Replace screws with exposed bolts. Leave wood unfinished or use matte black metal accents.
True Bunk Bed with Desk
Add a lower bunk with 3/4-inch plywood base. Place the desk at the foot of the bed or on the open side.
Frequently Asked Questions About Building a Bunk Bed with Desk
How much does it cost to build a bunk bed with desk?
The materials cost approximately $200, including paint, fasteners, and construction-grade lumber. Costs vary based on wood type, finish quality, and accessories you choose.
How long does it take to build a bunk bed with desk?
Simple builds using pocket-hole joinery can be completed in 2 to 4 weekends. More complex designs with custom details, shiplap paneling, and extensive trim work take longer.
What is the weight capacity of a loft bed with desk?
A properly constructed frame with wall anchoring supports up to 450 pounds. Add a center support beam for heavier loads or full-size mattresses.
Can adults use a loft bed with desk safely?
Yes, adults can use these beds safely. The key is using 2×10 lumber for main supports, adding a center support beam, and anchoring securely to wall studs. One builder tested their build at over 195 pounds with no wobble.
What is the best desk depth for a loft bed setup?
The ideal desk depth is 30 inches. Standard 24-inch depth is often too shallow for comfortable typing and working. Increase the depth during planning if possible.
Do I need to anchor the bunk bed to the wall?
Yes, wall anchoring is critical for safety. Never rely on drywall anchors alone. Secure the main support beam to at least two wall studs using 3-inch to 4-inch lag screws.
Key Takeaways for Building Your Bunk Bed with Desk
Building a bunk bed with desk is more than a furniture project. It is a space transformation that delivers maximum function in minimal square footage. The most important elements are using quality 2×10 lumber for main supports, anchoring securely to wall studs, and reinforcing corners with extra screws.
Choose the loft bed with desk configuration unless you specifically need to sleep two people. This design offers better structural simplicity, more workspace, and easier construction for DIY builders. The desk depth should be at least 30 inches for comfortable use.
With the right materials, tools, and attention to safety, you can create a custom, ultra-sturdy loft that lasts for years. Whether you are building for a child, a student, or a small apartment, this design delivers maximum function in minimal space. Start measuring, cut smart, and build strong.