Putting together your UPLIFT Desk might seem daunting, but with the right approach, it is a manageable DIY project that takes under 90 minutes. Whether you own the V2, V3, or a 3-leg height-adjustable model, this guide walks you through every step from unboxing to programming presets. You will learn how to avoid common mistakes, install accessories correctly, and perform the essential reset that ensures smooth operation.
This article covers everything you need to build your desk safely and efficiently. We will walk through unpacking, tool preparation, frame assembly, desktop mounting, electrical connections, and final setup. Each section includes expert tips to help you complete the build without frustration or errors.
Unpack and Inspect Components
Check All Seven Boxes Before Starting
Your UPLIFT Desk arrives in seven separate boxes. Lay them out on a clean, padded surface like carpet or foam to protect the desktop finish. Take your time verifying that all parts are present before beginning assembly.
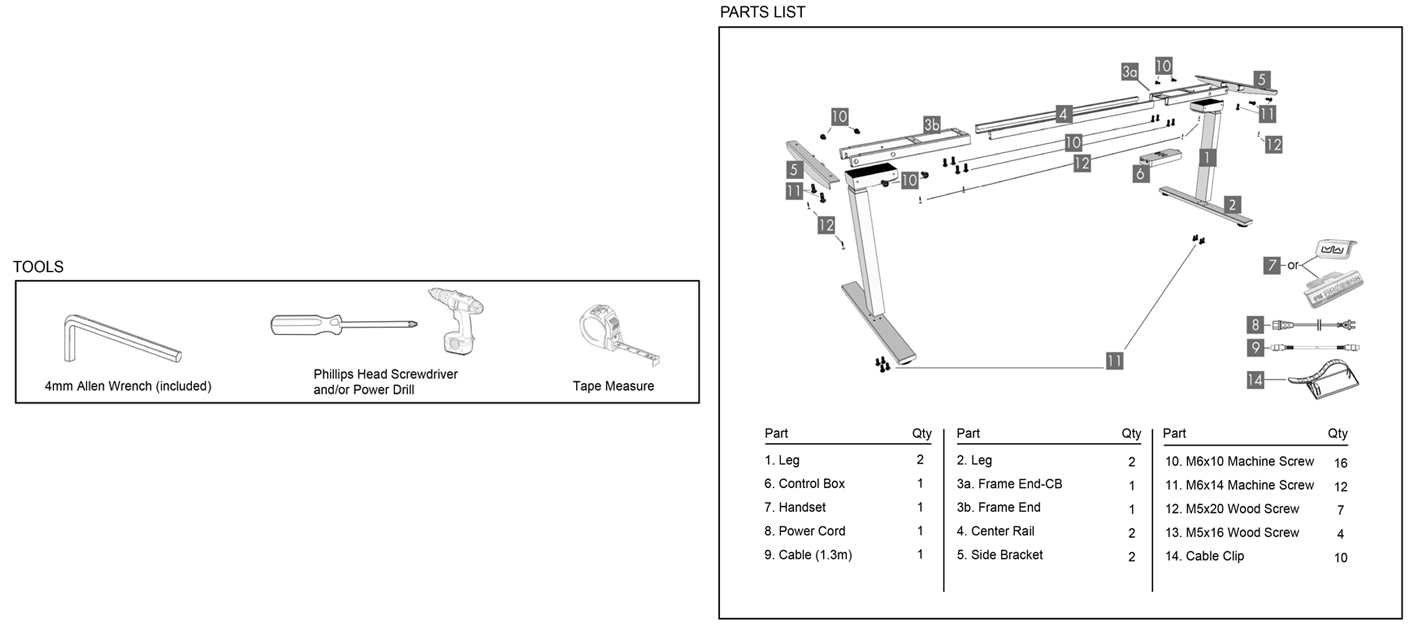
You should find the following components in your boxes.
• Frame legs and cross-bars
• Cross-bar rails (main and open-end)
• Side brackets (6 total for 3-leg models)
• Control box, keypad, and cables
• Screws, washers, and mounting hardware
• Optional accessories like storage drawer or extension tray
Pro Tip: Use a second desk or workbench slightly elevated to make assembly easier and reduce bending.
Inspect Desktop for Shipping Damage
Check the desktop corners for dents or cracks immediately after unpacking. Dropping during transit can cause hidden damage that is not visible at first glance.
Critical Alert: If you spot damage, take photos right away and contact UPLIFT Support. They will ship a free replacement top within days.
Save all packaging until assembly is complete and the desk is fully functional.
Gather Required Tools
Use Included and Basic Hand Tools
Most tools are provided in your kit, but a few must be sourced separately. Having everything ready before you start prevents interruptions during assembly.
Included in your kit:
• 4mm Allen wrench (V2/V3)
• 5mm Allen wrench (V3/3-leg models)
• All labeled screws (H1, H3, H4, H4B, H14), washers, and cable nuts
• Wire-management tray, adhesive pads, and feet
Tools you should add:
• Phillips-head screwdriver (not included; needed for multiple steps)
• Power drill with bit set (optional; speeds up pilot holes but use low torque)
• Measuring tape (helpful for stairwell clearance checks)
• Work gloves (recommended; frame components are heavy and sharp-edged)
• Soft padding (blanket or foam to protect desktop during build)
User-Tested Hack: Work on carpet or a yoga mat to prevent scratches and keep parts from sliding.
Assemble the Frame Base
Attach Legs to Cross-Bar Ends
Follow these steps to connect the legs to the cross-bar.
- Position one leg at the open end of a cross-bar.
- Align the back of the leg flush with the back of the cross-bar.
- Insert four H1 machine screws using the 4mm or 5mm Allen wrench.
- Start each screw loosely to prevent cross-threading.
- Once all four are started, tighten fully.
- Repeat for the second leg.
V2 Solo Tip: Rest the cross-bar on your thigh while securing the top screws. No helper needed.
Secure Side Brackets
- Slide the tab of a side bracket into the cross-bar end.
- Fasten with two H1 screws.
- Hand-tighten first, then finish with the wrench.
- Repeat on the opposite side.
Best Practice (V3): Tighten screws in a criss-cross pattern to prevent warping and ensure even pressure.
Install Cross-Bar Rails
Position Rails Correctly
- Hold both rails with center marks facing up.
- Make sure slots face inward.
- Position the thicker end down for structural strength.
- Slide them into the open end of the cross-bar.
- Ensure smooth sliding motion before moving on.
Pro Tip (V3): Keep the frame slightly collapsed until the desktop is mounted. This makes flipping easier later.
Mount the Desktop
Flip Frame and Align Desktop
- Place the assembled leg frame upside down on a soft surface.
- Lay the desktop face-down onto the frame.
- Align screw holes on side brackets with those on the cross-bar ends.
Choose Correct Screws for Your Desktop
Desktop type determines which screws you need.
• Desktops with threaded inserts: Use H4B machine screws plus H5 washers
• Standard desktops (no inserts): Use H4 wood screws plus H5 washers
• Never use the 3/4-inch H4 screw. It is too long and can damage internal wiring.
- Insert three side-bracket screws and one cross-bar screw per side.
- Start loosely with a Phillips screwdriver.
- Slide the second leg onto the rails and attach its four screws loosely.
Critical Note: Do not fully tighten yet. Wait until alignment is confirmed.
Tighten All Frame Screws
Finalize Structural Connections
Once all eight screws (four per side) are started, tighten firmly but do not over-tighten. Over-tightening can strip wood or plastic inserts.
Torque Tip (V3): Snug is sufficient. Fully tightened joints prevent wobble and extend desk life.
Lock Cross-Bar Rails in Place
Align and Secure Rails
- Adjust rails so center marks are evenly spaced between both ends.
- Insert H3 set screws into the threaded holes on cross-bar ends.
- Tighten with the 4mm Allen wrench.
This step ensures smooth vertical movement and prevents motor strain.
Install Keypad and Accessories
Mount Keypad Correctly
- Choose the side based on your dominant hand.
- Right-handed use: Mount on right side (keypad appears on left when viewed from below).
- Left-handed: Reverse placement.
- Align holes and hand-tighten two H14 5/8-inch wood screws.
- Do not use longer 3/4-inch screws. Risk of damaging control box.
Best Practice (V3): In L-shaped desks, mount keypad on the return desktop for better access.
Attach Wire-Management Tray
- With desk still upside down, position tray where cords will exit.
- Secure with #10 5/8-inch H14 screws.
- These are shorter than standard H4 screws. Use only the correct length.
This prevents cable tangles and protects wires during movement.
Connect Wiring and Control Box
Install Control Box
- Insert tabs of control box into cross-bar end slots.
- In 3-leg models, place inside corner crossbar cavity.
- Secure with two wood screws, ensuring cables are not pinched.
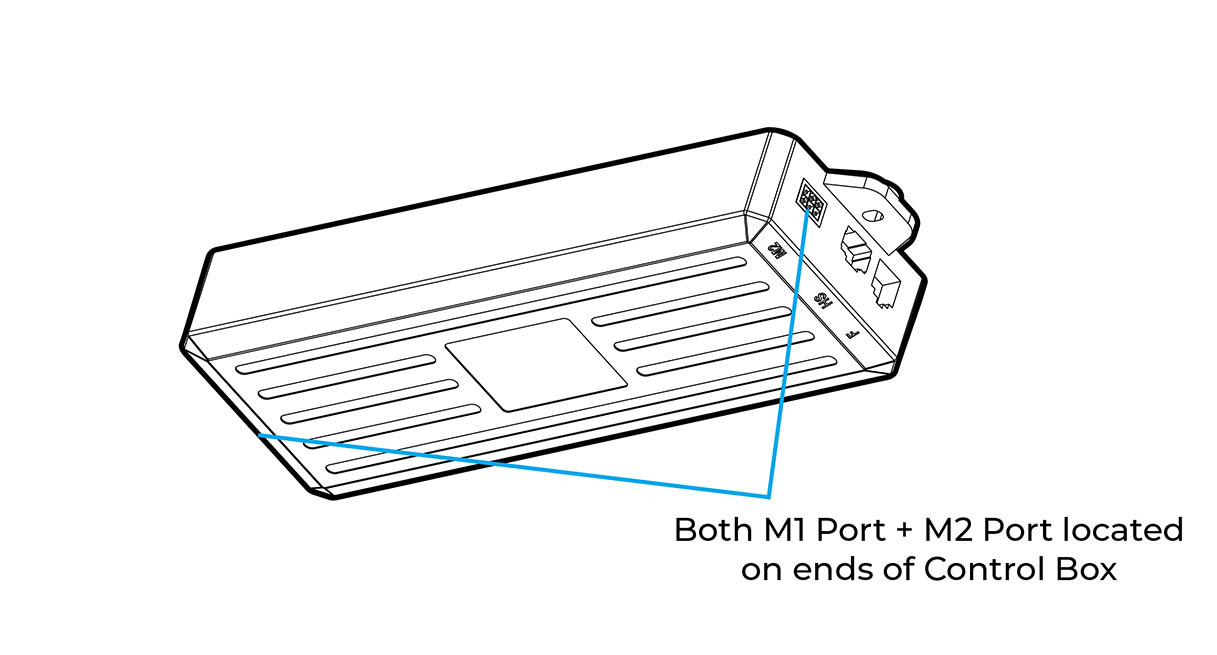
Make Electrical Connections
Plug into the control box.
• Nearest leg motor goes to its labeled port
• Second leg extension cable goes to M1 white port
• Keypad cable goes to HS port
Pro Tip: All connectors are color-coded and keyed. They are nearly impossible to plug in wrong.
Route Cables Properly
Use internal channels or included zip ties and velcro straps. Avoid sharp bends or tension on wires. This prevents disconnections and motor errors over time.
Flip Desk Upright Safely
Final Tightening Before Flip
Double-check all screws while desk is still upside down. Confirm no loose hardware or dangling cables.
Flip Using Proper Technique
- Rotate desk onto its back edge first.
- Then lift fully upright.
User Feedback (V2): Even a 72″ x 30″ desk weighing about 60 pounds flips easier than expected.
Two-Person Flip Recommended for V3 and 3-Leg Models
Person 1 holds inner leg and center. Person 2 supports outer leg and desktop edge. Let return side rest on support brackets after uprighting. This prevents stress on joints and avoids misalignment.
Reconnect Center Rails (3-Leg Models Only)
Finalize 3-Leg Frame
- Re-insert crossbar rails into corner crossbar end.
- Ensure rails extend fully through all mounting holes.
- Tighten eight short Allen screws to lock rails in place.
This ensures full structural integrity and smooth dual-motor synchronization.
Perform Essential Desk Reset
Why Reset Is Non-Negotiable
Skipping the reset causes erratic movement, keypad unresponsiveness, and error codes. Failure to reset means improper calibration of height sensors.
How to Reset Your UPLIFT Desk
- Press and hold the DOWN button for 10 seconds, then release.
- Immediately press and hold DOWN again.
- Desk will lower slightly, rise slightly, then stop automatically.
- Release the button.
Result: Motors and sensors recalibrated.
Also Use Reset When: Power outage occurs, keypad shows error, or desk moves unevenly.
Note: Display keypads show ASr (equals RST) while paddle keypads show RESET.
Save Height Presets
Program Memory Positions (M1-M4)
- Move desk to preferred standing height.
- Press M, then a number (1-4) to save.
- Lower to ideal sitting height.
- Press M, then another number.
You can store up to four presets.
Verified User Presets:
• M1: Seated typing
• M2: Standing meetings
• M3: Tablet or drawing mode
• M4: Collaborative or guest height
Enable Anti-Collision (If Equipped)
This feature automatically stops and reverses if obstruction is detected. Calibration varies by model. Refer to your manual for exact sequence.
Install Optional Accessories
Slim Under Desk Storage Drawer
- Attach mounting bracket to metal frame (not desktop).
- Drill four pilot holes.
- Secure with screws.
- Creates space for laptop, keyboard, or bags.
This installs in under 10 minutes.
Desk Extension Tray
Easy bolt-on addition expands workspace without structural changes.
Storage Grommets
Insert into desktop for organized cable routing. Prevents wire clutter.
Under-Desk Hooks
These require pilot holes and permanent installation. Some users find them gimmicky.
Better Alternative: Use clamp-on organizers. No drilling needed and fully adjustable.
Prevent Common Failures
Avoid Heat Damage to Desktop
Problem: Cracks in whiteboard or laminate surface.
Cause: Prolonged contact with warm devices like laptop docks and hubs. This is not caused by weight, dry-erase markers, or normal use.
User Warning: “My hub caused hairline cracks even though it only felt warm.”
Solution: Use a thermal barrier. Place a writing desk pad, rubber mat, or insulated tray under warm electronics.
Update: “I added pads. Desk still strong after two moves.”
Handle Control Box Failure
Symptoms of Electrical Failure
Desk stops moving, burning smell or pop sound, no keypad response.
What to Do
- Contact UPLIFT Support immediately.
- Submit photos or video of issue.
- Receive free replacement control box and plug in about 5 business days.
User Timeline: Day 0: Failure after 3 months. Day 12: New part installed. Downtime about 11 days including weekend.
Optimize Performance and Stability
For Large Desktops (Over 72 Inches)
Add reinforcement brackets. Consider dual-motor system for smoother lift. This prevents sagging and reduces wobble.
Reduce Noise and Vibration
Apply all 15 adhesive pads. Five per leg under feet and contact points. Avoid over-tightening rails. This can increase friction noise.
Results: Quieter, smoother operation.
Long-Term Maintenance Tips
Weekly and Monthly Checks
After 24 hours of use, recheck all screw tightness. Components settle over time. Monthly inspect cables for wear and ensure keypad responsiveness. Clean whiteboard surface with dry-erase cleaner only. Never use wet-erase markers.
Warranty Coverage
| Component | Warranty |
|---|---|
| Frame | 15-year |
| Motor | 5-year |
| Control box, Keypad | 3-year |
Free replacements are available for control box failures. Simply contact support.
Final Thoughts on Building Your UPLIFT Desk
Building your UPLIFT Desk is a straightforward process when you follow the correct sequence and avoid common pitfalls. Three key actions make all the difference. First, use the right screws. Never substitute 3/4-inch for 5/8-inch variants. Second, perform the reset. It is mandatory for proper function. Third, protect the desktop. Always use a pad under warm electronics.
Additional tips improve your experience. Mount accessories to the frame rather than the desktop. Contact support fast if the control box fails. Replacement parts are free and arrive quickly.
With dual-linear actuators rated for over 10,000 cycles, cold-rolled steel construction, and excellent customer support, your UPLIFT Desk is built to last. From initial flip to daily preset use, it delivers reliable ergonomic performance for years.
Final Verdict (User-Tested): “I liked my first UPLIFT Desk so much, I bought a second.”
Frequently Asked Questions About Building an UPLIFT Desk
How long does it take to assemble an UPLIFT Desk?
Assembly takes 60-90 minutes for V2 models (solo) and 30-45 minutes for V3 or 3-leg models with two people. Experience level and available workspace affect timing.
Do I need any special tools to build an UPLIFT Desk?
The kit includes 4mm and 5mm Allen wrenches plus all screws and washers. You need to add a Phillips-head screwdriver. A power drill is optional but speeds up the process.
What happens if I skip the desk reset after assembly?
Skipping the reset causes erratic movement, error codes like ASr, and keypad unresponsiveness. The desk will not calibrate properly for height sensors, leading to poor performance.
Can I assemble an UPLIFT Desk alone?
Yes. V2 models are solo-friendly even at 72″ x 30″ size. V3 and 3-leg models benefit from two people, especially during the flipping stage.
Why did my control box stop working?
Electrical failures can occur without warning. Symptoms include burning smell, popping sound, or complete keypad non-response. Contact UPLIFT Support for free replacement.
How do I prevent heat damage to my desktop?
Always place a thermal barrier under warm electronics. Use a writing desk pad, rubber mat, or insulated tray. Heat from laptops and docks causes hairline cracks in whiteboard surfaces.