Building a desk with drawers doesn’t require professional carpentry skills. With clear plans, affordable materials like plywood and MDF, and a few essential tools, you can create a custom workstation that fits your space perfectly while saving up to 70% compared to store-bought furniture. This guide walks you through every phase, from planning dimensions and selecting materials to assembling sturdy drawers, installing smooth-gliding slides, and applying a durable finish.
Plan Your Desk Design
Choose the Right Size for Your Space
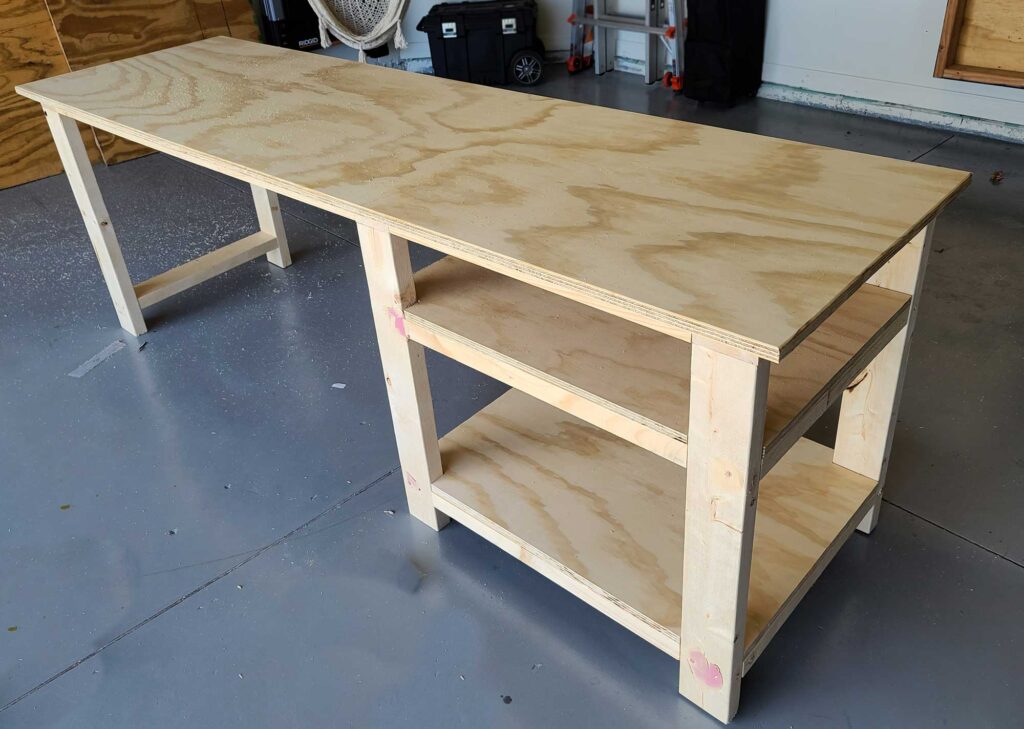
Start by measuring your room to determine how much floor space you can dedicate to your desk. Standard desk height ranges from 28 to 30 inches, which works well with most office chairs. For depth, aim for 20 to 30 inches, giving you enough room for a monitor and workspace without crowding the room. In small home offices, a longer and narrower design works best, such as a 7.5-foot-long desk with 20-inch depth.
Ensure at least 24 inches of vertical legroom beneath the desktop for comfortable seating. If you need shallow drawers to preserve knee clearance, limit them to 4 to 6 inches tall. Taller drawers up to 8 inches are possible if your legs allow the clearance.
Match Storage to Your Needs
Think about what you will store in your desk drawers. Students and remote workers benefit from enclosed drawers for files, supplies, and electronics. Artists and crafters may prefer one side with deep drawers and open shelves for supplies. Minimalists might choose floating drawers with no front trim for a sleek, modern look.
A hybrid design with drawers on one side and shelves on the other provides practical storage and visual balance. Consider including a recessed power strip inside a drawer or cabinet for charging devices and managing cords cleanly.
Pick Durable, Budget-Friendly Materials
You do not need solid wood to build a high-quality desk. Most DIY builders use a mix of engineered and solid woods. Three-quarter-inch plywood works well for side panels, drawer boxes, and shelves. Seal the edges with iron-on edge banding for a clean appearance. MDF serves as an excellent choice for desktops and drawer fronts when you plan to paint, as it is affordable and holds paint evenly, though it must be sealed to resist moisture. Solid wood trim in 1×2 or 2×2 sizes adds durability and visual interest to edges and legs. Quarter-inch melamine-coated hardboard resists warping and slides smoothly, making it ideal for drawer bottoms.
For legs, use 2×2 or 2×4 lumber cut to 28 inches. Add center legs for desks over 6 feet long to prevent sagging.
Gather Essential Tools
Must-Have Power Tools
You can build a full desk with just four core tools. A circular saw paired with a straight-edge guide makes precise cuts in plywood and boards. A drill or driver drives screws and drills pilot holes to prevent splitting. A pocket hole jig creates strong, hidden joints ideal for beginners. An orbital sander smooths surfaces before finishing.
A table saw or track saw helps with sheet goods but is not required. If you lack large cutting tools, use pre-cut services available at hardware stores.
Helpful Add-On Tools
Several additional tools make the build easier. Use 2 to 4 clamps to hold pieces together during glue-ups and screw assembly. A speed square ensures 90-degree corners and accurate cuts. A tape measure and pencil let you mark all cuts clearly. Wood glue reinforces joints beyond what screws alone provide. An edge banding iron applies veneer tape to hide raw plywood edges.
Build the Desk Frame
Cut and Prepare All Pieces
Follow a phased cutting approach to ensure accurate dimensions. Cut frame parts first including legs, side supports, and the desktop. Save drawer cuts for later, measuring after frame assembly for a perfect fit.
Sand all pieces to 150-grit before assembly. Apply edge banding to any exposed plywood edges on desktops, shelves, and drawer fronts.
Assemble the Base Upside Down
Lay the desktop face-down on a clean surface. Position legs cut to 28 inches tall at each corner. For long desks, add two center legs under the middle of the frame to prevent sagging.
Attach horizontal supports between legs using three-quarter-inch plywood or 2x4s. Use pocket holes and wood glue to join supports to legs. Drill pocket holes on the inside face of supports, then screw into leg ends.
Reinforce joints with clamps and check for squareness with a speed square. Flip the desk upright and test for wobble. If unstable, add diagonal bracing or a back panel for rigidity.
Construct the Drawer Unit

Build Side Panels and Dividers
Cut two vertical side panels from three-quarter-inch plywood, matching the desk height minus desktop thickness. Attach 1×2 trim to the front edges for a seamless look.
Connect panels with a bottom brace using pocket holes. Install a vertical divider between drawer openings if building two side-by-side drawers. Use shelf-pin jigs to drill holes for adjustable shelves on one side, or install fixed shelves with cleats.
Install a Recessed Power Strip
Trace the outline of a power strip on the back panel of the drawer unit. Use an oscillating multi-tool to cut the opening cleanly.
Drill a 2-inch hole in the desktop near the back edge for cord routing. Install the power strip before final assembly to avoid painting over raw cut edges later.
Build and Install Drawers
Cut and Assemble Drawer Boxes
Use three-quarter-inch plywood for drawer sides, front, and back. Drawer bottoms go in quarter-inch melamine-coated hardboard.
Calculate dimensions carefully. Front and back width equals drawer opening width minus 1 inch for slide clearance. Side length equals drawer depth minus 1.5 inches to account for two three-quarter-inch end pieces. For example, an 8-inch-deep drawer needs sides that are 6.5 inches long.
Assemble the box by laying front, back, and sides flat. Apply wood glue to joints. Clamp square using a framing square. Drill pilot holes and screw through front and back into side ends.
Attach the Drawer Bottom
Place the quarter-inch bottom panel on top of the assembled frame. It should sit inside the box, resting on the bottom edges.
Glue the frame top edges, then clamp and nail the bottom in place with finish nails. Do not screw into the drawer interior.
Add Drawer Fronts
Use 4-inch-wide MDF panels as drawer fronts. Make them slightly larger than the drawer box for an overhang that acts as a pull without hardware. Alternatively, attach knobs or cup pulls after painting.
Use a drawer front jig or spacers like nickels to align fronts evenly, leaving a one-eighth-inch gap on all sides.
Mount Drawer Slides
Choose the Right Slides
Use side-mount ball-bearing slides rated for 75 to 100 pounds. Full-extension or soft-close models offer better usability and easier access to drawer contents.
Install Slides in Two Steps
Attach cabinet-side rails first. Place the drawer in position. Mark the slide location on the desk frame. Screw the rail to the underside of the desktop or drawer unit, ensuring both sides are level and parallel.
Attach drawer-side hardware next. Align the drawer-mounted part with the cabinet rail. Screw into the drawer side.
Test the drawer by opening and closing it slowly. If it binds, adjust the slide position by one-sixteenth inch. Lubricate with silicone spray if needed.
Finish for Durability and Style
Prepare Surfaces
Fill all screw holes and gaps with wood filler. Sand smooth with 220-grit paper. Wipe away dust thoroughly.
If using MDF, apply primer first because its porous surface absorbs paint unevenly without a primer coat.
Paint or Stain
For painted finishes, use two coats of primer followed by two coats of paint. Sand lightly between coats. Use a paint sprayer for the smoothest result, or brush with long, even strokes.
For a faux wood grain effect on MDF, apply a base coat of dark brown paint. Then use a dry brush with diluted black paint in sweeping motions to create grain lines. Seal with clear polyurethane applied with long brushstrokes to enhance the texture.
Seal the Desktop
Apply 2 to 3 coats of water-based polyurethane for durability. Let each coat dry fully and lightly sand between layers. Avoid placing heavy objects until the finish cures completely, which takes 48 to 72 hours.
Final Assembly and Testing
Attach Drawer Fronts
Once the desk is upright and slides are mounted, install drawer fronts. Use spacers such as two nickels to maintain even one-eighth-inch gaps. Screw through the drawer box into the back of the front panel.
Secure the Desktop
If not already attached, fasten the desktop to the frame using countersunk screws through support braces. This prevents lifting and adds overall stability.
Install Back Panel
Cut a quarter-inch plywood back panel to fit the rear of the drawer unit. Nail or screw it in place to prevent racking and add rigidity to the entire desk.
Optimize Ergonomics and Use
Maximize Legroom
Sit in your chair and slide under the desk. Ensure 2 to 3 inches of clearance above your thighs. If drawers hit your legs, reduce their height or recess them slightly into the frame.
Choose Floating or Enclosed Drawers
Floating drawers mount directly under the desktop with support boxes for a modern look but require precise alignment. Enclosed drawers fit within a frame and are easier to install and align. Both work well, so choose based on your style preference and skill level.
Organize Smart Storage
Use the top drawer for daily essentials like pens and notepads. Reserve the middle drawer for electronics, chargers, and small tools. Store files, notebooks, or art supplies in the bottom drawer. Use open shelves for books, binders, or decorative items. Drawer dividers made from scrap wood or foam inserts keep contents organized.
Pro Tips for Success
Cut in Phases for Perfect Fit
Do not cut all pieces at once. Build the frame first, then measure openings for drawers and shelves. This approach avoids measurement errors and ensures a tight fit.
Paint Before Assembly
Finish all parts before final assembly. It is easier to reach all surfaces, and you will not scratch paint during construction.
Use Clamps Relentlessly
Clamps hold joints square during glue-up and prevent misalignment. Use at least 3 to 4 clamps during critical assemblies.
Dry-Fit Everything First
Assemble without glue or screws to check fit. Fix alignment issues early because once glued, mistakes become hard to undo.
Invest in a Pocket Hole Jig
A pocket hole jig simplifies joinery, strengthens connections, and hides screws. Even beginners can build professional-looking furniture with one.
Maintain Your Desk Long-Term
Clean Gently
Wipe with a damp microfiber cloth. Avoid soaking MDF or plywood because excess moisture causes swelling and damage.
Repair Scratches
Touch up scuffs with matching paint or wood filler. For deep dents, sand the area, fill it, and reseal the spot.
Service Drawer Slides
Every 6 to 12 months, wipe slides with a dry cloth and apply silicone-based lubricant. This keeps drawers gliding smoothly over years of use.
With quality materials and proper care, your DIY desk can last 5 to 10 years or more and look better than store-bought alternatives.
Key Takeaways for Building a Desk with Drawers
Building a desk with drawers is achievable with basic tools and budget-friendly materials like plywood and MDF. Focus on accurate measurements during the planning phase, cut frame pieces first, then measure for drawers for a perfect fit. Use pocket hole joinery for strong, invisible connections, and apply a quality finish including primer, paint, and polyurethane for durability. Regular maintenance including cleaning and slide lubrication keeps your desk functioning beautifully for a decade or more.
Frequently Asked Questions About Building a Desk with Drawers
What is the standard desk height for office use?
The standard desk height ranges from 28 to 30 inches from floor to desktop. This height works well with most office chairs and allows comfortable typing and working.
What materials are best for building a DIY desk with drawers?
Three-quarter-inch plywood works well for structural parts like side panels and drawer boxes. MDF serves as an excellent choice for desktops and drawer fronts when painting. Quarter-inch melamine-coated hardboard makes ideal drawer bottoms because it resists warping and slides smoothly.
How much legroom do I need under a desk with drawers?
Allow at least 24 inches of vertical space under the desk for knees and movement. When sitting, ensure 2 to 3 inches of clearance above your thighs. If drawers interfere with legroom, reduce their height to 4 to 6 inches.
Can I build a desk with drawers using only basic tools?
Yes, you can build a full desk with just four core tools: a circular saw with straight-edge guide, a drill or driver, a pocket hole jig, and an orbital sander. These tools handle all essential cuts and joinery.
How do I make drawers open and close smoothly?
Use quality side-mount ball-bearing slides rated for 75 to 100 pounds. Install cabinet-side rails and drawer-side hardware carefully, ensuring both are level and parallel. Test frequently during installation and adjust by one-sixteenth inch if the drawer binds.