Your desk deserves more than a plain cup for your pens, and your craft stash holds more potential than you think. A handmade organizer can store your favorite writing tools while adding serious personality to your workspace. With the right clay pen holder ideas, you can transform simple air-dry or polymer clay into charming desk companions that double as functional art.
This guide covers the best materials, proven construction methods, and dozens of unique design themes to spark your next creative session. You’ll also find expert tips on painting, sealing, and durability so your finished piece lasts for years.
Pick the Best Clay for Your Project

Your material choice shapes the entire crafting experience, from how long it takes to how durable the final piece becomes. Match your clay to your skill level, available tools, and desired finish.
Air Dry Clay for Beginners and Kids
This no-bake option cures naturally through air exposure, making it perfect for classrooms and quick weekend projects.
- Top Picks: Sculpey Air-Dry and Model Magic
- Upsides: No oven required, lightweight, paints beautifully
- Downsides: Less durable than baked clay and needs sealing
- Storage Tip: Keep unused clay sealed in an airtight container to prevent premature hardening
Polymer Clay for Detailed Designs
Fimo and Sculpey polymer clays require baking but reward you with crisp details and long-lasting strength.
- Bake Time: Usually 25 to 30 minutes at 265°F (follow package directions)
- Best For: Miniature figures, textured surfaces, intricate character work
- Pro Tip: Condition the clay by kneading thoroughly before shaping to prevent cracking
Ceramic Clay for Studio Artists
Traditional pottery clay delivers professional results when you have access to a kiln.
- Techniques: Pinch pots, coil building, wheel throwing
- Finish: Glaze and fire for waterproof, glossy durability
- Ideal For: School ceramics programs or dedicated home studios
Hybrid and Alternative Materials
Mix textures and styles for modern, multi-material organizers that stand out.
- Wood and Clay Combo: Use a wooden base topped with a sculpted clay figure
- Paper-Clay Fusion: Reinforce paper forms with thin clay layers for extra strength
- 3D Printed Accents: Print custom bases that mimic hand-sculpted clay textures
Master Three Core Construction Methods
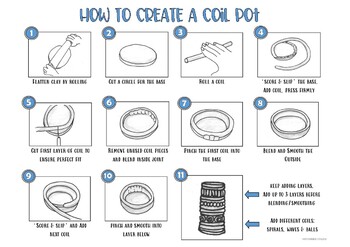
Each technique suits different skill levels and design goals. Choose based on your vision and experience.
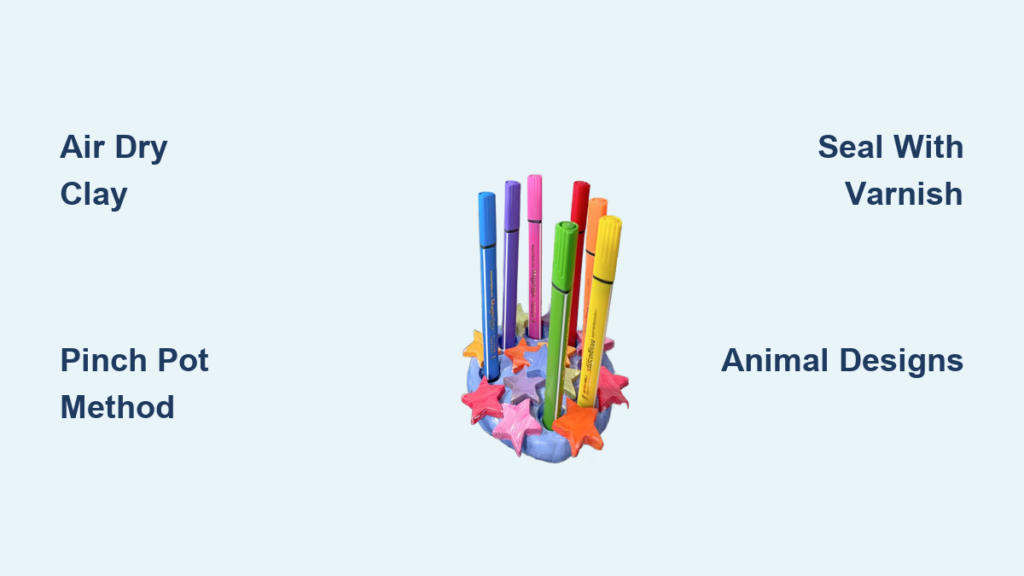
Build a Holed Base Slab
This method works best when you want pens to stand upright in individual slots. It’s ideal for marker sets and craft supplies.
Roll the Base to 3/4-Inch Thickness
- Use a rolling pin with guide sticks to maintain even thickness
- Thicker bases create deeper holes that grip pens more securely
- Works well with both air dry and polymer clay
Cut Pen-Sized Holes
- Use a bottle cap, dowel, or the pen itself as a cutting tool
- Press straight down and wiggle slightly to remove the clay plug
- Test fit by inserting a pen before the clay dries
Add Decorative Cut-Outs
- Roll a second slab to 1/4 inch thick
- Cut shapes like stars, hearts, or leaves and let them dry separately
- Glue the cut-outs to the base with strong adhesive after painting
Time Estimate: 45 minutes of active work plus 24 to 48 hours of drying time.
Shape a Coil Pot Holder
This classic pottery method creates a cup-style holder perfect for pencils, brushes, or makeup tools.
Form a 1/4-Inch Base
- Roll clay flat and trace a cup or bowl for a perfect circle
- Smooth the edges with a damp brush or your finger
- Let the base rest for 5 minutes before adding walls
Roll and Attach a Clay Rope
- Create a rope 1 to 1.5 inches thick and long enough to wrap the base
- Score both the base edge and rope end with a toothpick
- Apply slip (a water-clay mix) to bond the pieces, then press firmly together
Seal and Smooth the Seam
- Blend the joint with your finger or a rib tool
- Reinforce with a small coil of extra clay along the seam
- Taper the walls inward slightly for an elegant silhouette
Difficulty: Beginner to intermediate
Drying Time: 24 hours minimum, longer for thick walls
Sculpt With the Pinch Pot Method
Fast, tactile, and endlessly customizable, this approach is perfect for animal shapes and playful designs.
Start With a Clay Ball
- Aim for a ball about the width of your palm
- Organic shapes add charm, so don’t worry about perfect symmetry
Pinch the Walls Evenly
- Push your thumb into the center while rotating the ball
- Keep walls about 1/4 inch thick to prevent cracking
- Stop pinching when the opening is wide enough for your pens
Mold Into Animals
- Owl: Pinch the rim into pointed ears and add eyes later
- Monster: Twist the rim for jagged teeth or add horns
- Snail: Flatten one side and attach a coiled shell on top
Best For: Rainy-day crafts, birthday parties, and fine motor skill practice
Explore Dozens of Design Themes

From whimsical creatures to sleek minimalism, there’s a style for every taste and skill level.
Animal-Themed Holders
Animals dominate the world of clay pen holder ideas because they’re fun to sculpt and full of personality.
Make an Owl Pinch Pot
- Paint with earth tones like brown, cream, and rust
- Add large eyes using black paint or small beads
- Optional: Glue felt wings to the back for extra texture
Craft a Hedgehog Holder
- Shape a rounded back and use a fork to create textured spines
- Attach googly eyes or paint a tiny face
- Pens slide into the belly cavity for storage
Build a Shark Tooth Holder
- Sculpt a shark head with an open jaw
- Insert pens between the teeth for a fierce look
- Paint in gray and white for realistic detail
Design a Snail Pen Carrier
- Create a spiral shell from rolled clay coils
- Attach it to a low, curved body
- Paint in bright rainbow colors for a cheerful desk companion
Sculpt a Penguin Cup
- Form a rounded body with a flat, stable base
- Paint black and white with an orange beak and feet
- Use the top opening to hold pens and pencils
Food and Nature Motifs
Delightful and unexpected, these designs bring playfulness to any workspace.
Bake a Cupcake Pencil Holder
- Shape a cupcake liner base with a ruffled edge
- Top with a clay frosting swirl
- Decorate with tiny clay balls as sprinkles
Create a Mushroom Toadstool
- Make a domed red cap dotted with white spots
- Attach a short white stem underneath
- Use the inside of the cap to hold pens
Mold a Strawberry Pen Pot
- Shape an oval red body with a green leafy top
- Add tiny yellow seeds with paint
- Hollow out the center to hold pencils
Pop Culture and Character Designs
Turn your favorite fandoms into functional desk decor.
Craft a SpongeBob Pen Holder
- Sculpt a square body with arms and expressive eyes
- Paint yellow with a red tie and white gloves
- Use the back or side opening to hold pens
Build a DoodleBob Sculpture
- Go abstract with a wavy body and mismatched eyes
- Use black, white, and neon accent colors
- Let kids design their own quirky version
Sculpt a Picasso-Style Owl
- Use abstract shapes with mismatched eyes and a geometric beak
- Paint in bold blues, whites, and grays
- Inspired by Pablo Picasso’s iconic ceramic owls
Abstract and Aesthetic Styles
For modern desks and minimalist tastes, focus on form, texture, and color.
Make a Galaxy Pen Stand
- Swirl black, deep blue, purple, and silver clay together
- Add tiny white dots with paint for stars
- Seal with glossy varnish for cosmic shine
Design a Rainbow Holder
- Layer different colored clays vertically or horizontally
- Shape into a cylinder or freeform sculpture
- Brightens any workspace with cheerful color
Create a Kawaii Cute Pen Pot
- Round, chibi-style face with rosy cheeks
- Big eyes and a tiny smile for personality
- Use pastel colors and glitter accents
Finish Your Holder Like a Pro
A great design deserves a flawless finish. Follow these steps to protect and enhance your creation.
Paint With Acrylics
Acrylic paint adheres well to dried clay and comes in endless color options.
Apply Thin Coats
- Prevent cracking by using 2 to 3 light layers instead of one thick coat
- Let each layer dry completely before adding the next
Add Fine Details With Markers
- Use permanent markers for small features like pupils and whiskers
- Test your markers on scrap clay first to check color and flow
Try Nail Polish for Shine
- Paint pinch pots with colored nail polish for a unique glossy finish
- Dries fast and creates a durable, eye-catching surface
Seal for Long-Lasting Durability
Never skip this step, especially with air dry clay.
Choose Your Varnish
- Matte: For a soft, modern look
- Gloss: For vibrant colors and shiny surfaces
- Water-Based: Easy cleanup with low odor
Apply After Paint Dries
- Wait at least 2 hours after painting before sealing
- Brush on 2 to 3 even coats, letting each dry fully
Why It Matters: Sealing prevents chipping, moisture damage, and everyday wear.
Embellish With Texture and Add-Ons
Make your holder stand out with tactile details and decorative accents.
Press Tools for Patterns
- Use forks, stamps, lace, or toothpicks to imprint designs
- Try bubble wrap for a quick polka-dot texture
Glue on Beads or Flowers
- Add small dried flowers for a nature-inspired touch
- Use beads for eyes, buttons, or decorative accents
Warning: Attach heavy add-ons after sealing and use strong glue for lasting hold.
Optimize for Everyday Use
A beautiful holder must also work well on a daily basis.
Match Size to Your Pens
- Measure your longest pen or marker before starting
- Design the holder at least 1 inch taller than your longest pen
- For hole-style bases, ensure holes are snug but not too tight
Reinforce Weak Seams
- Coil pots often crack at the base, so reinforce with extra clay
- Smooth all joints thoroughly before the drying phase begins
Prevent Cracking During Drying
- Dry pieces away from direct sunlight and heat sources
- Flip thick pieces halfway through drying for even moisture release
- Don’t rush the process; thick slabs may need up to 72 hours
Discover Creative Use Cases

Clay pen holder ideas aren’t limited to holding pens. They’re personalized, meaningful, and surprisingly versatile.
Classroom Projects
- Best Methods: Pinch pots and coil pots work well for groups
- Popular Themes: Animals, monsters, and cupcakes
- Skills Developed: Fine motor control, creativity, and patience
Teacher Tip: Split the project into two sessions. Sculpt on day one and paint on day two or three.
Office Desk Upgrades
- Ideal Styles: Minimalist, geometric, and monochrome designs
- Bonus Function: Holds scissors, rulers, and sticky notes too
Pro Pick: A sleek “Cool Pen Stand (Modern & Minimalist)” elevates any professional workspace.
Handmade Gifts That Impress
- For Teachers: Owl or apple-themed holders show appreciation
- For Teens: Galaxy, kawaii, or pop culture designs feel personal
- For Artists: Brush holders with sculpted palettes add function
Market Value: Handmade polymer or ceramic holders typically sell for $25 to $35.
Apply Expert Tips for Success
Avoid common mistakes and elevate your results with these professional insights.
Let Thick Pieces Dry Slowly
- A 3/4-inch slab can take over 48 hours to dry completely
- Speeding up with a hairdryer causes cracks, so patience pays off
Use Strong Glue for Attachments
- Standard craft glue may fail with heavy clay pieces
- Choose epoxy or super glue for durable decoration
Customize for Multi-Use
- Make a clay mug that also holds pens on the side
- Design a specs holder for reading glasses
- Combine with cork or felt for hybrid organizers
Frequently Asked Questions About Clay Pen Holder Ideas
What type of clay works best for beginners making pen holders?
Air dry clay is the most beginner-friendly option. It requires no baking, cures in 24 to 48 hours, and paints beautifully. Sculpey Air-Dry and Model Magic are popular choices for classrooms and first-time crafters.
How long does it take for a clay pen holder to dry completely?
Standard pieces dry within 24 to 48 hours. However, thicker slabs over 3/4 inch may require 72 hours or more. Dry pieces away from direct sunlight to prevent cracking and flip them halfway through for even drying.
Can I make a clay pen holder without a kiln or oven?
Yes. Air dry clay cures naturally without any heat source. Polymer clay requires baking, but air dry versions work perfectly for most pen holder projects, especially for kids and classroom activities.
How do I seal a clay pen holder to make it last?
Apply 2 to 3 coats of clear varnish (matte, gloss, or water-based) after your paint dries completely. Sealing protects against chipping, moisture, and everyday wear, especially important for air dry clay.
What are the most popular design themes for clay pen holders?
Animal themes dominate the category, with owls, hedgehogs, sharks, snails, and penguins leading the pack. Food motifs like cupcakes and strawberries, along with pop culture characters and galaxy designs, are also extremely popular choices.
How much can I sell handmade clay pen holders for?
Handmade polymer clay and ceramic pen holders typically sell for $25 to $35 in online marketplaces. Intricate designs with detailed sculpting or character work can command premium prices, especially when marketed as personalized gifts.
Key Takeaways for Crafting Your Own Clay Pen Holder

Clay pen holder ideas blend function, art, and personal expression into one satisfying project. Whether you’re rolling your first pinch pot or sculpting a detailed character, the process is as rewarding as the result. With the right clay, proven method, and creative design, you can create a piece that’s uniquely yours.
Start by choosing your clay type based on your skill level and tools. Pick a construction method that matches your vision, then select a design theme that excites you. Remember to seal your finished piece for durability and let thick projects dry slowly to prevent cracks.
Grab your clay, pick a theme, and start shaping a holder that doesn’t just store pens. It tells a story.