A messy desk can quietly drain your focus, but a single overlooked item holds the fix: the pen holder. Decorating a pen holder offers a creative outlet that personalizes your workspace, sparks motivation, and clears visual clutter at the same time. Whether you upcycle a tin can or craft a resin masterpiece, this guide walks you through every step, material, and design tip to build a one-of-a-kind organizer that fits your style and skill level.
Choose Your Base Material

The first decision in any pen holder project is the foundation. Almost any upright container can become a canvas with the right prep and a bit of imagination.
Upcycled Household Items
Many everyday objects transform into excellent pen holders while saving money and reducing waste.
- Tin cans: Soak in warm, soapy water to remove labels, then dry fully. Sand sharp rims smooth or use a safety can opener.
- Plastic bottles: Cut to your preferred height, wash thoroughly, and wipe with rubbing alcohol to strip away residue.
- Cardboard tubes: Reinforce with glue or a second layer for heavier pens. Paper towel rolls offer tall storage; toilet paper rolls suit mini organizers.
- Pringles cans: Their uniform shape works beautifully for bold patterns or photo wraps.
- Old mugs: Chipped or mismatched mugs gain new purpose as quirky pen stands with just a label or ribbon.
Craft and Natural Bases
For a more polished look, consider purpose-bought or natural materials.
- Wooden holders: Accept paint, stain, and carving. Sand smooth before decorating.
- Mason jars: Transparent sides let your pen colors become part of the visual display.
- Thread spools: Industrial-sized spools become statement pieces for large desks.
- Paper cups: Lightweight and easy to decorate, perfect for temporary or locker use.
Prep for Long-Lasting Results
Even the most beautiful decoration will fail without proper surface preparation. A few minutes of prep saves hours of frustration later.
Clean and Dry Thoroughly
Dust, oil, and moisture prevent adhesives and paint from bonding correctly.
- Wash recycled containers with dish soap and water.
- Wipe plastic surfaces with rubbing alcohol to remove invisible oils.
- Let all materials air-dry completely, ideally overnight.
Sand Rough Edges
Smooth surfaces create cleaner finishes and prevent injuries during use.
- Sand tin can rims and cardboard edges with fine-grit sandpaper.
- Lightly sand wooden holders to remove splinters and open the grain for staining.
Prime When Needed
Some materials demand a base coat for paint or glue to adhere properly.
- Apply plastic primer before painting plastic bottles.
- Brush a clear acrylic sealer onto porous cardboard to prevent warping.
Easy Decoration Techniques
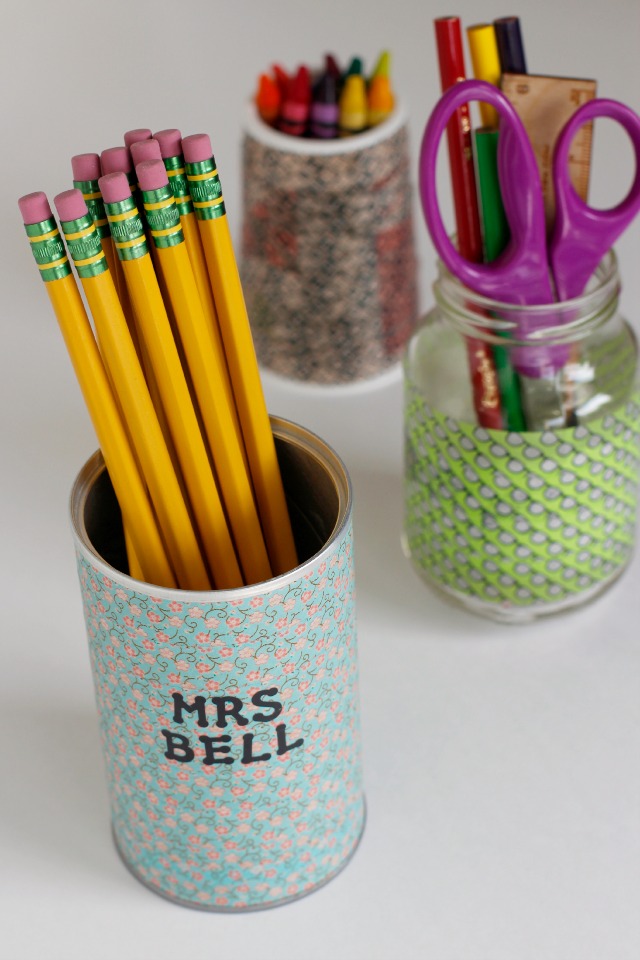
You do not need artistic skills to create a standout pen holder. These beginner-friendly methods deliver instant results with minimal supplies.
Wrap With Washi Tape
Washi tape is the fastest, mess-free way to decorate almost any container.
- Pick patterns that match your desk theme, such as florals, geometrics, or metallics.
- Apply strips horizontally, vertically, or in crisscross designs.
- Overlap slightly to hide gaps and trim excess with scissors.
- Pro tip: Layer two tapes, one wide and one narrow, for a framed look.
Use Decorative Paper
Scrapbook paper, gift wrap, or magazine pages add bold color and personality.
- Measure the height and circumference of your holder before cutting.
- Wrap snugly and secure with craft glue or mod podge.
- Smooth out air bubbles as you go.
- Seal with a top coat of mod podge for added durability.
Stick On Embellishments
Instant decoration with zero mess and zero drying time.
- Apply stick-on gems, alphabet stickers, or pre-cut decals.
- Choose themed stickers like cats, books, or space for personality.
- Arrange in spirals, clusters, or grid layouts for visual variety.
Fabric and Texture Wraps
Add warmth and dimension with soft or natural materials that go beyond paper and tape.
Cover With Fabric
Cotton, burlap, or lace transform hard surfaces into cozy textures.
- Cut fabric to fit around the holder with a half-inch overlap.
- Apply fabric glue or hot glue in sections, wrapping tightly as you go.
- Tuck and glue excess at the bottom edge for a clean finish.
- Tip: Use pinking shears to prevent fraying on cotton fabrics.
Wrap With Twine or Raffia
Natural fibers create rustic charm that fits farmhouse or boho themes.
- Apply hot glue every two to three inches and wrap tightly.
- For full coverage, run a continuous bead of glue while wrapping.
- Top with a dried flower or mini tag for seasonal flair.
Leather or Faux Leather Trim
Adds executive elegance to wooden or mason jar holders.
- Cut a strip to size and glue vertically or as a band around the holder.
- Choose black, brown, or navy for professional appeal.
- Pair with embossed initials or metallic corner protectors for extra polish.
Paint and Color Upgrades

Painting unlocks full customization and delivers professional-looking results that match any desk theme.
Use Acrylic Paint
Acrylics work on wood, metal, and primed plastic with excellent durability.
- Apply two to three thin coats, letting each dry before the next.
- Use small brushes for details or foam rollers for smooth finishes.
- Color tip: Match your pen holder to your notebook or keyboard for a cohesive desk theme.
Try Ombre or Gradient Effects
Blend two or three shades for a modern, eye-catching look.
- Wet a sponge and dab two colors side by side.
- Lightly dab over the surface, blending the colors as you work.
- Let dry fully and seal with a clear spray for protection.
Create Geometric Patterns
Crisp lines elevate simple designs into something striking.
- Use painter’s tape to mask off triangles, stripes, or hexagons.
- Paint over the tape, then peel off carefully once dry.
- Monochrome patterns in black and white or navy and gold look sleek and professional.
Add 3D Embellishments
Make your pen holder pop with tactile details that catch the eye and invite touch.
Glue On Buttons or Beads
Colorful and fun, especially for kids or creative workspaces.
- Arrange buttons in rows, spirals, or random clusters.
- Use hot glue for quick, secure setting.
- Mix sizes and textures like matte, shiny, or pearl-finish beads for visual depth.
Use Popsicle Sticks
Create a wooden slat effect on tin cans with minimal effort.
- Paint sticks in advance if desired for a custom color.
- Glue vertically around the can, aligning tops evenly.
- Let dry flat to prevent leaning or shifting.
Embed With Resin
For a glossy, protective finish that doubles as art.
- Mix clear epoxy resin according to package instructions.
- Pour a thin layer, then add glitter, dried flowers, or tiny charms.
- Let cure 24 to 48 hours in a dust-free area.
- Warning: Work in a well-ventilated space and wear gloves.
Design by Theme

Match your pen holder to seasons, hobbies, or office style for a curated look that feels intentional.
Seasonal Looks
Refresh your desk every few months to keep the energy fresh.
- Spring: Pastel paper wraps with hand-painted flowers.
- Summer: Tropical washi tape or seashell glue-ons.
- Autumn: Burlap wrap with twine and mini pinecones.
- Winter: Metallic paint with snowflake stickers or faux fur trim.
Office-Friendly Styles
Keep it professional yet personal with these refined approaches.
- Corporate: Black leather wrap with gold initials.
- Minimalist: Matte white paint with a single black line.
- Creative: Bright geometric tape or rainbow button accents.
Boho or Rustic Vibes
Embrace texture and nature for a warm, layered aesthetic.
- Layer macramé, beads, and feathers.
- Combine birch bark, twine, and dried lavender.
- Use earth tones like sage, terracotta, and cream.
Boost Functionality
Decoration and utility can coexist beautifully in a single project.
Build Multi-Compartment Holders
Group multiple containers for better organization across tools.
- Use two tin cans: one tall for pens, one short for pencils.
- Paint or wrap them in coordinating designs.
- Glue them side by side on a wooden base for stability.
Add Magnetic Strips
Store paper clips, scissors, or small metal tools behind the scenes.
- Glue a small magnetic strip inside or on the back of the holder.
- Hide it with fabric or paint to maintain a clean aesthetic.
Make It Modular
Use stackable or attachable designs for flexible storage.
- Decorate several small paper cups and clip them to a binder ring.
- Attach magnets to the back of mason jars for locker or fridge use.
Match to Your Skill Level
Pick techniques that fit your confidence and available time for the best experience.
Beginner Projects (Under 30 Minutes)
- Washi tape can: Wrap any tin can in 10 minutes flat.
- Sticker mug: Decorate a chipped mug with office-themed stickers.
- Spray-painted bottle: Use matte black or gold spray paint on a plastic bottle outdoors.
Intermediate Ideas (1 to 2 Hours)
- Fabric-wrapped jar: Cover a mason jar with cotton and lace trim.
- Stencil painting: Use a star or leaf stencil with acrylics.
- Twine and charm: Wrap twine and glue on a small key or charm.
Advanced Creations (2+ Hours)
- Wood-burned holder: Use a pyrography tool to etch initials or patterns.
- Resin-embedded design: Pour resin with layered flowers or glitter.
- Mini mosaic: Glue broken tiles or glass pieces and grout the surface.
Maintain and Protect
Keep your pen holder looking fresh for months with simple care routines.
Seal for Durability
A protective coat prevents wear from daily handling.
- Apply clear polyurethane or mod podge sealer for lasting protection.
- Use spray-on sealant for textured surfaces like twine or fabric.
Clean Gently
Avoid water damage and fading with careful cleaning habits.
- Dust with a dry microfiber cloth regularly.
- For painted surfaces, use a slightly damp cloth and never soak.
- Keep out of direct sunlight to prevent UV fading over time.
Rotate Seasonally
Change designs every three months to keep your desk inspiring.
- Store old holders in tissue paper to protect embellishments.
- Reuse bases by peeling off tape or sanding paint for a fresh start.
Frequently Asked Questions About Decorating a Pen Holder
What materials work best for pen stand decoration?
The best material depends on your style and maintenance goals. Acrylic paints offer versatility across surfaces. Fabrics add texture and warmth. Natural elements like wood, jute, and bark create organic aesthetics. Plastic requires specific primers, while wood accepts stains and carvings well.
How can I decorate a pen stand without artistic skills?
No special talent is required for several methods. Wrapping with decorative paper, fabric, or washi tape works for anyone. Stencils help with patterns. Stick-on embellishments like gems or stickers provide instant decoration. Spray painting offers a uniform, professional look without brush strokes.
Can plastic pen holders be decorated effectively?
Yes, but preparation is key. Clean plastic surfaces thoroughly with rubbing alcohol. Use paints formulated for plastic or apply a primer beforehand. Hot glue adheres well for attaching embellishments. Avoid heat-based techniques that might melt the plastic.
What is the most durable decoration method?
Painted designs finished with a clear polyurethane coat provide excellent durability. Resin coatings offer a waterproof and scratch-resistant surface suitable for heavy use. Use permanent adhesives for longevity, especially with fragile embellishments in high-traffic spaces.
How often should pen stand decorations be changed?
Frequency depends on personal preference. Seasonal rotations every three months keep desks feeling fresh. Minimalists might change yearly. Washi tape allows for frequent updates without long-term commitment, since the tape peels off cleanly.
Where can inspiration for wooden pen stand designs be found?
Inspiration comes from nature, craft sites, Pinterest boards, and home furnishing stores. Observe grain patterns in existing furnishings, architectural detailing, or textile designs that can be adapted to a smaller scale.
Key Takeaways for Decorating a Pen Holder

Decorating a pen holder combines creativity, sustainability, and personal expression into one satisfying project. Start by choosing a base that fits your style and skill level, then prep the surface for lasting results. Choose techniques that match your confidence, from beginner-friendly washi tape to advanced resin embedding. Finally, seal and maintain your creation so it stays fresh through daily use.
Your next step is simple: pick one method from this guide and gather your supplies today. A single afternoon is enough to transform an old tin can or mason jar into a desk centerpiece that sparks joy every time you reach for a pen.