
Tired of balancing laptops, books, or snacks on your lap? A DIY lap desk pillow combines comfort and function, perfect for working, studying, or snacking on the couch. This budget-friendly project costs under $10 and uses simple materials from the dollar store. You’ll get a padded, stable surface that contours to your lap, resists spills, and stays in place.
Whether you’re crafting for yourself or making a gift, this sewing-friendly build takes just one hour. Follow this step-by-step guide to create a durable, custom-fit lap desk pillow with a non-slip tray, soft cushioning, and clean finish.
Choose the Right Tray Base

The foundation of your lap desk pillow starts with selecting the right tray. This component determines how stable and durable your final product will be.
Pick a Flexible Lap Tray
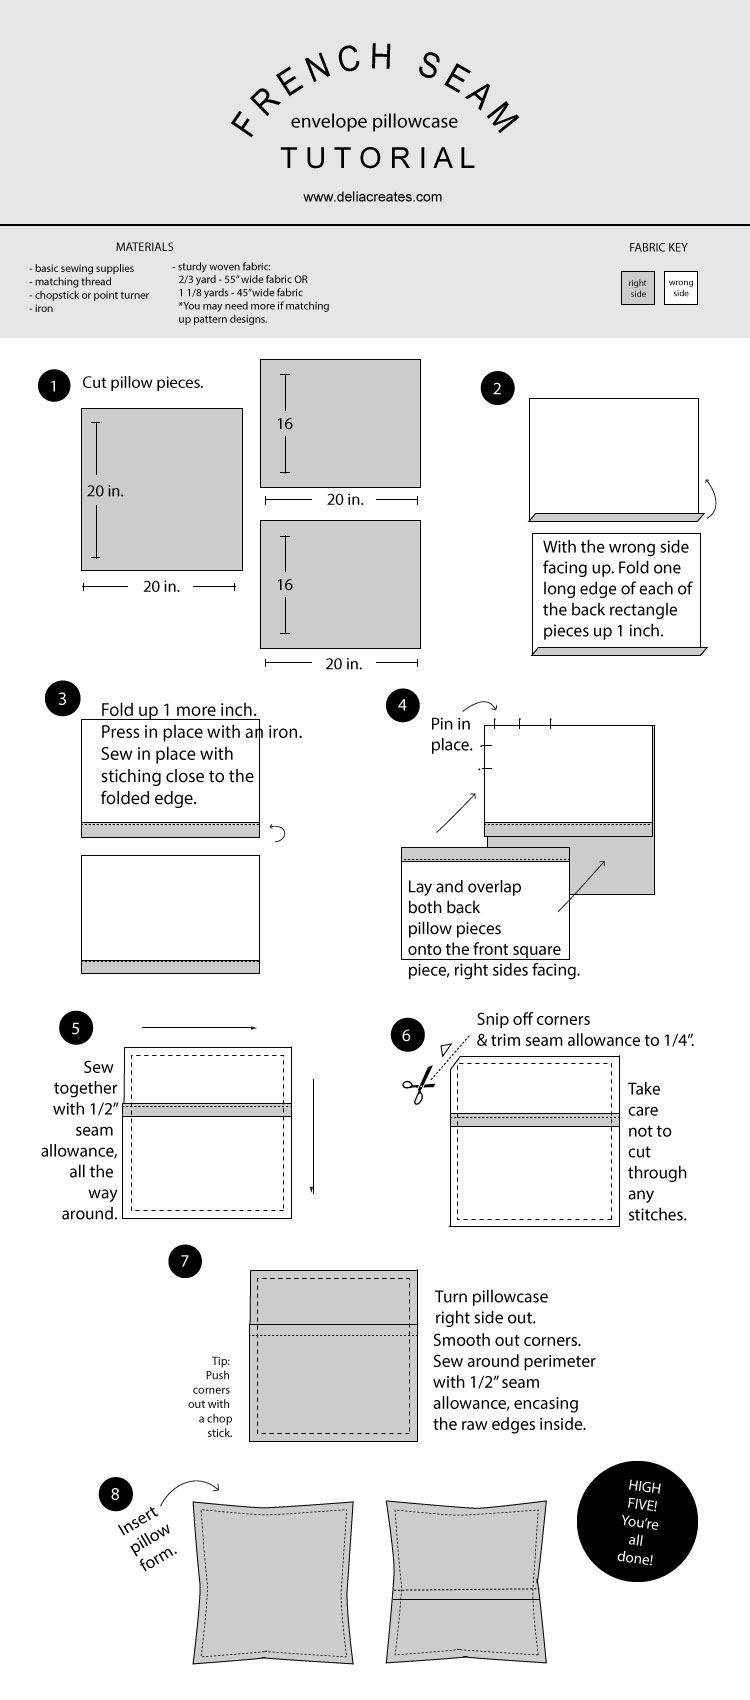
Start with a Dollar Tree lap tray measuring 13″ × 10″. Its non-stick surface resists spills and crumbs, while slight flexibility prevents cracking if dropped. Avoid rigid plastic trays that can snap under pressure. The curved edges also make it more comfortable on your thighs.
Cut Cardboard to Match Tray Size
Measure your tray’s base and cut a piece of cardboard to 13″ × 10″. This will reinforce the pillow and provide a firm base for the tray. Use a utility knife and straightedge for clean edges. Center this piece on your fabric before sewing to ensure even padding.
Prepare the Pillow Fabric
The fabric you choose determines how comfortable and durable your lap desk pillow will be. Getting the measurements right from the start saves time on adjustments later.
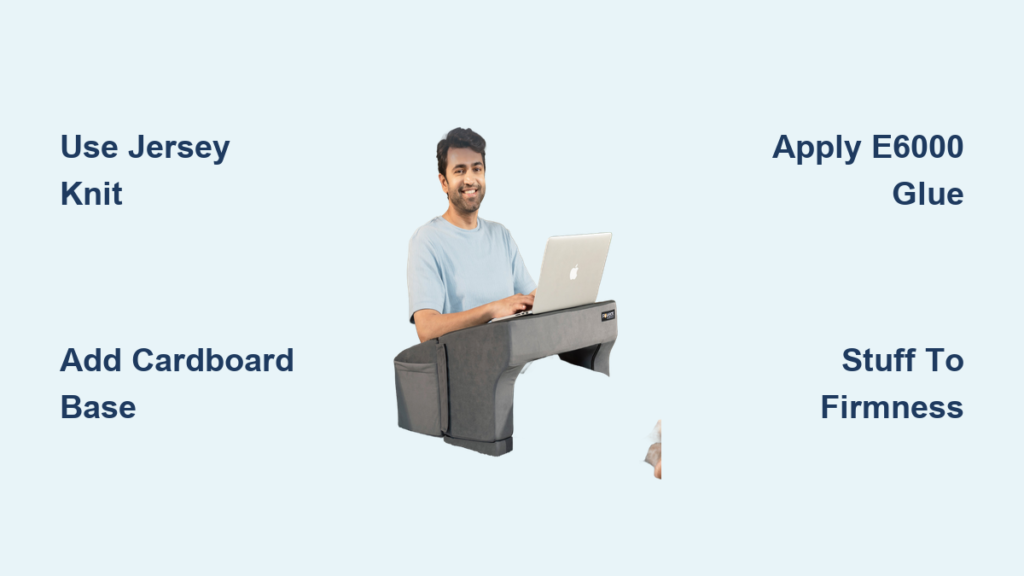
Use Stretchy Jersey Knit
Cut your main pillow fabric to 13.5″ × 10.5″, which includes a ½” seam allowance on all sides. Stretchy jersey knit works best because it drapes well and conforms to your lap. Cotton can be used, but it’s less flexible and may not hug your body as comfortably.
Measure and Cut Side Panels
Create a side panel that wraps around the pillow. Measure the perimeter of the tray (49″) and add 1″ for seam allowance, then cut a strip 4″ high × 49″ long. This height gives enough depth to hold stuffing and aligns neatly with the tray edge.
Sew the Pillow Casing
Sewing the casing correctly ensures your pillow holds its shape and provides even support across your lap.
Pin and Sew Side Panel
With right sides together, pin the side panel to the main fabric. Sew around the edges using a ½” seam allowance, pivoting at each corner to maintain the tray’s rectangular shape. Use a longer stitch length (3–3.5) to prevent tearing through the cardboard later.
Leave a Stuffing Opening
Stop sewing about 5–7″ from closing the loop. This gap lets you turn the casing right-side out and add stuffing. Don’t skip this opening; you’ll need it to fill and adjust firmness before sealing.
Insert and Secure Cardboard
The cardboard base provides essential stability for your lap desk pillow. Proper insertion prevents wobbling during use.
Slide in the Cardboard Base
Once the casing is sewn and turned right-side out, insert the 13″ × 10″ cardboard piece into the bottom. Push it all the way to the base so it’s centered and flat. This creates a stable platform that supports weight without collapsing.
Test Fit Before Gluing
Place the tray on top to check alignment. The cardboard should sit flush, with no bulging or shifting. Adjust if needed. This ensures the lap desk won’t wobble during use.
Stuff the Pillow Layer
The filling you choose affects both comfort and longevity. Getting the right firmness makes the difference between a usable lap desk and a flat, useless pillow.
Pick the Best Filling
Choose between pillowfill or bean-bag stuffing. Pillowfill is soft but flattens over time. Bean-bag beads hold shape better but can generate static in dry or heated rooms. Fill to medium firmness, soft enough to contour to your lap but firm enough to support a laptop or plate. Over-stuffing makes the pillow rigid and uncomfortable.
Close the Seam by Hand
Use a ladder stitch to sew the opening shut. Pull tight to hide the gap and maintain a seamless look. Knot securely and trim excess thread. This hand-sewn finish is nearly invisible and holds up well.
Attach Tray with Strong Adhesive
The adhesive is what holds your entire project together. Taking time with this step prevents future frustration.
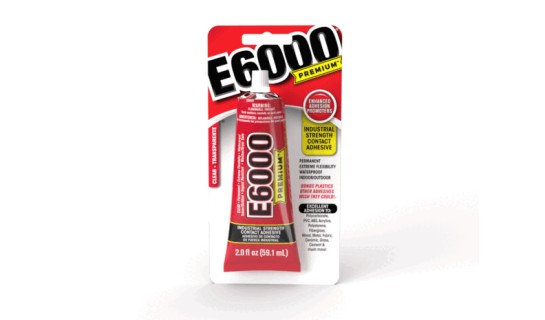
Use E6000 Glue for Grip
Apply E6000 adhesive to both the back of the tray and the top of the cardboard. Spread evenly with a toothpick or small brush. This industrial-strength glue bonds plastic to cardboard and resists heat and moisture.
Weight It During Drying
Press the tray onto the pillow and place a laundry basket or heavy book on top. Let it cure for at least 24 hours before use. Rushing this step risks peeling or misalignment.
Add Finishing Touches
These final details elevate your project from functional to professional-looking.
Hem the Top Edge (Optional)
For a neater look, fold the top edge of the side panel down ½” and stitch around the rim. This hides raw edges and gives a store-bought appearance. Skip if you’re short on time. It’s functional either way.
Test Flex and Stability
Gently bend the lap desk to check flexibility. A slight curve is good. It means it won’t crack if dropped. Place it on your lap with a book or plate to confirm it stays put and doesn’t slide.
Customize Your Design
Making your lap desk pillow unique adds personality and increases its usefulness.
Choose Fun Fabric Themes
Use themed fabric to match hobbies or seasons. Think superhero prints for kids, floral patterns for adults, or holiday designs for gifts. Jersey knit comes in many colors and stretches easily for snug fits.
Add a Velcro Snack Pocket
Sew a small fabric pocket to the front and attach Velcro strips to hold snacks, pens, or remotes. Use matching thread and reinforce stitching for durability.
Troubleshooting Common Issues
Even well-planned projects can hit snags. Here’s how to fix the most common problems.
Pillow Feels Too Flat
If the cushion flattens quickly, re-stuff with more filling or switch to bean-bag beads. Avoid over-compressing during sewing. Leave room for fluff to expand.
Tray Slides Off
Ensure the E6000 dried fully and covered the entire surface. If sliding persists, add non-slip shelf liner under the tray or use a rubberized grip mat.
Static from Bean Filling
Combat static by spraying a light mist of fabric softener on the inside before sealing. Or use anti-static spray on the outer fabric. Just avoid oversaturation.
Care and Maintenance Tips
Proper care extends the life of your lap desk pillow and keeps it looking fresh.
Spot Clean Only
Never machine wash. Use a damp cloth with mild soap to wipe spills or stains. Let air dry completely before reuse. Avoid soaking. Water can warp the cardboard.
Store Flat When Not in Use
Keep the lap desk pillow in a dry place, away from direct sunlight. Storing it flat prevents warping and keeps the shape intact.
Time-Saving Shortcuts
When you need to finish faster, these shortcuts help without sacrificing quality.
Skip Sewing the Hem
Omit the top hem if you’re in a rush. The seam will still hold, and the tray covers the edge anyway.
Use Hot Glue (With Caution)
While E6000 is best, high-temp hot glue can work in a pinch. Apply in zigzags for better grip, but avoid thin layers. They fail under heat.
Why This Lap Desk Beats Store-Bought
Understanding the benefits helps you appreciate your finished creation and justify the effort.
Costs Under $10
Total cost breaks down to approximately $1 for the tray, $1 for fabric, $2 for stuffing, and $3 for glue. Commercial lap desks cost $25–$50 and often lack padding or non-slip features.
Fits Your Body Perfectly
Unlike rigid models, this pillow molds to your lap, reducing pressure and improving comfort during long use.
Dual Function: Desk Plus Cushion
It’s not just a tray. It’s a lap pillow with a stable surface, ideal for remote work, crafting, or bedtime reading.
Frequently Asked Questions About Making a Lap Desk Pillow
How long does it take to make a lap desk pillow?
This project takes approximately one hour from start to finish. The most time-consuming steps are cutting fabric precisely and waiting for the adhesive to cure. Plan for an additional 24 hours before using it.
What type of fabric works best for a lap desk pillow?
Stretchy jersey knit is the ideal choice because it conforms to your body and provides comfort. Cotton works but offers less flexibility. Avoid stiff fabrics that won’t drape over your lap.
Can I skip the cardboard base?
The cardboard provides essential stability and prevents the pillow from collapsing under weight. Skipping it results in a wobbly, unusable lap desk that can’t support a laptop or book.
How do I prevent the tray from sliding off?
Apply E6000 adhesive generously to both surfaces and allow full 24-hour curing time. If sliding persists, add a non-slip shelf liner between the tray and pillow for extra grip.
Can I machine wash my lap desk pillow?
Never machine wash. The cardboard base will warp and disintegrate. Spot clean with a damp cloth and mild soap instead, then air dry completely before use.
Final Thoughts on Your DIY Lap Desk Pillow
This DIY lap desk pillow blends affordability, comfort, and practicality. With just a few dollar store supplies and basic sewing, you can build a custom workspace that moves with you. Whether you’re lounging on the couch or traveling in the car, it keeps your tech, meals, and projects secure.
The key takeaways are simple: use the right materials (Dollar Tree tray, jersey knit, E6000 glue), take time with the adhesive curing, and stuff to medium firmness for best results. Follow the steps above, and in under an hour, you’ll have a personalized lap desk that outperforms store-bought versions.
Ready to upgrade your cozy setup? Start cutting, sewing, and gluing today. Your perfect lap desk pillow awaits.


