
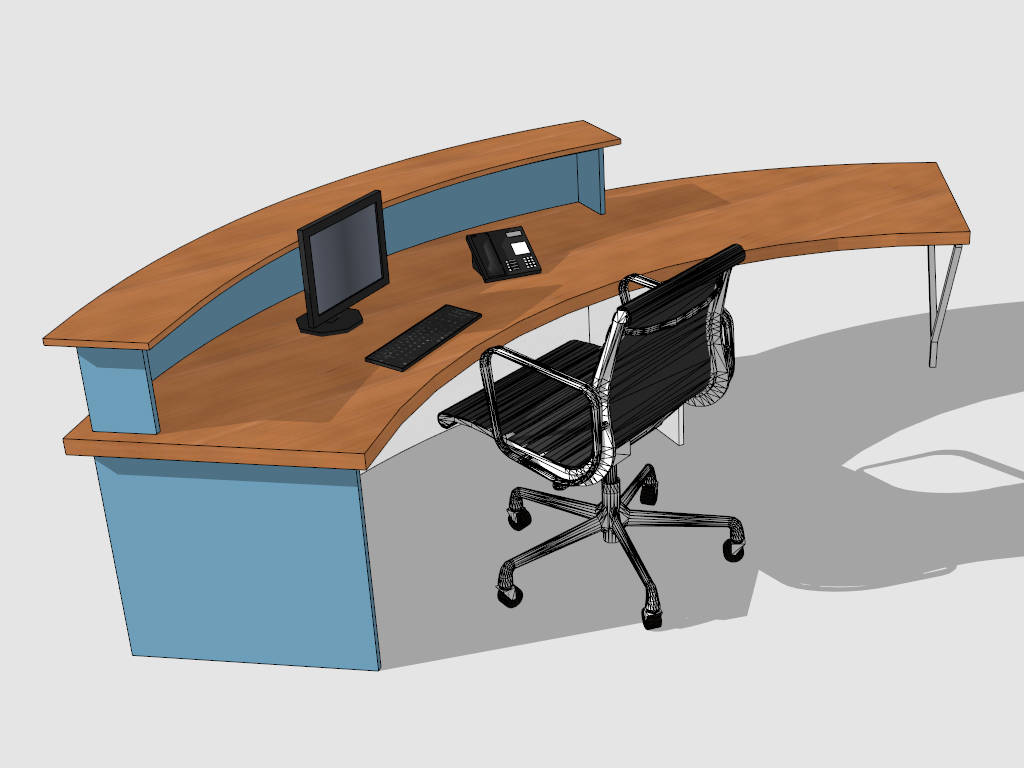
Building a curved desk transforms an ordinary workspace into a custom, eye-catching centerpiece. Whether you’re crafting a sleek floating desk for a modern home office or a bold reception desk with sweeping curves, the right approach ensures both beauty and durability. This guide dives into every step, from design and materials to assembly and finishing, so you can build a professional-grade curved desk with confidence.
You’ll learn how to shape smooth arcs, choose the best materials, secure your build safely, and finish like a pro. No fluff, no guesswork. Just actionable steps that deliver results. The keyword how to make a curved desk anchors our focus, guiding you through proven techniques used by expert woodworkers.
Plan Your Curved Desk Layout
Measure Your Space First
Before cutting any wood, measure the installation area precisely. Record width, depth, ceiling height, and proximity to doors, outlets, or windows. For wall-mounted desks, note stud locations because these are critical for safe anchoring. Use a level and tape measure to ensure accuracy. If the desk will fit into a corner or wrap around a column, create a simple sketch with dimensions to guide your design.
Choose the Right Curve Style
Curves change the feel of a room. A semi-circular shape works well in corners or as a freestanding unit. Concave fronts give more legroom. Convex fronts make a bold visual statement. For subtle elegance, opt for a gentle radius arc that you can easily draw with a batten.
The options include:
- Semi-circular (half-moon) for corners or freestanding use
- Concave curves (curved inward) for extra legroom
- Convex curves (bulging outward) for dramatic visual impact
- Gentle radius arcs for elegant, simple designs
- Complex ovals or compound bends for custom builds
Define Function and Use Case
Is this a home office, reception desk, or floating workstation? Home desks prioritize comfort and space-saving. Reception desks need storage, durability, and a polished look. Freestanding models require stable legs or bases. Floating desks rely on hidden wall supports. Knowing the use case shapes material choices, joinery methods, and finish type.
Design With Precision Tools
Sketch Your Design in SketchUp
Use SketchUp to model your curved desk in 3D before building. Import room dimensions, then draw the desk to scale. Test different radii, leg placements, and drawer positions. This helps catch fit issues early, like a curve that blocks a door swing. You can also apply material textures to preview the final look.
Create Full-Scale Templates
Transfer your digital design to real life using cardboard or MDF templates. Cut a full-size outline of the desktop curve and test it in place. Adjust until it fits perfectly. For repeatable parts like aprons or drawer fronts, use Paul Schürch’s large-radius arc jig to ensure consistent, smooth curves every time.
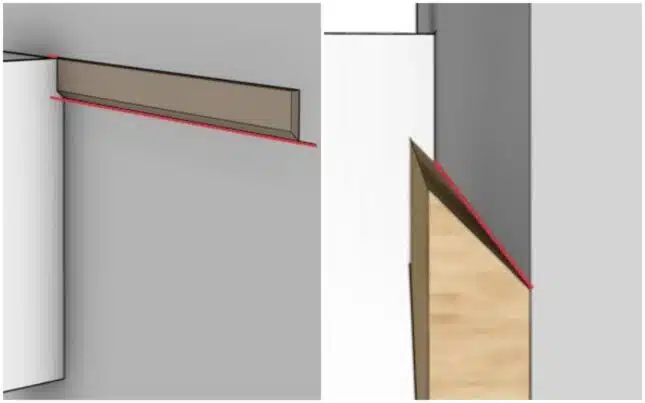
Draw Smooth Curves With a Flexible Batten
To draw a flawless arc, clamp a thin strip of 1/4-inch plywood or spline ruler at both ends of your workpiece. Bend it gently into a natural curve and trace along the edge. This technique avoids lumps or flat spots. Mark reference lines on the template and transfer them to your desktop substrate for accurate cutting.
Choose the Best Materials
Pick a Stable Desktop Core
Use 3/4-inch MDF or plywood for the desktop base. MDF offers a perfectly smooth surface ideal for paint. Birch plywood is stronger and better for stained finishes. Cut the base slightly oversized, about 1 inch deeper than final size, so you can trim it flush after attaching supports.
Laminate Curved Edges With Solid Wood
Raw MDF edges look unfinished. Cover them with laminated solid wood strips like poplar or maple. Rip three 3/8-inch thick strips from a 1×3 board. Glue and clamp one strip at a time to the curved edge. This prevents misalignment and ensures a tight fit.
The lamination process works best when you:
- Apply wood glue to the MDF edge
- Position the first strip and clamp at the center
- Work toward ends with additional clamps
- Secure with brad nails or pin nails every 6 to 8 inches
- Repeat for second and third strips until full thickness is achieved
Use Thin Plywood for Tight Bends
For curved aprons or legs with small radii, 1/4-inch bending plywood (birch or maple) is ideal. It flexes without breaking. For tighter curves, consider bent lamination, gluing thin wood strips over a mold. This method is stronger than solid wood and allows full control over shape.
Build a Strong Support Frame
Install Wall Cleats for Floating Desks
For wall-mounted designs, anchor 2×2 cleats directly into wall studs using 3-inch construction screws or lag bolts. Position one cleat under each end of the desk and a third at the center for long spans. Use a level to ensure they are perfectly aligned. Double up cleats at the front for extra support.
Attach the Front Support Rail
Connect side cleats with a front 2×2 rail. Screw through the cleats at an angle (toe-screwing) to avoid weak end-grain joints. Add construction adhesive (Loctite PL Premium) between rail and cleats for added rigidity and to reduce creaking. This frame must support the full weight of the desk and work gear.
Construct a Base for Freestanding Desks
Freestanding units need a sturdy base. Build a rectangular frame from 2×4s or 1×6s using pocket screws or mortise-and-tenon joints. Add curved aprons between legs for style and strength. Attach legs before shaping because this keeps joinery accurate. Bandsaw the curves after assembly, then refine with a spokeshave.
Shape the Curved Desktop
Cut the Curve With a Jigsaw or Bandsaw
Trace your template onto the desktop. Use a sharp jigsaw blade (fine-tooth, 10 to 12 TPI) to cut along the line. Keep the blade perpendicular to avoid beveling. For cleaner cuts, use a scrolling bandsaw or track saw with a curve guide. Cut just outside the line, about 1/16 inch away, so you can sand to perfection.
Sand for a Smooth, Uniform Edge
Start with 120-grit sandpaper on a random orbital sander to remove tool marks. Switch to 180-grit, then 220-grit for a glass-smooth finish. Use a spindle sander or oscillating tool for tight curves. Round over the front edge slightly for comfort during use, about a 1/8-inch radius.
Trim to Final Depth After Installation
Once the desktop is attached to the frame, trim it to final depth. Use a track saw with a guide for a straight, dust-controlled cut. This ensures the back edge sits flush against the wall or cabinet. A circular saw works too, but a track saw delivers cleaner results.
Master Curved Joinery

Cut Joints Before Shaping Wood
Expert woodworkers follow one golden rule. Build joints straight, shape later. Cut mortises, tenons, and dovetails while the wood is still square and flat. Once joints are perfect, bandsaw the curve. This avoids alignment errors and keeps drawers and legs fitting tightly.
Build Drawers for a Curved Front
Even with a curved front rail, build drawer pockets square. Use spacers to align dividers during dry-fit. Cut dovetails as usual, then attach stepped drawer fronts that follow the curve. Clamp the front in a jig while gluing to maintain position. This gives legroom and a seamless look.
Shape Legs With a Template
For cabriole or curved legs, trace a full-scale template onto squared stock. Bandsaw the profile on adjacent faces, then smooth with a rasp, spokeshave, and block plane. Cut the mortise before shaping because this guarantees the tenon fits perfectly into the apron.
Finish for Durability and Beauty
Prepare the Surface Thoroughly
Remove all glue squeeze-out with a chisel or scraper before sanding. Sand progressively: 120 to 180 to 220 grit. Wipe down with a tack cloth to remove dust. Fill any gaps or nail holes with wood putty and sand again after drying.
Prime and Paint MDF Properly
If using MDF, prime all surfaces including edges and cutouts. Use oil-based or bonding primer to prevent swelling and ensure adhesion. Apply 2 to 3 coats of paint. An airless sprayer gives the smoothest, brush-mark-free finish. Sand lightly between coats with 220-grit.
Stain and Seal Solid Wood
For natural wood, use gel stain to avoid blotchiness, especially on MDF-laminated edges. Apply with a cloth, wipe off excess, and let dry. Seal with 2 to 3 coats of polyurethane (oil- or water-based). Lightly sand between coats. This protects against scratches and daily wear.
Assemble and Install Safely
Attach the Desktop From Below
Place the desktop onto the support frame. Secure it by driving coarse-thread wood screws up through the cleats into the underside of the desktop. Pre-drill to prevent splitting. Add construction adhesive along the frame for extra strength and to dampen vibrations.
Anchor Floating Desks Into Studs
Never rely on drywall anchors. Mount cleats directly into wall studs using 3-inch screws. Use a stud finder and verify locations. If studs do not align with your design, install a horizontal backer board across multiple studs, then attach cleats to it. This spreads the load safely.
Install Cabinets and Shelves
If your desk includes storage, install cabinets after the desktop is secure. Align them with the curve using shims. Anchor tall units to the wall with anti-tip brackets for safety. Ensure doors and drawers open freely without hitting the curve.
Tackle Advanced Curve Techniques
Bend Wood With Steam or Lamination
For tight curves in solid wood, steam bending works but it is risky. A safer method is bent lamination. Cut 1/8-inch to 1/4-inch strips, glue them with Titebond III, and clamp over a form. Let cure 24 or more hours. Trim and sand to final shape. This creates strong, beautiful curves for aprons or legs.
Use CNC for Precision Replication
If making multiple desks or complex shapes, CNC routers deliver unmatched accuracy. Program your design once, then cut identical parts repeatedly. Ideal for shops or production builds. Even small desktop CNC machines can carve templates or final edges.
Avoid Common Building Mistakes
Prevent MDF Edge Swelling
MDF absorbs moisture and swells. Seal all edges with primer or sealant before final finish. In humid rooms, consider using moisture-resistant MDF or switching to plywood.
Stop Screws From Pulling Out
MDF does not hold screws well. Always pre-drill and use coarse-thread screws. Add construction adhesive to joints. For wall mounts, ensure screws hit studs, not just drywall.
Avoid Uneven Laminations
When gluing curved edge strips, clamp evenly and wipe off excess glue immediately. Stacked strips can shift. Attach one at a time for better control. Use caul clamps or web clamps to maintain pressure along the curve.
Frequently Asked Questions About Making a Curved Desk
What is the best material for a curved desktop?
The best material for a curved desktop is 3/4-inch MDF or plywood for the core. MDF offers a perfectly smooth surface that accepts paint well. Birch plywood is stronger and better for stained finishes. Both materials are stable and easy to cut into curves.
Do I need special tools to cut curves in wood?
You need a jigsaw with a fine-tooth blade (10 to 12 TPI), a bandsaw, or a track saw with a curve guide. A flexible batten helps you draw smooth curves before cutting. For finishing curves, a spindle sander or oscillating tool works well on tight radii.
How do I attach a curved desktop to a wall securely?
Mount 2×2 cleats directly into wall studs using 3-inch construction screws or lag bolts. Position one cleat under each end and one at the center for long spans. Use a level to ensure alignment. Add construction adhesive between the cleats and the desktop for extra rigidity.
Can I build a curved desk with limited woodworking experience?
Yes, you can build a curved desk with basic skills. Start with simple curves like a gentle radius arc. Use MDF for the desktop because it cuts easily. Take time to create accurate templates before cutting. The key is planning and using templates to guide your cuts.
How long does it take to build a curved desk?
Building a curved desk typically takes 2 to 4 days for a beginner. This includes planning and design (several hours), material cutting and assembly (1 to 2 days), and finishing (1 day plus drying time). Complex designs with bent lamination may take longer.
Key Takeaways for Building a Curved Desk
Building a curved desk is not just about looks. It is about function, safety, and craftsmanship. By planning with SketchUp, using 3/4-inch MDF with solid wood lamination, cutting joints before shaping, and anchoring securely into studs, you will create a desk that is as strong as it is beautiful.
The most important steps are creating accurate templates, cutting joints before shaping the wood, and securing wall-mounted desks into actual studs. Take your time with the lamination process by attaching edge strips one at a time. Finish with a smooth, durable coat, and maintain it with regular cleaning and protective pads.
Now you know exactly how to make a curved desk, from first sketch to final sanding. Start with simple curves and work up to more complex designs as your skills develop.


