
If you’re struggling to focus in a shared space, wondering how to organize your work tools, or looking for a simple way to create privacy during video calls, a DIY desk divider could be the solution. Learning how to make a desk divider doesn’t require advanced skills or expensive materials, just a few basic supplies and about 30 minutes of time. Whether for homeschooling, remote work, or creating a focused workspace, a personalized divider can reduce distractions, boost concentration, and turn any table into a dedicated work area. This guide walks you through every step, from choosing materials to adding smart functional upgrades, so you can build a custom desk divider that works exactly for your needs.
Choose the Right Base Material for Your Desk Divider

The foundation of your desk divider determines its durability, portability, and ease of customization. Select one based on your primary goal: focus, organization, or privacy.
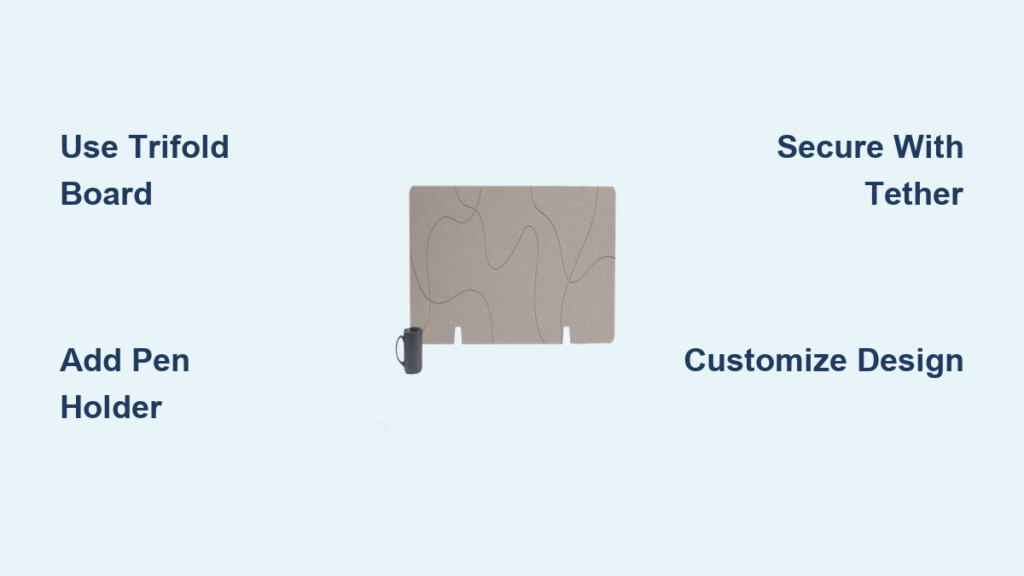
Use a Trifold Board for Homeschooling Setups
A standard trifold display board (36″ x 48″) is ideal for children’s learning spaces. It folds for storage, stands upright, and offers three panels for functional zones. Cut it in half lengthwise with a box cutter to create two narrower dividers, perfect for side-by-side desks or smaller tables. The center panel becomes your main display area, while the side flaps provide emotional regulation tools or storage space.
Opt for Foam or Cork Board for Office Use
Foam board is lightweight and paintable, making it great for temporary setups. For better durability, use cork board, which allows pinning notes, schedules, or reminders without tape. Both can be cut to custom dimensions using a utility knife and straightedge. If you need more rigidity, layer multiple foam boards and bind them with packing tape.
Build with Wood for Long-Term Stability
For permanent or heavy-duty use, construct your divider from plywood or MDF. These materials support deeper storage compartments and resist warping. Customize the shape to fit sloped or recessed desks by tapering from 10 inches at the base to 6 inches at the top. Secure panels with L-brackets or wood glue, then finish with paint or laminate for a professional look.
Design Your Desk Divider for Function and Focus
A well-designed desk divider does more than block sightlines. It supports behavior, organization, and emotional regulation through intentional layout and smart placement.
Create Functional Zones for Key Tools
Divide the surface into specific areas:
– Top section: Monthly calendar or class schedule
– Center: Child’s name or motivational quote
– Left side: Positive affirmations like “I can do hard things”
– Right side: Emotional regulation chart listing calming strategies
Place affirmations on the left so they enter peripheral vision when the user glances away from the screen. This subtle cue reinforces confidence throughout the day.
Add a Calendar That’s Easy to Update Monthly
Print a free monthly calendar from printacalendar.com and tape it across the top edge with Scotch tape. This allows you to flip or replace it each month without redoing the entire divider. Tuck login details, teacher contacts, or assignment due dates behind it for quick access.
Include Emotional Regulation Aids for Kids
Attach a behavior support chart listing calming strategies like taking 5 deep breaths, asking for a break, squeezing a stress ball, or doing a quick stretch. Pair this with a downloadable yoga pose chart on the opposite side to encourage movement breaks during long study sessions.
Build a Pen Holder from Recycled Materials
Keep writing tools within reach by creating a simple DIY pen holder using everyday supplies you likely already have at home.
Cut and Seal a Wrapping-Paper Tube
Select a sturdy cardboard tube from wrapping paper or foil. Cut it to 4 to 6 inches tall. Seal the bottom tightly with packing tape, as Scotch tape won’t hold under weight. Fold the cut edges inward for a clean finish, then tape them securely.
Suspend with Ribbon for Stability
Thread a ribbon through the top of the tube and tape both ends to the inside of the divider panel. Use a second ribbon loop at a different height to prevent tipping when pens are inserted. This dual-point suspension keeps the holder upright and functional.
Pro Tip: Paint or wrap the tube in decorative paper to match your theme, whether space, jungle, sports, or any favorite topic.
Secure the Desk Divider to Prevent Tipping
Prevent accidental tipping and keep your divider always in place with a simple anchoring system that works with your specific setup.
Attach a Ribbon Tether for Easy Storage
Cut a 6 to 8 inch ribbon and tape one end to the top center of the divider. Tape the other end to the back edge of the desk. This allows the divider to stay connected while folding flat for storage. Use double-sided tape or clear packing tape for a discreet hold.
Use Adhesive Strips for Lightweight Models
For foam or poster board dividers, use removable adhesive strips like Command strips to anchor the base. They provide gentle hold without damaging surfaces and can be repositioned as needed.
Warning: Never leave a freestanding divider unattended around small children or pets. Ensure it cannot tip forward and cause injury.
Customize Your Desk Divider for Maximum Engagement
Personalization increases user buy-in, especially for kids. A visually appealing divider feels like theirs, encouraging consistent use and making the workspace feel special.
Decorate with Glitter and Stencils for Visual Appeal
Outline the child’s name with pencil, apply glue, then sprinkle glitter for a sparkling effect. Let dry completely before shaking off excess. Use stencils for clean lettering of quotes or labels, as freehand writing often looks messy and reduces readability.
Choose High-Contrast Colors for Better Legibility
Use black poster board as a background for maximum contrast. White, silver, or neon markers stand out clearly, improving legibility of schedules and affirmations. Avoid overly bright or flashing patterns that may cause distraction during work sessions.
Theme It to Match Personal Interests
Design around favorite topics like dinosaurs, space, soccer, or unicorns. Search Pinterest for desk divider themes or kids focus tools for inspiration. But keep visuals minimal, as too many images can defeat the purpose of reducing clutter.
Upgrade Your Desk Divider with Smart Storage Solutions
Turn your divider into a mini command center by integrating smart storage solutions that keep essentials within reach while maintaining a clean appearance.
Add a Post-it Note Zone for Temporary Reminders
Reserve the lower third of the panel for temporary reminders like test dates, chores, or parent-teacher meetings. Use bright Post-its for urgent items and pastels for routine tasks. Replace them weekly to prevent buildup.
Create Hidden Pockets for Sensitive Information
Tape envelopes or folded paper behind the calendar or charts to store passwords, Zoom links, or billing details. Label them discreetly so only the user knows where to look.
Install a Magnetic Strip for Interactive Storage
Glue a thin magnetic strip to the surface. Use it to hold paperclips, small scissors, or metal-tipped dry-erase markers. Combine with a dry-erase surface for a fully interactive workspace that adapts to changing needs.
Build a Freestanding U-Shaped Booth for Full Privacy
When a flat divider isn’t enough, construct a three-panel enclosure that surrounds the desk and chair for maximum privacy and focus.
Connect Panels with Hinges for Folding Storage
Use hinge connectors to join three boards, a back panel and two sides. This allows the unit to fold flat when not in use. Position the side panels at a 90-degree angle to the back for maximum coverage and minimal gaps.
Add Outward-Kicked Legs for Stability
Cut leg supports from scrap wood or foam board and attach them at an angle extending behind the back panel. This lowers the center of gravity and prevents tipping. For extra security, add circular bases or small weights like sandbags inside the legs.
Cover with Fabric for Professional Aesthetics
Stretch fabric over the frame and secure with staples or adhesive. Choose calming colors like navy, gray, or sage green for a professional look. Alternatively, use a clip-on curtain like a shower curtain for a quick, temporary solution.
Alternative: Modify a pre-made folding room divider by removing one panel and shaping it into a U-shape. Reinforce joints with tape or brackets for added stability.
Optimize Your Desk Divider for Video Calls
A desk divider doubles as a clean, professional backdrop for Zoom, Teams, or Google Meet, making virtual meetings more polished and reducing background distractions.
Use Solid Colors or Subtle Patterns for Camera
Avoid busy prints on camera. Solid black, white, or neutral tones look sharp and allow digital background blur to work more effectively. If decorating, keep designs low-profile and centered in the frame.
Add LED Strip Lighting for Better Visibility
Attach a battery-powered LED strip along the top edge for soft ambient lighting. This reduces shadows on your face and creates a focused atmosphere. Choose warm white for comfort during evening calls or cool white for alertness during daytime meetings.
Ensure Safety and Durability of Your Build
Even simple builds need safety checks, especially in homes with children or pets. Taking these precautions prevents accidents and extends the life of your desk divider.
Round Sharp Corners to Prevent Injuries
Use sandpaper or a corner rounder tool to smooth edges on wood or rigid foam. This prevents cuts and makes the divider safer for daily use, particularly in households with curious children.
Use Non-Toxic Supplies for Children’s Desks
Choose water-based glue, non-VOC paint, and BPA-free tape, especially for children’s desks. Avoid strong adhesives that emit fumes over time, which can affect indoor air quality.
Test for Stability Before Regular Use
Gently push the divider from different angles to ensure it won’t tip. If it wobbles, widen the base or add weight like books inside a lower compartment to anchor it securely.
Compare Costs and Choose the Right Budget Option
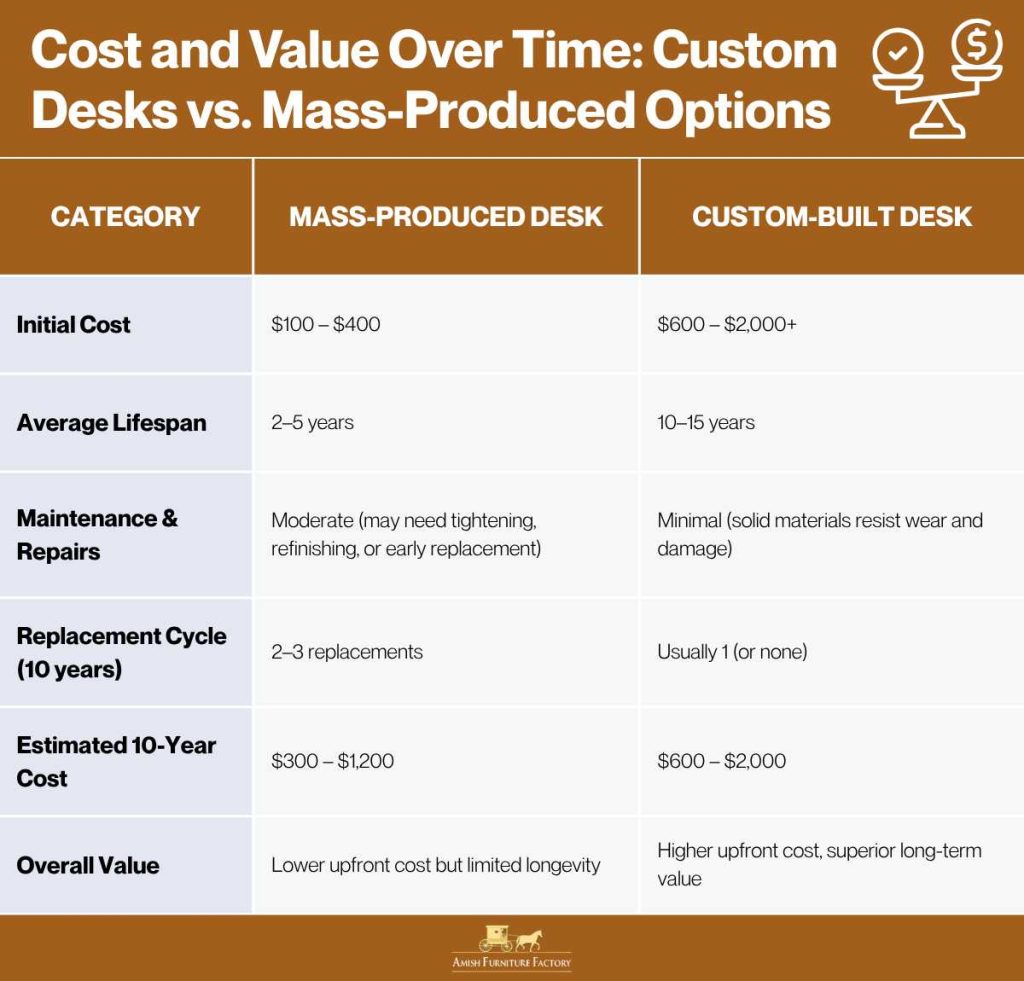
You don’t need to spend much to make an effective desk divider. Most DIY versions cost under $10, making them far more affordable than commercial alternatives.
Low-Cost Craft Version Under $10
• Trifold board cut in half: $3.50
• Black poster board: $0.50
• Packing tape: $1.00
• Glitter, glue, ribbon: $2.00
• Wrapping-paper tube (recycled): $0
• Total: approximately $7
This yields two functional dividers, ideal for homeschooling families with multiple children.
Mid-Range Cork or Foam Build $20 to $50
Using pre-cut cork or foam panels (6 feet tall) costs $20 to $50. Add hinges and leg supports for another $10 to $20. This option works best for adults needing taller privacy screens in home offices.
Commercial Alternative $100 and Up
Pre-built room dividers range from $100 to $200. While sturdier, they lack customization and take up more space. A DIY desk divider often outperforms them for specific desk needs.
Test, Iterate, and Improve Your Design Over Time
Start simple, then refine based on real-world use. Building in phases prevents overwhelm and lets you discover what actually works for your situation.
Mock Up First with Cardboard Before Cutting Materials
Before cutting final materials, sketch your design on cardboard. Test height, width, and layout. Adjust for desk shape, especially if it has a recessed compartment or sloped edge that requires custom fitting.
Involve the User in Design Decisions
Let children pick colors, themes, and affirmations. Adults should choose storage layouts that match their workflow. Ownership increases daily use and makes the divider feel like a personalized solution rather than a generic imposition.
Add Features Over Time to Prevent Overwhelm
Begin with a basic divider and add the pen holder in week one, the calendar in week two, and an emotional chart in week three. This phased approach lets you see what works without committing to a complex build upfront.
Frequently Asked Questions About Desk Dividers
How long does it take to make a desk divider?
Most simple desk dividers can be completed in 30 to 60 minutes. Basic trifold versions take about 30 minutes, while custom wooden builds with storage compartments may take 2 to 3 hours.
What is the best material for a desk divider?
Trifold boards work best for homeschooling and temporary setups. Foam or cork board suits office use for pinning notes. Wood is ideal for permanent installations requiring durability and custom storage compartments.
Can a desk divider help with focus?
Yes, desk dividers reduce visual distractions, create a dedicated work zone, and provide psychological cues that signal the brain to shift into task mode. Adding functional elements like calendars and affirmations further enhances focus.
Are desk dividers good for video calls?
Absolutely. A desk divider creates a clean, professional background for Zoom or Teams calls. Use solid colors or subtle patterns for the best camera appearance, and consider adding LED lighting to reduce shadows.
How do I attach a desk divider to prevent tipping?
Use ribbon tethers connected to the desk edge for lightweight dividers. Apply adhesive strips like Command hooks for foam or poster board versions. For taller dividers, add weights at the base or widen the footprint for stability.
Key Takeaways for Building Your Own Desk Divider
Making a desk divider is a fast, low-cost way to transform any surface into a focused, organized workspace. Whether you’re supporting a child’s remote learning or carving out privacy in a shared home office, a custom-built divider improves concentration, reduces stress, and enhances productivity. Start with the trifold method for quick results under $10, upgrade to wood or hinges for permanence, and always prioritize function over form. With just a few supplies and smart design choices, you can build a solution that’s as unique as your workspace needs. Begin with a simple build, test it in your actual workflow, and add features like pen holders, calendars, or emotional regulation charts over time.


