
Is your desk wobbling every time you type or adjust your monitor? You’re not alone. Many modern desks especially flat-pack models like IKEA’s Linmon and Adils lack built-in lateral support, leading to frustrating movement under everyday use. The solution is bracing a desk properly to eliminate racking, reduce flex, and create a rock-solid work surface.
This guide will show you how to brace a desk effectively using proven structural methods, from simple DIY fixes to advanced reinforcement techniques. Whether you’re dealing with an L-shaped workstation, a long-span tabletop, or a flimsy MDF desk, you’ll learn exactly what to do step by step using affordable materials and common tools.
Diagnose the Wobble First
Before adding braces, identify what is causing the instability. Bracing won’t fix everything. Sometimes the problem is not the frame, but loose joints or an uneven floor.
Check for Loose Joints
Inspect where the legs meet the tabletop. Wiggle each corner firmly. If there is play, the issue may be loose screws or weak fasteners. Tighten all bolts and consider upgrading to threaded inserts or L-brackets for stronger connections.
Pro Tip: Apply a drop of medium-strength threadlocker (Loctite 243) to screw threads to prevent future loosening from vibrations.
Test for Uneven Legs or Flooring
Place a level across the desk surface in multiple directions. If it tilts, one leg may be shorter or the floor unlevel. Use adjustable glides or shims under the shorter leg to stabilize it.
Identify Racking vs. Sagging
Racking is side-to-side wobble that feels like the frame wants to collapse into a parallelogram. This needs lateral or diagonal bracing.
Sagging is when the center of the desktop dips under weight. This needs underside battens or C-channels.
Top flex is when the desktop itself bends when touched. This needs stiffeners or upgraded material.
Only proceed with bracing once these basics are ruled out.
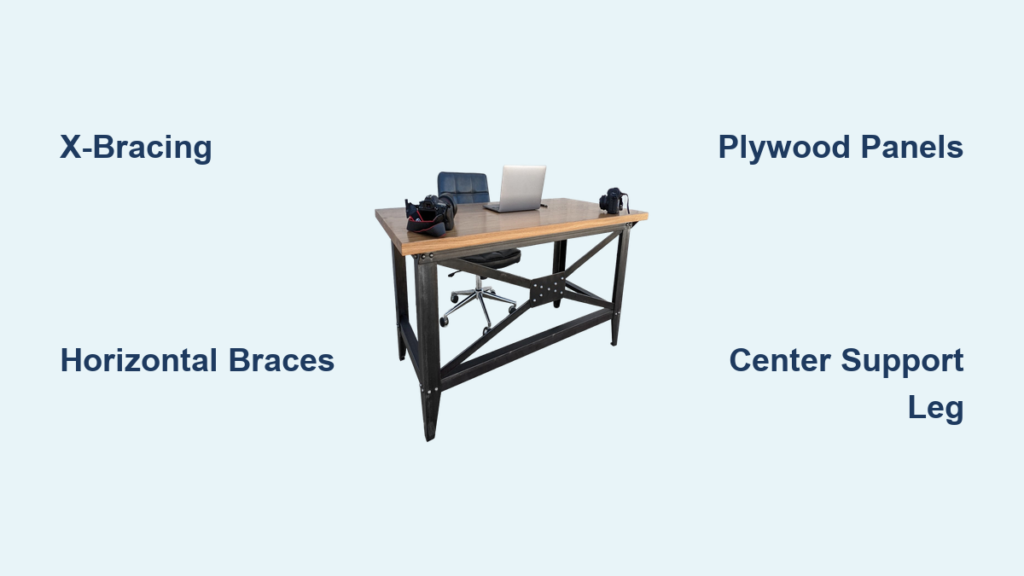
Install X-Bracing for Maximum Rigidity
X-bracing is the most effective way to stop racking by turning a flexible rectangle into two rigid triangles. This is a basic engineering principle that works every time.
Use Steel or Wood for X-Braces
Steel flat bar (1/16 inch thick, 1-3/8 inch wide) is extremely strong and pre-drilled options are available. It is ideal for heavy-duty builds.
Hardwood (1×3 or 1×4) is easier to cut and finish. It blends better with furniture for a more polished look.
Size: Measure diagonally between opposing legs. Cut braces slightly shorter for a snug, compression-fit installation.
Attach Braces Low on the Legs
Mounting braces near the floor increases leverage and reduces moment arm, making them far more effective. Avoid high mounting because it reduces mechanical advantage.
Fasten Securely with Screws or Bolts
Pre-drill holes to prevent splitting wood or cracking MDF.
Use washer-backed screws or hex bolts with nuts for metal braces.
For wood braces, use 2-inch deck screws at both ends.
Warning: Do not overtighten steel braces on soft wood because it can crush fibers and weaken joints.
Improve Aesthetics After Installation
Exposed metal braces look industrial. To blend them in, paint to match legs or floor. Glue wood veneer over steel or cover with thin trim or a modesty panel.
Add Horizontal Leg Braces for Simplicity
If X-bracing feels too aggressive or blocks legroom, horizontal braces are a simpler alternative that still provides meaningful reinforcement.
Connect Adjacent Legs at the Base
Use 1×4 pine or oak boards cut to length and screw into the inside faces of each leg pair. Position them 2 to 4 inches off the ground to avoid knee interference.
Reinforce with Corner Blocks
For extra strength, add triangular wood blocks (gussets) between the brace and leg. Glue and screw for permanence.
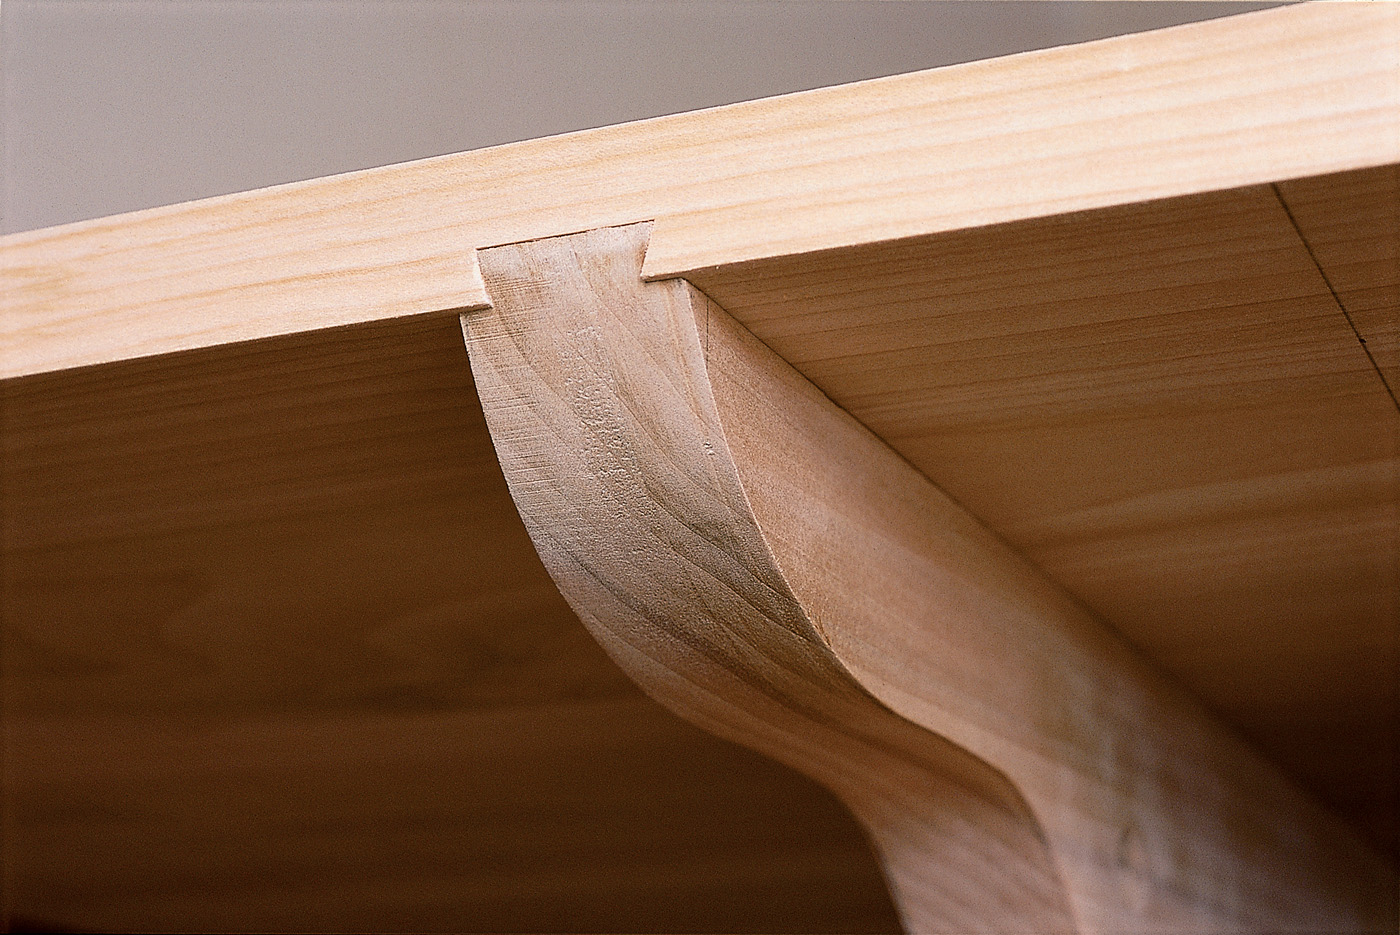
Consider Lap Joints for Strength
Advanced builders can use lap joints or dado cuts so braces sit flush with leg surfaces, creating a seamless, cabinet-like base.
Time Estimate: 30 to 60 minutes per side with basic tools.
Build Plywood Shear Panels for Full Rigidity

For ultimate stability, enclose one or more sides with plywood shear panels. This essentially turns your desk frame into a mini cabinet with exceptional torsional stiffness.
Use 1/2-Inch or 3/4-Inch Plywood Cut to Fit
Cut panels to span between legs vertically. Height matters. Twenty-four inches is ideal. Six-inch strips do little to improve stability.
Secure with Screws or Machine Fasteners
Drill pilot holes to avoid splitting.
Use #8 or #10 wood screws, 1.5 inches long.
For stronger hold, use machine screws with washers and nuts through pre-drilled holes.
Finish to Match Your Desk
Paint or stain the panel to blend with your existing furniture.
Apply edge banding to hide raw plywood edges.
Install as a modesty panel on the front or side.
Bonus: Add cable cutouts or small shelves inside the panel for extra storage.
Strengthen Corners with Gussets and Corbels
Gussets are small triangular supports that stiffen weak joints without taking up valuable floor space.
Install at Each Leg-to-Top Connection
Cut triangles from 1/2-inch plywood or hardwood scraps.
Size them 3×3 to 6×6 inches depending on leg thickness.
Attach with wood glue and screws.
Use Metal Corbels for Heavy Loads
For desks holding dual monitors or full desktop towers, install heavy-duty L-brackets or steel corbels under the overhang.
Pro Tip: Combine gussets with figure-8 fasteners to allow wood movement while maintaining rigidity.
Use Hidden Support Plates for Clean Looks
Want a minimalist, modern desk with zero visible hardware? Hidden support plates are the professional solution that maintains clean aesthetics.
Install Liberty or FederalBrace Plates
These plates sit between the leg and desktop, concealed from view.
Steps:
Route shallow recesses into the top of each leg to accept the plate.
Install threaded inserts in the underside of the tabletop.
Screw the plate to the leg, then fasten the top down via bolts through the inserts.
Optional: Use connection eclipses for a seamless finish.
Best For: Custom builds, modular desks, or rentals where aesthetics matter.
Prevent Sag with Underside Battens or C-Channels
Long desktops over 48 inches tend to sag in the middle, especially under heavy equipment like monitors and CPUs.
Install Perpendicular Stiffeners
Run hardwood battens or steel C-channels across the underside, perpendicular to the grain direction.
Recommended Spacing:
Every 12 to 18 inches along the span.
At least one batten directly under monitor areas where weight concentrates.
Allow for Wood Movement
Solid wood expands and contracts with humidity. Never rigidly glue or screw the entire length.
Use:
Elongated screw holes
Figure-8 fasteners
Slotted brackets
This lets the top move slightly without cracking.
Choose the Right Material
Hardwood batten (oak or maple) works best for natural look and DIY projects. Cost is $3 to $8 per foot with high strength.
Pine 1×3 suits budget builds well. Cost is under $2 per foot with medium strength.
Steel C-channel (1 inch square) provides maximum rigidity. Cost is $15 to $30 with the highest strength rating.
Round or square tubing offers an industrial style. Cost is $10 to $25 with high strength.
Case Example: A user stopped sag in an 1800mm acacia top using two steel C-channels and the desk became rock solid.
Add a Center Support Leg for Long Spans
If your desk is over 60 inches (1500mm) long, side legs alone may not provide sufficient support.
Install a Third Leg or Beam
Place it centrally, running front to back.
It can be hidden behind a drawer, modesty panel, or CPU stand.
Attach to floor if possible. On carpet, use a thick pad to prevent sinking.
Evaluate Legroom First
Will the center leg interfere with seating? Consider offset placement, narrow-profile leg (like steel tube), or removable design.
Pro Tip: Use a center beam with cross-bracing instead of a single leg for broader support distribution.
Reinforce Weak Joints and Materials
Even the best bracing fails if the base structure is compromised. Address weak points first.
Upgrade MDF or Particleboard Connections
These materials strip easily. Improve screw grip by gluing hardwood blocks under legs. Install threaded inserts or T-nuts. Use longer screws through reinforced zones.
Prevent Pull-Out with Mounting Blocks
Glue and screw a 2×4 or plywood block to the underside of the desktop, then attach the leg to the block. This doubles holding power.
Use Lock Washers or Threadlocker
Prevent screws from backing out due to daily vibration.
Lock washers go under bolt heads.
Loctite 243 on threads is removable when needed.
Match Bracing to Your Desk Type
Not all desks need the same solution. Choose based on your specific configuration.
IKEA Linmon Plus Adils Legs
The problem is tall metal legs with no bracing, prone to racking.
The fix is adding X-braces at long spans and L-joint. Use gussets at all leg-to-top connections.
L-Shaped Desk
The weak point is the inside corner where two sections meet.
The solution is bracing both legs at the joint. Add plywood panel on the short side for enclosure.
Glass or Laminate Top
Avoid drilling if possible. Use clamping brackets or surface-mounted L-brackets instead of through-bolts.
Rental-Friendly Desk
Avoid permanent modifications. Use freestanding braces, non-slip mats, or adjustable corner brackets that do not require drilling.
Choose the Right Tools and Skill Level
Most bracing jobs require only basic tools and beginner skills.
Essential Tools
Tape measure
Drill or driver
Level
Screwdriver
Saw (hand or circular)
Optional But Helpful
Clamps
Router (for recesses)
Grinder (cutting metal)
Drill press (precision holes)
Skill Level: Most methods are beginner-friendly. X-bracing and hidden plates require more precision.
Compare Bracing Methods by Effectiveness
X-Bracing (Metal) works best for heavy-duty stability with five-star effectiveness and low aesthetic impact.
X-Bracing (Wood) provides balanced look and strength with four-star effectiveness and medium aesthetic impact.
Plywood Panels deliver full rigidity and storage potential with five-star effectiveness and high aesthetic impact.
Horizontal Braces offer simple fixes while preserving legroom with three-star effectiveness and low aesthetic impact.
Gussets provide corner reinforcement with two-star effectiveness and very low aesthetic impact.
Hidden Plates create clean, modern looks with five-star effectiveness and no visible aesthetic impact.
C-Channels prevent sag with five-star effectiveness and low aesthetic impact (under desk).
Center Leg supports long spans with four-star effectiveness and medium aesthetic impact.
When to Replace vs. Brace
Brace if the frame is intact, the top is undamaged, and you want to save money.
Replace if MDF is swollen or delaminated, legs are bent or cracked, or the cost of materials exceeds buying a new desk.
Frequently Asked Questions About Bracing a Desk
What is the most effective way to brace a desk?
X-bracing with steel or wood is the most effective method. It triangulates the frame and distributes lateral forces across multiple points, eliminating over 90 percent of wobble in typical setups.
Can I brace a desk without drilling into it?
Yes. Use freestanding braces, non-slip mats under legs, or adjustable corner brackets that clamp on without drilling. These work for rental situations where permanent modifications are not allowed.
How do I stop my desk from swaying side to side?
Install diagonal X-braces between opposing legs. This converts a flexible rectangle into two rigid triangles, which is the most effective way to resist lateral racking forces.
What causes desk sag in the middle?
Long spans over 48 inches combined with heavy loads (monitors, CPUs) cause sag. Prevent it by installing hardwood battens or steel C-channels perpendicular to the grain on the underside, spaced 12 to 18 inches apart.
Should I use wood or metal braces?
Metal (steel flat bar) provides maximum strength and is thinner. Wood (1×3 or 1×4) is easier to cut, finish, and paint to match your desk. Choose based on your strength needs and aesthetic preferences.
How do I brace an IKEA desk?
IKEA flat-pack desks like the Linmon with Adils legs lack built-in bracing. Add X-braces at long spans, use gussets at all leg-to-top connections, and consider adding a plywood panel on one side for maximum rigidity.
Final Takeaways for Bracing Your Desk
Bracing a desk is not just about stopping wobble. It is about creating a durable, functional workspace that lasts. Start by diagnosing the actual problem. Loose joints need tightening first. Uneven floors need shims or glides. Only then add structural bracing.
Triangulation is your best friend when it comes to stability. Diagonal X-braces outperform horizontal braces every time because they convert flexible rectangular frames into rigid triangular systems. Mount braces low on the legs for maximum mechanical advantage.
Use quality hardware. Threaded inserts, heavy-duty brackets, and bolts outperform basic screws. Apply threadlocker to prevent loosening from daily vibrations. For long desktops over 48 inches, add underside battens or C-channels to prevent sag.
Allow for wood movement if your desk has a solid wood top. Use figure-8 fasteners or elongated holes so the top can expand and contract with humidity changes without cracking.
Now that you know how to brace a desk properly, pick your method, grab your tools, and eliminate that annoying shake for good. Your wrists and your productivity will thank you.


