
Tired of cramped workspaces and cluttered countertops? Learning how to build a simple L-shaped desk transforms unused corners into powerful, ergonomic workstations. This DIY project combines smart space planning, sturdy construction, and customizable storage to deliver a professional-grade desk for under $200. Whether you’re a remote worker, gamer, or creative professional, an L-shaped desk maximizes productivity by giving you room for dual monitors, a keyboard zone, and storage. You don’t need advanced tools or carpentry skills. With basic lumber, a Kreg Jig, and a few afternoon sessions, you can assemble a solid, long-lasting desk tailored to your needs.
Plan Your L-Shaped Desk Layout First
Start by measuring your room’s corner and nearby obstructions. Use a tape measure to record wall lengths, floor-to-ceiling height, and distances to outlets, vents, or baseboards. The desk should leave at least 36 inches behind for chair movement and avoid blocking HVAC registers. If walls aren’t perfectly square, build the desk slightly smaller than the space and use adjustable feet to level it. Mark the ideal footprint with painter’s tape to visualize the final setup.
Choose Standard Dimensions for Your Build
Most DIY L-shaped desks use one of two configurations. Symmetrical options include 60″ x 60″ or 72″ x 72″ arms. Asymmetrical builds typically feature a 72″ long arm with a 48″ short wing. Keep desktop depth between 24″ and 30″ for comfortable typing and mouse use. The longer arm typically holds monitors and primary devices while the shorter wing supports notebooks, tablets, or reference materials. Ensure knee clearance is at least 29″ from floor to desk underside.
Use CAD to Visualize Your Design
Sketch your design in free CAD software like Onshape to test fit. Model the legs, support braces, and corner joint. Add IKEA ALEX drawers or other storage to see how they align. This digital mockup helps avoid costly mistakes and confirms cable routing paths before cutting wood.
Select Cost-Effective Materials for Your Desk
Choose based on budget, look, and durability. Three-quarter inch birch plywood offers the best balance of strength, stability, and cost. Two-by-six pine boards serve as a budget-friendly option when glued edge-to-edge for a solid top. MDF provides a smooth surface for painting but remains heavy and moisture-sensitive. Reclaimed wood adds character but requires sanding and planing. For a clean finish, apply iron-on veneer tape or solid wood edge banding to plywood edges.
Choose Strong Frame Lumber
Use two-by-four kiln-dried pine or spruce for legs and base frames. These materials are affordable, widely available, and strong enough to support 300 to 500 pounds when properly braced. Avoid particleboard for structural parts since it weakens over time under load. For a modern look, consider steel hairpin legs, but reinforce the inner corner with cross-bracing for stability.
Balance Cost and Quality
Keep total costs under $200 by using budget-friendly substrates for structure and upgrading only visible surfaces. Build the frame with two-by-fours, use birch plywood for the top, then apply a premium stain or paint. This approach delivers durability without overspending on hidden components.
Build the Desktop with Strong Joints

Lay out two-by-six boards side-by-side with alternating grain direction to reduce warping. Clamp them tightly using bar clamps. Drill pocket holes along the edges with a Kreg Jig and join with 2.5″ pocket screws and wood glue. This method is beginner-friendly and creates a strong, flat surface. After assembly, use a circular saw with a straightedge to trim the edges flush.
Add Visual Impact with Herringbone Patterns
For a standout design, build a herringbone top using reclaimed wood strips. Lay the pieces in a zig-zag pattern on a 3/4″ plywood backing. Glue and clamp sections, then attach to the backing with construction adhesive and brad nails. Sand smooth and finish with dark walnut stain and polyurethane for contrast.
Finish Edges Professionally
Prevent splintering and improve appearance with edge treatment. Chamfer edges with a 1/8″ router bit. Apply iron-on veneer tape to plywood edges. Glue solid wood strips (1×2 or 1×3) for a seamless look. Use a roundover bit for soft, comfortable edges that won’t catch clothing or scratch skin.
Construct a Sturdy Double X Frame Base
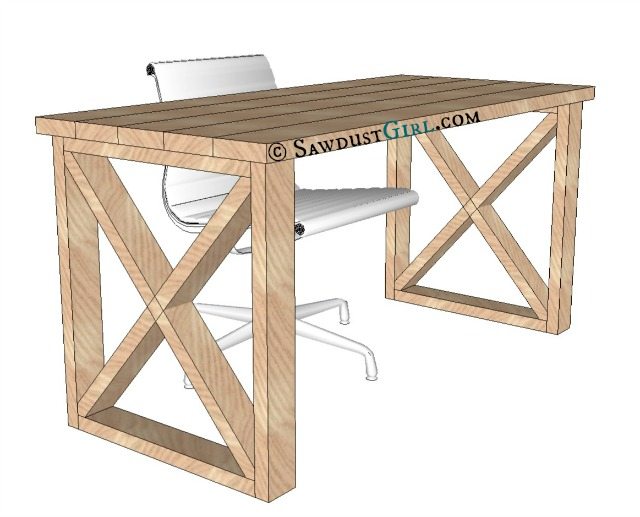
Cut four two-by-fours for vertical legs and assemble two rectangular leg frames. Use pocket screws and a Kreg Jig for clean joints. Add diagonal one-by-two pine braces cut at 45 degrees to form X-shapes on each frame. Layer the second brace over the first at the center for extra rigidity. This design resists wobbling and adds visual interest to your build.
Connect Frames with Support Braces
Install a central two-by-four brace and two side braces between the leg frames. Ensure all top edges are flush to support the desktop. Pre-drill pocket holes into the inside faces of the braces so you can attach the desktop from underneath, hiding fasteners for a clean look.
Reinforce the Critical Inner Corner
Focus extra support on the inner corner where stress is highest. Use steel L-brackets with 4″ arms minimum. Add a diagonal brace from floor to corner. Install a central vertical two-by-four post. Add an overhanging stabilizing brace on the outer side. These reinforcements prevent sagging and tipping, especially on long spans.
Assemble the L-Shape Correctly
Position the second desk section perpendicular to the first. Use a framing square or laser level to confirm a perfect 90-degree angle. Clamp both sections together before fastening. This ensures the L-shape fits snugly into the corner without gaps or uneven surfaces.
Fasten Sections with Screws and Glue
Attach the two desktop sections using 2.5″ to 3″ wood screws driven from underneath. Pre-drill to prevent splitting. For maximum strength, combine screws with wood glue at the joint. Reinforce the inner corner with right-angle steel brackets or mending plates for long-term stability and durability.
Prevent Sag and Eliminate Wobble
For desktop spans over 48″, install cross-braces every 16 to 24 inches. A center support beam running parallel to the back edge prevents sag in the middle. For very large desks, consider a torsion box subframe made from a grid of two-by-fours that adds stiffness without extra weight.
Install Adjustable Leveling Feet
Attach threaded glides or adjustable feet to the bottom of each leg. These compensate for uneven floors and eliminate wobble. Test the desk by rocking it gently. If it moves, tighten braces or add shims until it sits completely solid.
Distribute Weight Wisely
A well-built desk holds 300 to 500 pounds, but avoid placing heavy items like printers or PC towers on unsupported edges. Center weight over the legs and braces. Use monitor arms to hang screens and free up valuable desk surface space.
Manage Cables Like a Pro
Plan cable routing during the design phase. Drill 1 to 2″ holes near the monitor area or power strip location. Insert metal or plastic grommets to protect wires and improve appearance. Route cables through concealed channels under the desk or inside a false bottom panel.
Mount Under-Desk Accessories
Install a cable tray or mesh basket underneath to hold power strips and hubs. Use Velcro straps or zip ties to group cords by device. Add a USB hub mount or monitor arm passthrough to keep connections tidy and accessible.
Hide Cords with Raceways
Attach a surface-mounted raceway along the back or side edge. Paint it to match the wall for low visibility. Use braided cable sleeves on desktop cords for a clean, professional look that complements your workspace.
Add Smart Storage Solutions
Build a four-drawer file cabinet with specific drawer heights. Make the top drawer 3″ high for small items. Create second and third drawers at 7-1/4″ each for legal or letter files. Build the bottom drawer 5″ for binders and supplies. Use 1/2-inch spacers to align drawer slides precisely.
Install File Cabinet Bars Correctly
Cut 40″ metal file bars to match drawer width. Test fit with hanging files. Replace factory screws with smaller-diameter screws for a snugger fit. Adjust bracket height if using labeled hanging files to prevent jamming in the drawer.
Add Under-Desk Drawers
Maximize narrow vertical space with under-desk drawers. Build boxes from 1/2″ plywood with 3/4″ wood fronts. Mount using ball-bearing, full-extension slides. Create brackets from 3/4″ plywood and 1×2 pine, secured to a 1/4″ lip extension on the desk underside.
Fill Gaps for a Clean Look
Cut herringbone-patterned wood segments to fill visual gaps between drawers and cabinets. Install with dowels and glue, then secure with screws. This creates a seamless, custom-built appearance that looks professional.
Use the Right Tools for the Job
Gather these essential tools before starting your build. You need a Kreg Jig for pocket holes. A circular saw or miter saw cuts lumber accurately. A drill/driver handles fastening. A brad nailer secures trim pieces. Bar clamps hold pieces together during assembly. A level and framing square ensure accuracy. An orbital sander smooths surfaces. A router creates professional edges. Many hardware stores offer tool rental and free cutting services, so use them to save money.
Optional Tools Improve Precision
A table saw provides straight rips for accurate cuts. A doweling jig ensures accurate alignment. A biscuit joiner creates seamless joints. A laser level delivers perfect positioning. These tools improve accuracy but aren’t required for building a successful desk.
Apply Finish for Long-Ledging Durability
Sand in grit progression for the best results. Start with 120-grit to remove tool marks. Progress to 150-grit, then 220-grit for a glass-smooth surface. Always sand with the grain to avoid scratches. Wipe clean with a tack cloth before applying finish.
Apply Protective Coating
Choose a finish based on style and use. Polyurethane requires three coats, sanded with 320-grit between applications. Tung oil provides a natural look but requires yearly reapplication. Paint works best on MDF using matte black or white for a modern look. Stain with dark walnut or espresso, then seal with a clear coat. Wipe-on finishes are easiest for beginners to apply.
Key Takeaways for Building Your L-Shaped Desk
Building a simple L-shaped desk is a rewarding DIY project that saves money and fits your exact needs. Focus on strong joints using pocket screws and wood glue, proper support with cross-bracing every 16 to 24 inches, and smart cable management with grommet holes and under-desk trays. Reinforce the inner corner with steel brackets or diagonal braces to prevent the most common failure point. With careful planning and basic tools, you’ll create a durable, functional workspace that lasts 10 years or more. Start measuring your corner today and begin gathering materials for your custom desk build.
Frequently Asked Questions About Building an L-Shaped Desk
How much does it cost to build an L-shaped desk yourself?
Total material costs can be kept under $200 with smart sourcing. Use affordable plywood and two-by-fours for the structure, then upgrade visible surfaces with premium finishes. This budget includes all lumber, hardware, fasteners, and finish supplies.
What is the best wood for a DIY L-shaped desk?
Three-quarter inch birch plywood offers the best balance of strength, stability, and cost for the desktop. Use two-by-four kiln-dried pine or spruce for the frame. Avoid particleboard for structural components since it lacks long-term durability under load.
How do I reinforce the inner corner of an L-shaped desk?
The inner corner is the most critical stress point. Use steel L-brackets with 4″ arms minimum. Add a diagonal brace from floor to corner. Install a central vertical two-by-four post. Combine multiple reinforcement methods for the strongest joint.
How long does it take to build an L-shaped desk?
Assembly time ranges from 1 to 3 days depending on complexity. A simple design with basic joinery takes one afternoon. Adding drawers, file cabinets, or herringbone tops extends the timeline. Allow 24 hours for wood glue to cure before moving the desk.
Can an L-shaped desk hold a heavy computer setup?
A properly supported L-shaped desk holds 300 to 500 pounds. Distribute heavy items like monitors, printers, and PC towers over the legs and support braces. Avoid placing weight on unsupported edges or cantilevers that could sag over time.


